Samsung NP700Z5BH User Manual Windows 8 User Manual Ver.1.2 (English) - Page 104
Upgrading Memory (Optional
 |
View all Samsung NP700Z5BH manuals
Add to My Manuals
Save this manual to your list of manuals |
Page 104 highlights
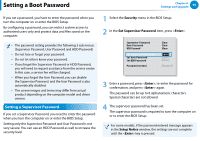
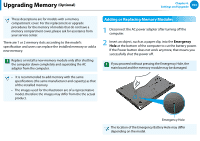
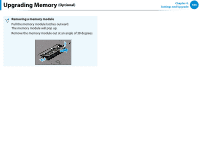
Upgrading Memory (Optional) Chapter 4. Settings and Upgrade 103 These descriptions are for models with a memory compartment cover. For the replacement or upgrade procedures for the memory of models that do not have a memory compartment cover, please ask for assistance from your service center. There are 1 or 2 memory slots according to the model's specification and users can replace the installed memory or add a new memory. Replace or install a new memory module only after shutting the computer down completely and separating the AC adapter from the computer. Adding or Replacing Memory Modules 1 Disconnect the AC power adapter after turning off the computer. 2 Insert an object, such as a paper clip, into the Emergency Hole at the bottom of the computer to cut the battery power. If the Power button does not work anymore, that means you successfully shut the power off. If you proceed without pressing the Emergency Hole, the main board and the memory module may be damaged. •• It is recommended to add memory with the same specifications (the same manufacturer and capacity) as that of the installed memory. •• The images used for the illustration are of a representative model, therefore the images may differ from the the actual product. Emergency Hole The location of the Emergency Battery Hole may differ depending on the model.
-
 1
1 -
2
-
3
-
4
-
5
-
6
-
7
-
8
-
9
-
10
-
11
-
12
-
13
-
14
-
15
-
16
-
17
-
18
-
19
-
20
-
21
-
22
-
23
-
24
-
25
-
26
-
27
-
28
-
29
-
30
-
31
-
32
-
33
-
34
-
35
-
36
-
37
-
38
-
39
-
40
-
41
-
42
-
43
-
44
-
45
-
46
-
47
-
48
-
49
-
50
-
51
-
52
-
53
-
54
-
55
-
56
-
57
-
58
-
59
-
60
-
61
-
62
-
63
-
64
-
65
-
66
-
67
-
68
-
69
-
70
-
71
-
72
-
73
-
74
-
75
-
76
-
77
-
78
-
79
-
80
-
81
-
82
-
83
-
84
-
85
-
86
-
87
-
88
-
89
-
90
-
91
-
92
-
93
-
94
-
95
-
96
-
97
-
98
-
 99
99 -
 100
100 -
 101
101 -
 102
102 -
 103
103 -
 104
104 -
 105
105 -
 106
106 -
 107
107 -
 108
108 -
 109
109 -
110
-
111
-
112
-
113
-
114
-
115
-
116
-
117
-
118
-
119
-
120
-
121
-
122
-
123
-
124
-
125
-
126
-
127
-
128
-
129
-
130
-
131
-
132
-
133
-
134
-
135
-
136
-
137
-
138
-
139
-
140
-
141
-
142
-
143
-
144
-
145
-
146
-
147
-
148
-
149
-
150
-
151
-
152
-
153
-
154
-
155
-
156
 |
 |