Samsung NV5 User Manual - Page 35
White balance, Voice recording / Voice memo
 |
View all Samsung NV5 manuals
Add to My Manuals
Save this manual to your list of manuals |
Page 35 highlights
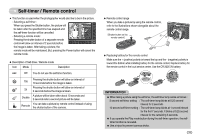
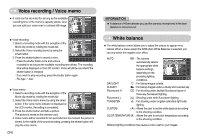
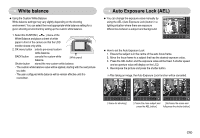
Voice recording / Voice memo ƅ A voice can be recorded for as long as the available recording time of the memory capacity allows. And you can add your voice-over to a stored still image. OFF MEMO RECORD ƀ Voice recording 1. Select a recording mode with the exception of the Movie clip mode by rotating the mode dial. OFF 2. Select the Voice recording menu by using the smart button. MEMO RECORD 3. Press the shutter button to record a voice. - Press the shutter button once and voice is recorded for as long as the available recording time allows. The recording time will be displayed on the LCD monitor. Voice will still be recorded if the shutter button is released. - If you wish to stop recording, press the shutter button again. - File type : *.wav ƀ Voice memo 1. Select a recording mode with the exception of the Movie clip mode by rotating the mode dial. 2. Select the Voice memo menu by using the smart button. If the voice memo indicator is displayed on the LCD monitor, the setting is completed. OFF MEMO RECORD 3. Press the shutter button and take a picture. The picture is stored on the memory card. 4. Voice memo will be recorded for ten seconds from the moment the picture is stored. In the middle of the sound recording, pressing the shutter button will stop the voice memo. Ś34ś INFORMATION ƀ A distance of 40cm between you and the camera (microphone) is the best distance to record sound. White balance ƅ The white balance control allows you to adjust the colours to appear more natural. When a menu except the AWB (Auto White Balance) is selected, you can only select the negative color effect. AUTO DAYLIGHT CLOUDY Fluorescent H Fluorescent L TUNGSTEN CUSTOM COLOR TEMPERATURE : The camera automatically selects the appropriate white balance settings, depending on the AEL prevailing lighting conditions. : For taking images outside. : For taking images under a cloudy and overcast sky. : For shooting under daylight fluorescent types of three way fluorescent lighting. : Shooting under white fluorescent lighting. : For shooting under tungsten (standard light bulb) lighting. : Allows the user to set the white balance according to the shooting condition. : Allows the user to set color temperature according to the shooting condition. Different lighting conditions may cause a colour cast on your images.
-
 1
1 -
2
-
3
-
4
-
5
-
6
-
7
-
8
-
9
-
10
-
11
-
12
-
13
-
14
-
15
-
16
-
17
-
18
-
19
-
20
-
21
-
22
-
23
-
24
-
25
-
26
-
27
-
28
-
29
-
 30
30 -
 31
31 -
 32
32 -
 33
33 -
 34
34 -
 35
35 -
 36
36 -
 37
37 -
 38
38 -
 39
39 -
 40
40 -
41
-
42
-
43
-
44
-
45
-
46
-
47
-
48
-
49
-
50
-
51
-
52
-
53
-
54
-
55
-
56
-
57
-
58
-
59
-
60
-
61
-
62
-
63
-
64
-
65
-
66
-
67
-
68
-
69
-
70
-
71
-
72
-
73
-
74
-
75
-
76
-
77
-
78
-
79
-
80
-
81
-
82
 |
 |
