Samsung NV5 User Manual - Page 51
Rotating an image, Resize
 |
View all Samsung NV5 manuals
Add to My Manuals
Save this manual to your list of manuals |
Page 51 highlights
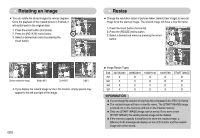
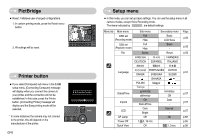
Rotating an image ƅ You can rotate the stored images by various degrees. Once the playback of the rotated picture is finished, it will switch back to the original state. 1. Press the smart button (horizontal). 2. Press the [ROTATE] menu button. 3. Select a desired sub menu by pressing the smart button. 100-0001 RIGHT 90Ū LEFT 90Ū 180Ū -LQ\" [Before rotating the image] -LQ\" [Right 90°] -LQ\" [Left 90°] -LQ\" [180°] 4. If you display the rotated image on the LCD monitor, empty spaces may appear to the left and right of the image. Ś50ś Resize ƅ Change the resolution (size) of pictures taken. Select [User image] to save an image to be the start-up image. The resized image will have a new file name. 1. Press the smart button (horizontal). 2. Press the [RESIZE] menu button. 3. Select a desired sub menu by pressing the smart button. 100-0001 2688x2016 1920x1440 1024x768 START IMAGE ƀ Image Resize Types Size 3072X2304 2688X2016 1920X1440 7M X O O 5M X X O 3M X X X 1M X X X 1024X768 O O O X START IMAGE O O O O INFORMATION ƀ You can change the resolution of only those files compressed in the JPEG 4:2:2 format. ƀ The resized image will have a new file name. The [START IMAGE] image is stored not on the memory card but on the internal memory. ƀ Only one [START IMAGE] image can be saved. If you save a new [START IMAGE], the existing startup image will be deleted. ƀ If the memory capacity is insufficient to store the resized image, a [Memory Full!] message will display on the LCD monitor and the resized image will not be stored.
-
 1
1 -
2
-
3
-
4
-
5
-
6
-
7
-
8
-
9
-
10
-
11
-
12
-
13
-
14
-
15
-
16
-
17
-
18
-
19
-
20
-
21
-
22
-
23
-
24
-
25
-
26
-
27
-
28
-
29
-
30
-
31
-
32
-
33
-
34
-
35
-
36
-
37
-
38
-
39
-
40
-
41
-
42
-
43
-
44
-
45
-
 46
46 -
 47
47 -
 48
48 -
 49
49 -
 50
50 -
 51
51 -
 52
52 -
 53
53 -
 54
54 -
 55
55 -
 56
56 -
57
-
58
-
59
-
60
-
61
-
62
-
63
-
64
-
65
-
66
-
67
-
68
-
69
-
70
-
71
-
72
-
73
-
74
-
75
-
76
-
77
-
78
-
79
-
80
-
81
-
82
 |
 |
