Samsung NY58J9850WS/AA User Manual - Page 31
LOWER, Cooking Time, START/SET, Delay Start, English 31, Timed Cook Lower oven mode
 |
View all Samsung NY58J9850WS/AA manuals
Add to My Manuals
Save this manual to your list of manuals |
Page 31 highlights
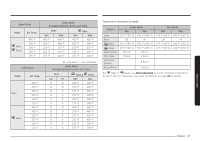
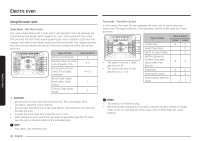
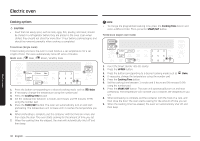
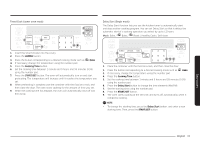
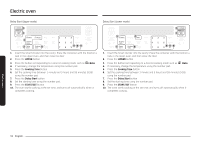
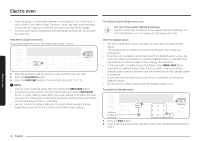
Timed Cook (Lower oven mode) 2 7 3 3 5 46 1. Insert the Smart divider into the cavity. 2. Press the LOWER button. 3. Press the button corresponding to a desired cooking mode such as Bake. 4. If necessary, change the temperature using the number pad. 5. Press the Cooking Time button. 6. Set the cooking time between 1 minute and 9 hours and 99 minutes (9:99) using the number pad. 7. Press the START/SET button. The oven will automatically turn on and start preheating. The temperature will increase until it reaches the temperature you set. 8. When preheating is complete, put the container with the food on a rack, and then close the door. The oven starts cooking for the amount of time you set. 9. When the cooking time has elapsed, the oven will automatically shut off and then beep. Delay Start (Single mode) The Delay Start function lets you use the kitchen timer to automatically start and stop another cooking program. You can set Delay Start so that it delays the automatic start of a cooking operation you select by up to 12 hours. Mode: Bake / Bake / Roast / Healthy Cook / Self-clean 8 2 2 6 4 357 1. Place the container with the food on a rack, and then close the door. 2. Press the button corresponding to a desired cooking mode such as Bake. 3. If necessary, change the temperature using the number pad. 4. Press the Cooking Time button. 5. Set the cooking time between 1 minute and 9 hours and 99 minutes (9:99) using the number pad. 6. Press the Delay Start button to change the time elements (AM/PM). 7. Set the starting time using the number pad. 8. Press the START/SET button. 9. The oven starts cooking at the set time, and turns off automatically when it completes cooking. NOTE • To change the starting time, press the Delay Start button, and enter a new starting time. Then, press the START/SET button. Electric oven English 31
-
 1
1 -
2
-
3
-
4
-
5
-
6
-
7
-
8
-
9
-
10
-
11
-
12
-
13
-
14
-
15
-
16
-
17
-
18
-
19
-
20
-
21
-
22
-
23
-
24
-
25
-
 26
26 -
 27
27 -
 28
28 -
 29
29 -
 30
30 -
 31
31 -
 32
32 -
 33
33 -
 34
34 -
 35
35 -
 36
36 -
37
-
38
-
39
-
40
-
41
-
42
-
43
-
44
-
45
-
46
-
47
-
48
-
49
-
50
-
51
-
52
-
53
-
54
-
55
-
56
-
57
-
58
-
59
-
60
-
61
-
62
-
63
-
64
-
65
-
66
-
67
-
68
-
69
-
70
-
71
-
72
-
73
-
74
-
75
-
76
-
77
-
78
-
79
-
80
-
81
-
82
-
83
-
84
-
85
-
86
-
87
-
88
-
89
-
90
-
91
-
92
-
93
-
94
-
95
-
96
-
97
-
98
-
99
-
100
-
101
-
102
-
103
-
104
-
105
-
106
-
107
-
108
-
109
-
110
-
111
-
112
-
113
-
114
-
115
-
116
-
117
-
118
-
119
-
120
-
121
-
122
-
123
-
124
-
125
-
126
-
127
-
128
-
129
-
130
-
131
-
132
-
133
-
134
-
135
-
136
-
137
-
138
-
139
-
140
-
141
-
142
-
143
-
144
-
145
-
146
-
147
-
148
-
149
-
150
-
151
-
152
-
153
-
154
-
155
-
156
-
157
-
158
-
159
-
160
-
161
-
162
-
163
-
164
-
165
-
166
-
167
-
168
-
169
-
170
-
171
-
172
-
173
-
174
-
175
-
176
-
177
-
178
-
179
-
180
 |
 |
