Samsung NY58J9850WS/AA User Manual - Page 49
Replacing the Oven Light, Removing and Re-installing the Oven Door, Locked position, Fig. 1, about 5°
 |
View all Samsung NY58J9850WS/AA manuals
Add to My Manuals
Save this manual to your list of manuals |
Page 49 highlights
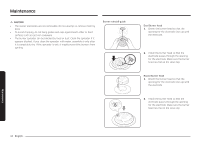
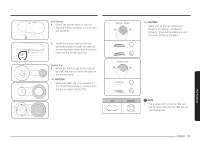
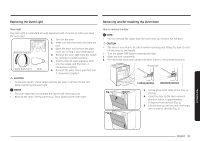
Replacing the Oven Light Oven light The oven light is a standard 40-watt appliance bulb. It comes on when you open the oven door. 1. Turn off the oven. 2. Make sure the oven and oven light are cool. 3. Open the door, and remove the glass Remove Replace cover by turning it counterclockwise. 4. Remove the oven light from the socket by turning it counterclockwise. 5. Insert a new 40-watt appliance bulb into the socket, and then turn it Glass bulb cover Bulb clockwise to tighten. 6. Reinsert the glass cover, and then turn it clockwise to tighten. CAUTION • To prevent electric shock, make sure the gas oven is turned off and cool before replacing the oven light. NOTES • The oven light does not operate during the self-cleaning cycle. • Remove the racks if they prevent you from accessing the oven light. Removing and Re-installing the Oven Door How to remove the door NOTE • You can remove the upper door the same way you remove the full door. CAUTION • The door is very heavy. Be careful when removing and lifting the door. Do not lift the door by the handle. • Turn the power OFF before removing the door. 1. Open the door completely. 2. Pull the hinge locks down toward the door frame to the unlocked position. Hinge lock Fig. 1 Fig. 2 about 5° Locked position Unlocked position 3. Firmly grasp both sides of the door at the top. 4. Close the door to the door removal position, which is approximately 5 degrees from vertical (Fig. 1). 5. Lift the door up and out until the hinge arm is clear of the slot (Fig. 2). Maintenance English 49
-
 1
1 -
2
-
3
-
4
-
5
-
6
-
7
-
8
-
9
-
10
-
11
-
12
-
13
-
14
-
15
-
16
-
17
-
18
-
19
-
20
-
21
-
22
-
23
-
24
-
25
-
26
-
27
-
28
-
29
-
30
-
31
-
32
-
33
-
34
-
35
-
36
-
37
-
38
-
39
-
40
-
41
-
42
-
43
-
 44
44 -
 45
45 -
 46
46 -
 47
47 -
 48
48 -
 49
49 -
 50
50 -
 51
51 -
 52
52 -
 53
53 -
 54
54 -
55
-
56
-
57
-
58
-
59
-
60
-
61
-
62
-
63
-
64
-
65
-
66
-
67
-
68
-
69
-
70
-
71
-
72
-
73
-
74
-
75
-
76
-
77
-
78
-
79
-
80
-
81
-
82
-
83
-
84
-
85
-
86
-
87
-
88
-
89
-
90
-
91
-
92
-
93
-
94
-
95
-
96
-
97
-
98
-
99
-
100
-
101
-
102
-
103
-
104
-
105
-
106
-
107
-
108
-
109
-
110
-
111
-
112
-
113
-
114
-
115
-
116
-
117
-
118
-
119
-
120
-
121
-
122
-
123
-
124
-
125
-
126
-
127
-
128
-
129
-
130
-
131
-
132
-
133
-
134
-
135
-
136
-
137
-
138
-
139
-
140
-
141
-
142
-
143
-
144
-
145
-
146
-
147
-
148
-
149
-
150
-
151
-
152
-
153
-
154
-
155
-
156
-
157
-
158
-
159
-
160
-
161
-
162
-
163
-
164
-
165
-
166
-
167
-
168
-
169
-
170
-
171
-
172
-
173
-
174
-
175
-
176
-
177
-
178
-
179
-
180
 |
 |
