Samsung R225 User Manual (ENGLISH) - Page 10
Place the battery back on the phone. Slide
 |
View all Samsung R225 manuals
Add to My Manuals
Save this manual to your list of manuals |
Page 10 highlights
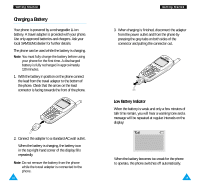
Getting Started 3. Slide the SIM card holder in the direction of the arrow and hold it in this position. Getting Started 5. Hold the SIM card down and release the holder to lock it into place. 4. Insert the SIM card under the two tabs, ensuring that the cut corner is lower left and the gold contacts of the card face into the phone. 6. Place the battery back on the phone. Slide the battery up towards the catch until it locks into place. Make sure that the battery is properly installed before switching on the power. Note: If you need to remove the SIM card, carefully slide the SIM card lock back and take the card out of the holder. 16 17
-
 1
1 -
2
-
3
-
4
-
 5
5 -
 6
6 -
 7
7 -
 8
8 -
 9
9 -
 10
10 -
 11
11 -
 12
12 -
 13
13 -
 14
14 -
 15
15 -
16
-
17
-
18
-
19
-
20
-
21
-
22
-
23
-
24
-
25
-
26
-
27
-
28
-
29
-
30
-
31
-
32
-
33
-
34
-
35
-
36
-
37
-
38
-
39
-
40
-
41
-
42
-
43
-
44
-
45
-
46
-
47
-
48
-
49
-
50
-
51
-
52
-
53
-
54
-
55
-
56
-
57
-
58
-
59
-
60
-
61
-
62
-
63
-
64
-
65
-
66
-
67
-
68
-
69
-
70
 |
 |

17
16
Getting Started
Getting Started
3.
Slide the SIM card holder in the direction of the
arrow and hold it in this position.
4.
Insert the SIM card under the two tabs, ensuring
that the cut corner is lower left and the gold
contacts of the card face into the phone.
Note:
If you need to remove the SIM card, carefully
slide the SIM card lock back and take the card
out of the holder.
5.
Hold the SIM card down and release the holder to
lock it into place.
6.
Place the battery back on the phone. Slide the
battery up towards the catch until it locks into
place. Make sure that the battery is properly
installed before switching on the power.