Samsung RF23M8070SR/AA User Manual - Page 32
Plastic Tubing A Not supplied, Ferrule Not supplied
 |
View all Samsung RF23M8070SR/AA manuals
Add to My Manuals
Save this manual to your list of manuals |
Page 32 highlights
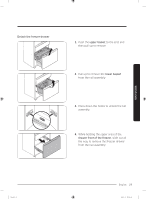
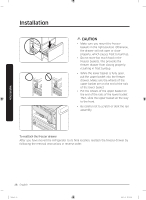
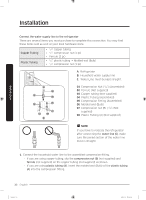
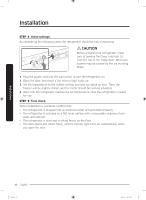
Installation Installation Connect the water supply line to the refrigerator There are several items you must purchase to complete this connection. You may find these items sold as a kit at your local hardware store. Copper Tubing Plastic Tubing • 1/4" copper tubing • 1/4" compression nut (1 pc) • Ferrule (2 pc) • 1/4" plastic tubing Molded end (Bulb) • 1/4" compression nut (1 pc) A. Refrigerator B. Household water supply line C C. Water Line: must be kept straight. A 04 01 05 02 06 07 03 08 B 01 Compression Nut (1/4") (Assembled) 02 Ferrule (Not supplied) 03 Copper tubing (Not supplied) 04 Plastic Tubing (Assembled) 05 Compression Fitting (Assembled) 06 Molded end (Bulb) 07 Compression nut (B) (1/4") (Not supplied) 08 Plastic Tubing (A) (Not supplied) NOTE If you have to relocate the refrigerator after connecting the water line (C), make sure the joined section of the water line must is straight. 1. Connect the household water line to the assembled compression fitting. - If you are using copper tubing, slip the compression nut (B) (not supplied) and ferrule (not supplied) on the copper tubing (not supplied) as shown. - If you are using plastic tubing (A), insert the molded end (Bulb) of the plastic tubing (A) into the compression fitting. 32 English Untitled-3 32 2020-04-07 PM 3:29:42
-
 1
1 -
2
-
3
-
4
-
5
-
6
-
7
-
8
-
9
-
10
-
11
-
12
-
13
-
14
-
15
-
16
-
17
-
18
-
19
-
20
-
21
-
22
-
23
-
24
-
25
-
26
-
 27
27 -
 28
28 -
 29
29 -
 30
30 -
 31
31 -
 32
32 -
 33
33 -
 34
34 -
 35
35 -
 36
36 -
 37
37 -
38
-
39
-
40
-
41
-
42
-
43
-
44
-
45
-
46
-
47
-
48
-
49
-
50
-
51
-
52
-
53
-
54
-
55
-
56
-
57
-
58
-
59
-
60
-
61
-
62
-
63
-
64
-
65
-
66
-
67
-
68
-
69
-
70
-
71
-
72
-
73
-
74
-
75
-
76
-
77
-
78
-
79
-
80
-
81
-
82
-
83
-
84
-
85
-
86
-
87
-
88
-
89
-
90
-
91
-
92
-
93
-
94
-
95
-
96
-
97
-
98
-
99
-
100
-
101
-
102
-
103
-
104
-
105
-
106
-
107
-
108
-
109
-
110
-
111
-
112
-
113
-
114
-
115
-
116
-
117
-
118
-
119
-
120
-
121
-
122
-
123
-
124
-
125
-
126
-
127
-
128
-
129
-
130
-
131
-
132
-
133
-
134
-
135
-
136
-
137
-
138
-
139
-
140
-
141
-
142
-
143
-
144
-
145
-
146
-
147
-
148
-
149
-
150
-
151
-
152
-
153
-
154
-
155
-
156
-
157
-
158
-
159
-
160
-
161
-
162
-
163
-
164
-
165
-
166
-
167
-
168
-
169
-
170
-
171
-
172
-
173
-
174
-
175
-
176
-
177
-
178
-
179
-
180
-
181
-
182
-
183
-
184
-
185
-
186
-
187
-
188
-
189
-
190
-
191
-
192
-
193
-
194
-
195
-
196
-
197
-
198
-
199
-
200
-
201
-
202
-
203
-
204
-
205
-
206
-
207
-
208
-
209
-
210
-
211
-
212
-
213
-
214
-
215
-
216
-
217
-
218
-
219
-
220
-
221
-
222
-
223
-
224
-
225
-
226
-
227
-
228
-
229
-
230
-
231
-
232
-
233
-
234
-
235
-
236
-
237
-
238
-
239
-
240
 |
 |