Samsung RSG307AARS User Manual (user Manual) (ver.0.2) (English, French, Spani - Page 7
Setting Up The Refrigerator, Doors
 |
View all Samsung RSG307AARS manuals
Add to My Manuals
Save this manual to your list of manuals |
Page 7 highlights
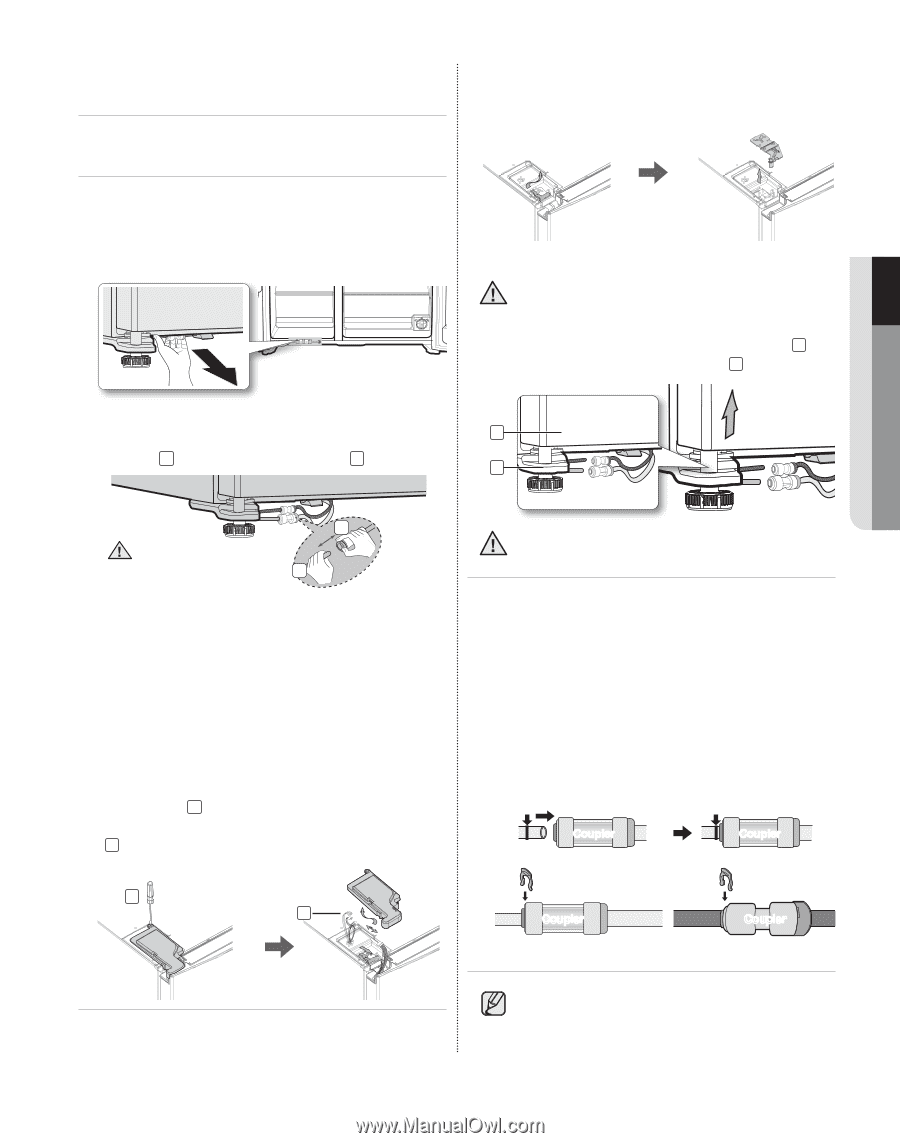
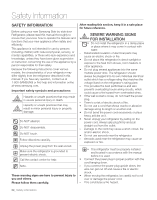
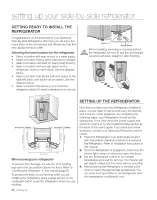
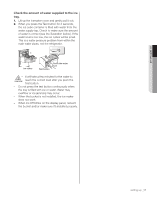
01 setting up SETTING UP the refrigerator doors If your entrance won't allow the refrigerator to pass easily through it, you can remove the doors. upper hinge. Be careful that the door does not fall on you as you are removing it. Separating the Water Supply Line from the Refrigerator 1. Pull the two water lines (which are in the Fixer) out to the front. Be sure to keep track of all parts you are removing. 3. Next, remove the door from the lower hinge 3 by carefully lifting the door straight up 4 . 2. Remove two water lines (White one is for water and the other one is for ice) by pressing the 4 coupler 1 and pulling the water line 2 away. 3 Make sure the color of the water lines match. 1 2 Removing the freezer door A few things to mention first. • Make sure that you lift the door straight up so the hinges are not bent or broken. • Be careful not to pinch the water tubing and wire harness on the door. • Place doors on a protected surface to prevent scratching or damage. 1. With the Freezer door closed, remove the upper hinge cover 1 using a screwdriver, and then disconnect the wires by gently pulling them apart 2. 1 2 Be careful not to pinch the water tubing and wire harness on the door. Reattaching the freezer doors To reattach the freezer doors, replace parts in reverse order Reattaching the Water Supply Line 1. The Water Line must be fully inserted to the marked line to prevent water leakage from the dispenser. 2. Insert the 2 clips in the install pack and check that each clip holds the line firmly. Line Line Coupler Coupler clip A (¼") clip A (¼") Coupler Coupler 2. Removing the FIXER HINGE ,and next take off the Do not cut the water line. Gently separate it from the coupler. setting up _07
-
 1
1 -
 2
2 -
 3
3 -
 4
4 -
 5
5 -
 6
6 -
 7
7 -
 8
8 -
 9
9 -
 10
10 -
 11
11 -
 12
12 -
13
-
14
-
15
-
16
-
17
-
18
-
19
-
20
-
21
-
22
-
23
-
24
-
25
-
26
-
27
-
28
-
29
-
30
-
31
-
32
-
33
-
34
-
35
-
36
-
37
-
38
-
39
-
40
-
41
-
42
-
43
-
44
-
45
-
46
-
47
-
48
-
49
-
50
-
51
-
52
-
53
-
54
-
55
-
56
-
57
-
58
-
59
-
60
-
61
-
62
-
63
-
64
 |
 |