Samsung S27E310H User Manual - Page 25
Installation
 |
View all Samsung S27E310H manuals
Add to My Manuals
Save this manual to your list of manuals |
Page 25 highlights
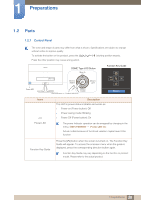
1 Preparations 1.3 Installation 1.3.1 Attaching the Stand Before assembling the product, place the product down on a flat and stable surface so that the screen is facing downwards. The exterior may differ depending on the product. Insert the stand neck into the stand base in the direction shown in the figure. Check that the stand neck is firmly connected. Tightly fasten the connecting screw at the bottom of the stand base. Place a soft cloth over the table to protect the product and place the product onto the cloth so that the front of the product is facing downwards. Insert the stand head into the connection hole in the direction, as shown in the figure. Hold the main body of the product with your hand, as shown in the figure. Hold and rotate the assembled stand until it fits exactly into the stop position. Push the assembled stand into the main body in the direction of the arrow, as shown in the figure. - Caution Do not hold the product upside down only by the stand. 25 1 Preparations
-
 1
1 -
2
-
3
-
4
-
5
-
6
-
7
-
8
-
9
-
10
-
11
-
12
-
13
-
14
-
15
-
16
-
17
-
18
-
19
-
 20
20 -
 21
21 -
 22
22 -
 23
23 -
 24
24 -
 25
25 -
 26
26 -
 27
27 -
 28
28 -
 29
29 -
 30
30 -
31
-
32
-
33
-
34
-
35
-
36
-
37
-
38
-
39
-
40
-
41
-
42
-
43
-
44
-
45
-
46
-
47
-
48
-
49
-
50
-
51
-
52
-
53
-
54
-
55
-
56
-
57
-
58
-
59
-
60
-
61
-
62
-
63
-
64
-
65
-
66
-
67
-
68
-
69
-
70
-
71
-
72
-
73
-
74
-
75
-
76
-
77
-
78
-
79
-
80
-
81
-
82
-
83
-
84
-
85
-
86
-
87
-
88
-
89
-
90
-
91
-
92
-
93
-
94
 |
 |
