Samsung SC-D375 User Manual (ENGLISH) - Page 69
Setting the AV In/Out SC-D975 only, Réglage Ent/Sor AV modèles SC-D975 uniquement
 |
View all Samsung SC-D375 manuals
Add to My Manuals
Save this manual to your list of manuals |
Page 69 highlights
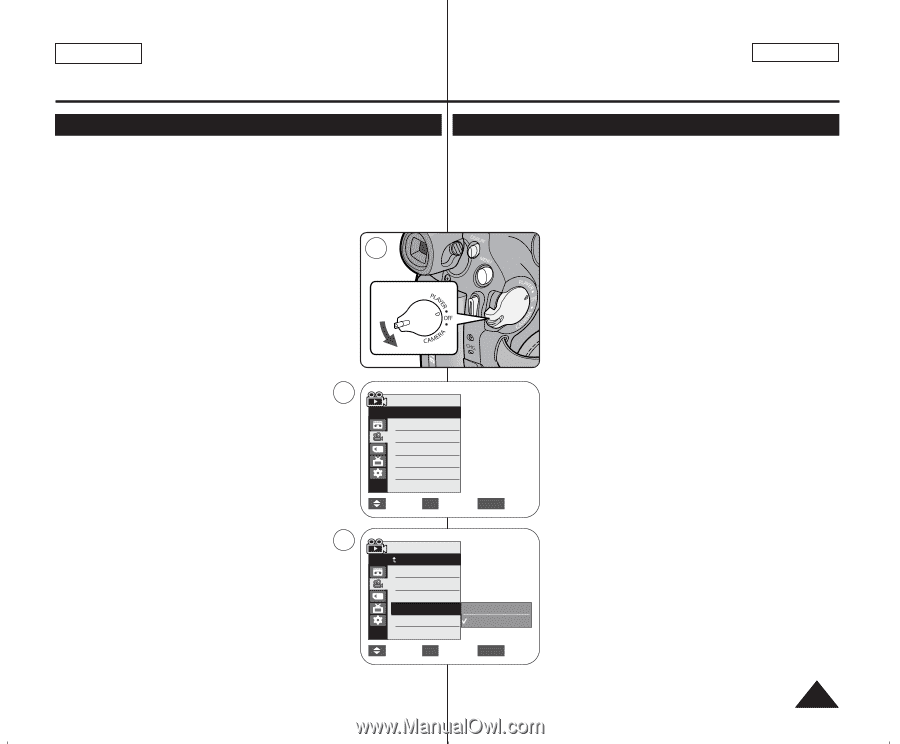
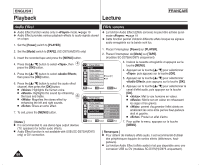
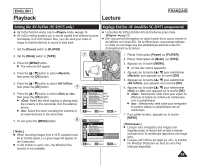
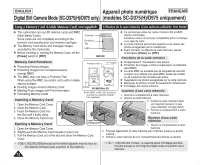
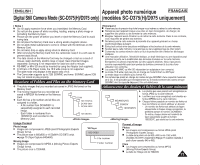
ENGLISH Playback Lecture FRANÇAIS Setting the AV In/Out (SC-D975 only) Réglage Ent/Sor AV (modèles SC-D975 uniquement) ✤ AV In/Out function works only in mode. ➥page 19 ✤ AV In/Out setting enables you to record signals from external sources and display it on LCD Screen. Also, you can send your video or image to external devices to record or play back. 1. Set the [Power] switch to [PLAYER]. ✤ La fonction AV In/Out (Ent/Sor AV) ne fonctionne qu'en mode . ➥page 19 ✤ Elle vous permet d'enregistrer un signal à partir d'une source externe et de l'afficher sur l'écran ACL. De la même façon, vous pouvez rediriger un vidéo ou une image vers des périphériques externes à des fins d'enregistrement ou de lecture. 2. Set the [Mode] switch to [TAPE]. 3. Press the [MENU] button. I The menu list will appear. 4. Press the button to select , then press the [OK] button. 5. Press the button to select , then press the [OK] button. 4 6. Press the button to select or , then press the [OK] button. I : Select this when copying or playing back the contents of this camcorder onto the external device. I : Select this when recording the contents of an external device to the camcorder. 7. To exit, press the [MENU] button. 6 [ Notes ] I When recording images from a VCR, playback must be at normal speed, or a gray image will appear on the Camcorder. I If is set to , the WindCut Plus function is not available. 2 Player Mode √Record Rec Mode Audio Mode WindCut Plus AV In/Out √SP √12Bit √Off √Out Move OK Select MENU Exit Player Mode Back Rec Mode Audio Mode WindCut Plus AV In/Out Out In Move OK Select MENU Exit 1. Placez l'interrupteur [Power] sur [PLAYER]. 2. Placez l'interrupteur de [Mode] sur [TAPE]. 3. Appuyez sur la touche [MENU]. I La liste des menus apparaîtra. 4. Appuyez sur la touche pour sélectionner , puis appuyez sur la touche [OK]. 5. Appuyez sur la touche pour sélectionner , puis appuyez sur la touche [OK]. 6. Appuyez sur la touche pour sélectionner ou , puis appuyez sur la touche [OK]. I : Sélectionner cette icône pour copier ou effectuer la lecture du contenu du caméscope vers un périphérique. I : Sélectionnez cette icône pour enregistrer le contenu depuis un périphérique vers le caméscope. 7. Pour quitter le menu, appuyez sur la touche [MENU]. [ Remarques ] I Lorsque vous enregistrez des images d'un magnétoscope, la lecture doit se faire à vitesse normale sinon le caméscope reproduira une image grise. I Lorsque est réglé sur , la fonction the WindCut (Réduction du bruit de vent) Plus n'est pas disponible. 69
-
 1
1 -
2
-
3
-
4
-
5
-
6
-
7
-
8
-
9
-
10
-
11
-
12
-
13
-
14
-
15
-
16
-
17
-
18
-
19
-
20
-
21
-
22
-
23
-
24
-
25
-
26
-
27
-
28
-
29
-
30
-
31
-
32
-
33
-
34
-
35
-
36
-
37
-
38
-
39
-
40
-
41
-
42
-
43
-
44
-
45
-
46
-
47
-
48
-
49
-
50
-
51
-
52
-
53
-
54
-
55
-
56
-
57
-
58
-
59
-
60
-
61
-
62
-
63
-
 64
64 -
 65
65 -
 66
66 -
 67
67 -
 68
68 -
 69
69 -
 70
70 -
 71
71 -
 72
72 -
 73
73 -
 74
74 -
75
-
76
-
77
-
78
-
79
-
80
-
81
-
82
-
83
-
84
-
85
-
86
-
87
-
88
-
89
-
90
-
91
-
92
-
93
-
94
-
95
-
96
-
97
-
98
-
99
-
100
-
101
-
102
-
103
-
104
-
105
-
106
-
107
-
108
-
109
-
110
 |
 |