Samsung SCC-641 Owners Instructions - Page 14
SCC-641P Installation
 |
UPC - 836164001306
View all Samsung SCC-641 manuals
Add to My Manuals
Save this manual to your list of manuals |
Page 14 highlights
SCC-641(P) Installation 1. [Figure 1] Install the structure on the ceiling. (Refer to Installation reference for the Length of the structure) * Built in by the builder of the structure [Figure 1] Lenght of ceiling Hole 2. Make a hole in the ceiling where the camera will be installed. (The hole should be about 180) 3. [Figure 2] Assemble the BRKT-ANCHOR on the ceiling and screw the 4 bolts in. [Figure 2] 4. [Figure 3,4] Connect the various cables to the CAMERA ADAPTER. (See page 2-6) [Figure 3] [Figure 4] 5. [Figure 5] Match the BRKT-ANCHOR and CAMERA ADAPTER and use 4screws (PH M4x8) to assemble them. [Figure 5]
-
 1
1 -
2
-
3
-
4
-
5
-
6
-
7
-
8
-
 9
9 -
 10
10 -
 11
11 -
 12
12 -
 13
13 -
 14
14 -
 15
15 -
 16
16 -
 17
17 -
 18
18 -
 19
19 -
20
-
21
-
22
-
23
-
24
-
25
-
26
-
27
-
28
 |
 |
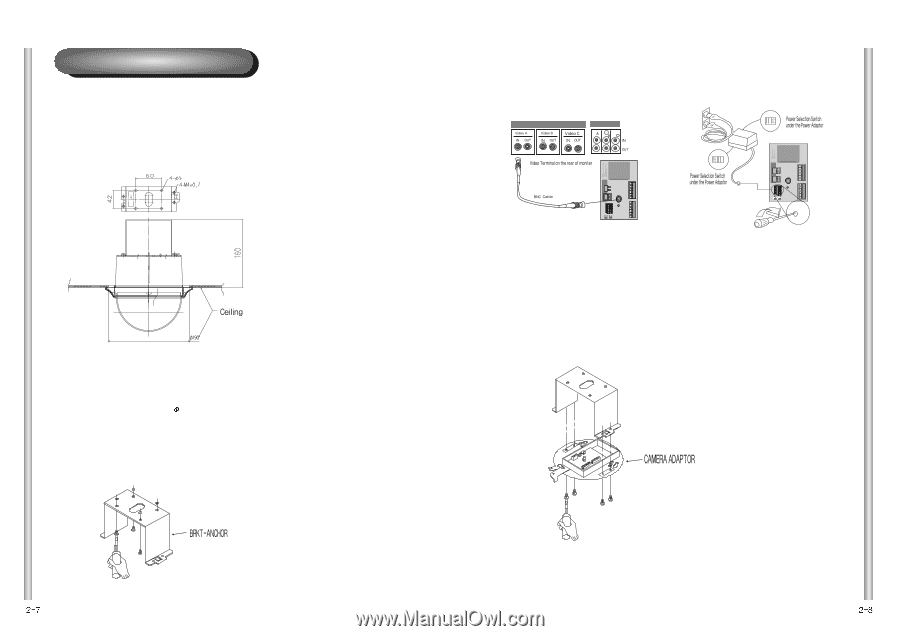
1. [Figure 1] Install the structure on the ceiling.
(Refer to Installation reference for the Length of the structure)
* Built in by the builder of the structure
3. [Figure 2] Assemble the BRKT-ANCHOR on the ceiling and screw the 4 bolts in.
SCC-641(P) Installation
[Figure 2]
[Figure 1]
2. Make a hole in the ceiling where the camera will be installed.
(The hole should be about
180)
5. [Figure 5] Match the BRKT-ANCHOR and CAMERA ADAPTER and use 4screws
(PH M4
x
8) to assemble them.
[Figure 5]
4. [Figure 3,4] Connect the various cables to the CAMERA ADAPTER.
(See page 2-6)
[Figure 4]
[Figure 3]
Lenght of ceiling Hole