Samsung SCX-6345N User Manual (user Manual) (ver.3.00) (English) - Page 70
Network Setup, Junk Fax Number List
 |
UPC - 635753610826
View all Samsung SCX-6345N manuals
Add to My Manuals
Save this manual to your list of manuals |
Page 70 highlights
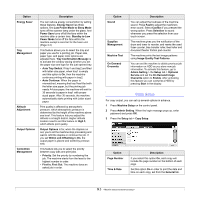
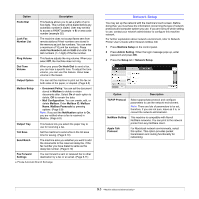
Option Description Prefix Dial Junk Fax Number List Ring Volume Dial Tone Volume Output Option Mailbox Setup This feature allows you to set a prefix of up to five digits. This number will be dialed before any automatic number is dialed. User may set this to access a PABXa (example 9) or area code number (example 02). The machine does not accept faxes sent from remote stations if their numbers are stored in the memory as junk fax numbers. You can enter a maximum of 10 junk fax numbers. Press Junk Fax Number List and Edit and enter the last numbers (1~7 digit) of the fax number. This feature adjusts the ring volume. When you select Off, the machine does not ring. When you press On Hook Dial to send a fax, you can hear a specific tone. To adjust the tone volume, you can use this feature. Value Low volume is the lowest. You can set the machine to print out the fax on both sides of the paper, or stapled. (Page 6.5) • Document Policy: You can set the document stored in Mailbox to delete or retain documents after. Select On of each option to delete, Off to remain the data. • Mail Configuration: You can create, edit, or delete Mailbox. Enter Mailbox ID, Mailbox Name, Mailbox Passcode by pressing options. (Page 6.9) Note: If you set the Notification option to On, you are notified when a fax is received in Mailbox. (Page 6.9) Output Tray This feature lets you select the paper tray to use for receiving a fax. Toll Save Set the machine to send a fax in the toll save time for saving. (Page 6.10) Send Batch The machine asks you whether you want to add the documents to the reserved delay fax, if the fax number you have dialed is same as the delay fax number. (Page 6.10) Fax Forward Settings You can forward a sent or received fax to other destination by a fax or an email. (Page 6.11) a. Private Automatic Branch Exchange Network Setup You may set up the network with the machine's touch screen. Before doing that, you must have the information concerning the type of network protocols and computer system you use. If you are not sure which setting to use, contact your network administrator to configure this machine network. For further explanation about network environment, refer to Network Printer User's Guide within Network Utilities CD. 1 Press Machine Setup on the control panel. 2 Press Admin Setting. When the login message pops up, enter password and press OK. 3 Press the Setup tab > Network Setup. Option TCP/IP Protocol NetWare Setting Apple Talk Protocol Description Select appropriate protocol and configure parameters to use the network environment. Note: There are lots of parameters to be set, therefore, if you are not sure, leave as it is, or consult the network administrator. This machine is compatible with Novell NetWare networks. You can print to the network printer from any NetWare client. For Macintosh network environments, select this option. This option provides packet transmission and routing functionality for networking. 9.5
-
 1
1 -
2
-
3
-
4
-
5
-
6
-
7
-
8
-
9
-
10
-
11
-
12
-
13
-
14
-
15
-
16
-
17
-
18
-
19
-
20
-
21
-
22
-
23
-
24
-
25
-
26
-
27
-
28
-
29
-
30
-
31
-
32
-
33
-
34
-
35
-
36
-
37
-
38
-
39
-
40
-
41
-
42
-
43
-
44
-
45
-
46
-
47
-
48
-
49
-
50
-
51
-
52
-
53
-
54
-
55
-
56
-
57
-
58
-
59
-
60
-
61
-
62
-
63
-
64
-
 65
65 -
 66
66 -
 67
67 -
 68
68 -
 69
69 -
 70
70 -
 71
71 -
 72
72 -
 73
73 -
 74
74 -
 75
75 -
76
-
77
-
78
-
79
-
80
-
81
-
82
-
83
-
84
-
85
-
86
-
87
-
88
-
89
-
90
-
91
-
92
-
93
-
94
-
95
-
96
-
97
-
98
-
99
-
100
-
101
-
102
-
103
-
104
-
105
-
106
-
107
-
108
-
109
-
110
-
111
-
112
-
113
-
114
-
115
-
116
-
117
-
118
-
119
-
120
-
121
-
122
-
123
-
124
-
125
-
126
-
127
-
128
-
129
-
130
-
131
-
132
-
133
-
134
-
135
-
136
-
137
-
138
-
139
-
140
-
141
-
142
-
143
-
144
-
145
-
146
-
147
-
148
-
149
-
150
-
151
-
152
-
153
-
154
-
155
-
156
-
157
-
158
-
159
-
160
-
161
 |
 |
