Samsung SRD-830D User Manual - Page 51
Using The Dvr
 |
View all Samsung SRD-830D manuals
Add to My Manuals
Save this manual to your list of manuals |
Page 51 highlights
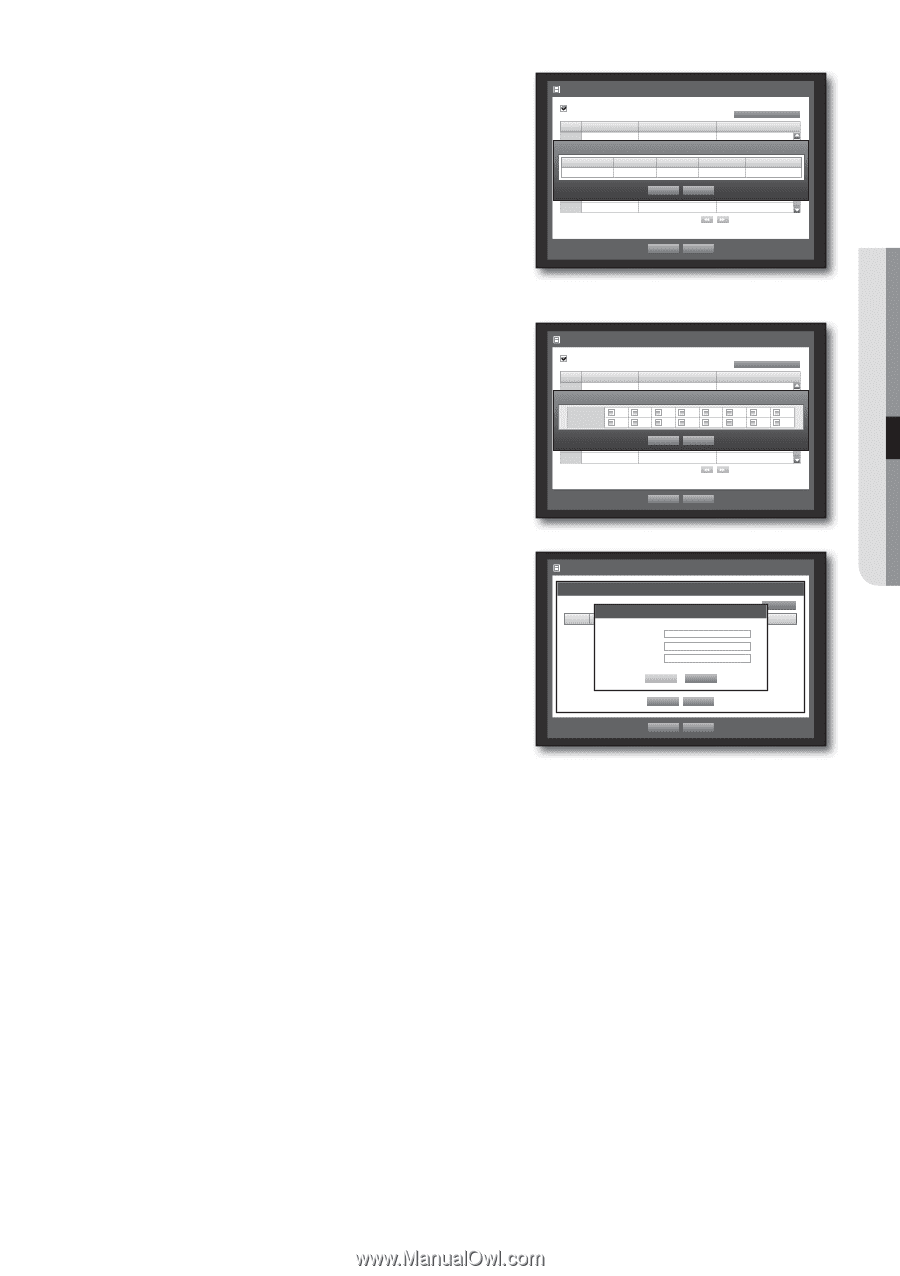
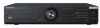
USING THE DVR • POS Device Setup : Sets the communication setups for the POS device and DVR. It is independent to the Remote Device setup. POS Device POS USE POS Device Setup POS CH 1 None P2OS DeviNcoeneSetup 3 None Baudrate 4 None 9600 5 None Parity None 6 None 7 None 8 None Preset Port/Ethernet No preset None No preset None No preset None Data Stop bit Transfer type No preset None 8 1 Half Duplex No preset None OKNo presetCancel No preset None None No preset None Previous/Next Page OK Cancel • CH : Select the camera to be synchronized to the POS device. If selected a channel input field, "Sync Channel Setup" window appears. One POS device can be synchronized to up to 16 cameras (channels), however one channel cannot be synchronized to multiple POS devices. Channels to be synchronized to a POS device should be set to "Event" in "Main Menu > Record > Recording Schedule". (Page 54) • Preset : Sets the name, start and end strings of the receipt for the preset. Preset name should be unique. Use button to display "Add Preset" window, and set its name, start string, and end string. • Port/Ethernet : Sets the port number for the DVR and POS device connection. COM1 : For RS-232C connections 7001~7016 : For Ethernet connections 3. When the POS Device setup is done, press . POS Device POS USE POS CH 1 None S2ync ChaNnonneel Setup 3 None 1 2 4 CH None 9 10 5 None 6 None 7 None 8 None Preset No preset No preset No preset 3 4 5 No preset 11 12 13 No preset OKNo presetCancel No preset No preset POS Device Setup Port/Ethernet None None None 6 7 8 None 14 15 16 None None None None Previous/Next Page OK Cancel POS Device PrPeOsSeUtSSE etup POS Device Setup POS 1No. 2 3 4 5 6 7 8 CH NNAaomdneed Preset Start None NoNneame Preset No preEsnedt No preset No preset NoSnetart Keyword No preset NoEnend Keyword None No preset No preset None None OKNo preset Cancel No preset Port/Ethernet Add Input char. SNeot ne Del None None None None None None None OK Cancel Previous/Next Page OK Cancel English _51
-
 1
1 -
2
-
3
-
4
-
5
-
6
-
7
-
8
-
9
-
10
-
11
-
12
-
13
-
14
-
15
-
16
-
17
-
18
-
19
-
20
-
21
-
22
-
23
-
24
-
25
-
26
-
27
-
28
-
29
-
30
-
31
-
32
-
33
-
34
-
35
-
36
-
37
-
38
-
39
-
40
-
41
-
42
-
43
-
44
-
45
-
 46
46 -
 47
47 -
 48
48 -
 49
49 -
 50
50 -
 51
51 -
 52
52 -
 53
53 -
 54
54 -
 55
55 -
 56
56 -
57
-
58
-
59
-
60
-
61
-
62
-
63
-
64
-
65
-
66
-
67
-
68
-
69
-
70
-
71
-
72
-
73
-
74
-
75
-
76
-
77
-
78
-
79
-
80
-
81
-
82
-
83
-
84
-
85
-
86
-
87
-
88
-
89
-
90
-
91
-
92
-
93
-
94
-
95
-
96
-
97
-
98
-
99
-
100
-
101
-
102
-
103
-
104
-
105
-
106
-
107
-
108
-
109
-
110
-
111
-
112
-
113
-
114
-
115
-
116
-
117
-
118
-
119
-
120
-
121
-
122
-
123
-
124
-
125
-
126
-
127
-
128
-
129
-
130
-
131
-
132
-
133
-
134
 |
 |