SanDisk E280 User Guide - Page 13
Supported IMPORT media types, Transfer Photos and Video, Video Files: AVI, MPEG-1 & MPEG-2 in MPEG - format
 |
UPC - 619659028893
View all SanDisk E280 manuals
Add to My Manuals
Save this manual to your list of manuals |
Page 13 highlights
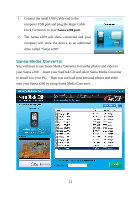
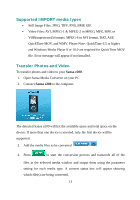
Supported IMPORT media types ƒ Still Image Files: JPEG, TIFF, PNG, BMP, GIF. ƒ Video Files: AVI, MPEG-1 & MPEG-2 in MPEG, MPG, MPE or VOB(unprotected) formats. MPEG-4 in AVI format, DAT, ASF, QuickTime MOV, and WMV. Please Note: QuickTime 6.5 or higher and Windows Media Player 9 or 10.0 are required for QuickTime MOV file. Error message will appear if not installed. Transfer Photos and Video To transfer photos and video to your Sansa e200. 1. Open Sansa Media Converter on your PC 2. Connect Sansa e200 to the computer. The detected Sansa e200 will list the available space and total space on the device. If more than one device is inserted, only the first device will be supported. 3. Add the media files to be converted 4. Press to start the conversion process and transcode all of the files in the selected media window and output them using the parameter setting for each media type. A convert status box will appear showing which file(s) are being converted. 13
-
 1
1 -
2
-
3
-
4
-
5
-
6
-
7
-
 8
8 -
 9
9 -
 10
10 -
 11
11 -
 12
12 -
 13
13 -
 14
14 -
 15
15 -
 16
16 -
 17
17 -
 18
18 -
19
-
20
-
21
-
22
-
23
-
24
-
25
-
26
-
27
-
28
-
29
-
30
-
31
-
32
-
33
-
34
-
35
-
36
-
37
-
38
-
39
-
40
-
41
-
42
 |
 |
