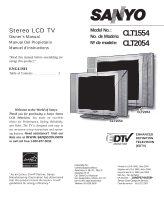
Sanyo CLT2054 Owners Manual - Page 3

Contents, Care and Cleaning - lcd tv

Page 3 highlights

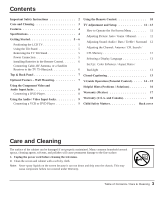
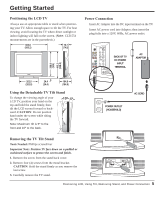
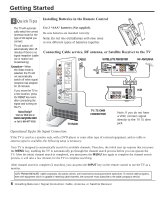
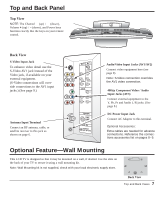
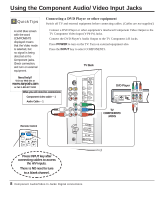
Contents Important Safety Instructions 2 Care and Cleaning 3 Features 4 Specifications 4 Getting Started 5 ~ 6 Positioning the LCD TV 5 Using the Tilt Stand 5 Removing the TV Tilt Stand 5 Power Connection 5 Installing Batteries in the Remote Control. . . . . . 6 Connecting Cable, RF Antenna, or a Satellite Receiver to the TV 75-Ohm jack 6 Top & Back Panel 7 Optional Feature - Wall Mounting 7 Using the Component Video and Audio Input Jacks 8 Connecting a DVD Player 8 Using the Audio / Video Input Jacks 9 Connecting a VCR or DVD Player 9 Using the Remote Control 10 TV Adjustment and Setup 11 ~ 13 How to Operate the On-Screen Menu 11 Adjusting Picture: Auto / Game / Manual . . . . . 11 Adjusting Sound: Audio / Bass / Treble / Surround 12 Adjusting the Channel: Antenna / CH. Search / CH. Memory 12 Selecting a Display Language 13 Set Up: Color Enhancer / Aspect Ratio / Backlight 13 Closed-Captioning 13 V-Guide Operation (Parental Control). . . . . 14 ~ 15 Helpful Hints (Problems / Solutions 16 Warranty (Mexico 17 Warranty (U.S.A. and Canada 18 Child Safety Matters Back cover Care and Cleaning The surface of the cabinet can be damaged if not properly maintained. Many common household aerosol sprays, cleaning agents, solvents, and polishes will cause permanent damage to the fine surface. 1. Unplug the power cord before cleaning the television. 2. Clean the screen and cabinet with a soft dry cloth. Note: Never spray liquids on the screen because it can run down and drip onto the chassis. This may cause component failure not covered under Warranty. Table of Contents / Care & Cleaning 3

  • 1
  • 2
  • 3
  • 4
  • 5
  • 6
  • 7
  • 8
  • 9
  • 10
  • 11
  • 12
  • 13
  • 14
  • 15
  • 16
  • 17
  • 18
  • 19

Table of Contents / Care & Cleaning
3
Important Safety Instructions
.
.
.
.
.
.
.
.
.
.
.
.
2
Care and Cleaning .
.
.
.
.
.
.
.
.
.
.
.
.
.
.
.
.
.
.
3
Features.
.
.
.
.
.
.
.
.
.
.
.
.
.
.
.
.
.
.
.
.
.
.
.
.
4
Specifications.
.
.
.
.
.
.
.
.
.
.
.
.
.
.
.
.
.
.
.
.
.
4
Getting Started.
.
.
.
.
.
.
.
.
.
.
.
.
.
.
.
.
.
.
5 ~ 6
Positioning the LCD TV .
.
.
.
.
.
.
.
.
.
.
.
.
.
.
5
Using the Tilt Stand
.
.
.
.
.
.
.
.
.
.
.
.
.
.
.
.
.
5
Removing the TV Tilt Stand .
.
.
.
.
.
.
.
.
.
.
.
.
5
Power Connection
.
.
.
.
.
.
.
.
.
.
.
.
.
.
.
.
.
.
5
Installing Batteries in the Remote Control.
.
.
.
.
.
6
Connecting Cable, RF Antenna, or a Satellite
Receiver to the TV 75-Ohm jack
.
.
.
.
.
.
.
.
.
.
6
Top & Back Panel .
.
.
.
.
.
.
.
.
.
.
.
.
.
.
.
.
.
.
7
Optional Feature – Wall Mounting.
.
.
.
.
.
.
.
.
.
7
Using the Component Video and
Audio
Input Jacks
.
.
.
.
.
.
.
.
.
.
.
.
.
.
.
.
.
.
.
8
Connecting a DVD Player .
.
.
.
.
.
.
.
.
.
.
.
.
.
8
Using the Audio / Video Input Jacks .
.
.
.
.
.
.
.
.
9
Connecting a VCR or DVD Player .
.
.
.
.
.
.
.
.
9
Using the Remote Control.
.
.
.
.
.
.
.
.
.
.
.
.
.
10
TV Adjustment and Setup
.
.
.
.
.
.
.
.
.
.
.
11 ~ 13
How to Operate the On-Screen Menu .
.
.
.
.
.
.
11
Adjusting Picture: Auto / Game / Manual .
.
.
.
.
11
Adjusting Sound: Audio / Bass / Treble / Surround
12
Adjusting the Channel: Antenna / CH. Search /
CH. Memory .
.
.
.
.
.
.
.
.
.
.
.
.
.
.
.
.
.
.
.
12
Selecting a Display Language .
.
.
.
.
.
.
.
.
.
.
.
13
Set Up:
Color Enhancer / Aspect Ratio /
Backlight
.
.
.
.
.
.
.
.
.
.
.
.
.
.
.
.
.
.
.
.
.
13
Closed-Captioning .
.
.
.
.
.
.
.
.
.
.
.
.
.
.
.
.
.
13
V-Guide Operation (Parental Control).
.
.
.
.
14 ~ 15
Helpful Hints (Problems / Solutions) .
.
.
.
.
.
.
.
16
Warranty (Mexico)
.
.
.
.
.
.
.
.
.
.
.
.
.
.
.
.
.
17
Warranty (U.S.A. and Canada).
.
.
.
.
.
.
.
.
.
.
18
Child Safety Matters.
.
.
.
.
.
.
.
.
.
.
.
Back cover
Contents
Care and Cleaning
The surface of the cabinet can be damaged if not properly maintained. Many common household aerosol
sprays, cleaning agents, solvents, and polishes will cause permanent damage to the fine surface.
1. Unplug the power cord before cleaning the television.
2.
Clean the screen and cabinet with a soft dry cloth.
Note:
Never
spray liquids on the screen because it can run down and drip onto the chassis. This may
cause component failure not covered under Warranty.