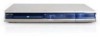
Sanyo DRW500 Instruction Manual
Sanyo DRW500 - Slim DVD Recorder/Player Manual
 |
UPC - 961613071002
View all Sanyo DRW500 manuals
Add to My Manuals
Save this manual to your list of manuals |
Sanyo DRW500 manual content summary:
- Sanyo DRW500 | Instruction Manual - Page 1
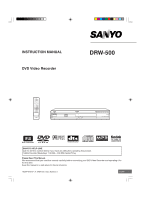
INSTRUCTION MANUAL DVD Video Recorder DRW-500 REMOTE CONTROLLER RB-DRW500 ® TM TM SANYO'S HELP-LINE Call the toll-free number below if you have any difficulties operating this product. 1-800-813-3435 (Weekdays: 7:30 AM - 4:00 PM Central Time) Please Read This Manual. We recommend that you read - Sanyo DRW500 | Instruction Manual - Page 2
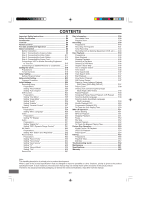
Instructions E2 Safety Certification E4 Accessories E4 Controls E5 Remote Control E6 For Safe and Efficient Operation E7 Basic Connection E8 Before Connection E8 Step 1: Connecting the Antenna Cable E8 Step 2: Connecting the Video Edit Disc E57 Troubleshooting Guide E59 Maintenance E61 - Sanyo DRW500 | Instruction Manual - Page 3
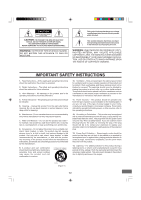
SHOCK, DO NOT REMOVE COVER (OR BACK). NO USER-SERVICEABLE PARTS INSIDE. REFER SERVICING TO QUALIFIED SERVICE PERSONNEL. WARNING: TO PREVENT FIRE OR SHOCK HAZARD, operating and maintenance instructions in the literature accompanying this unit. WARNING: UNAUTHORIZED RECORDING OF COPYRIGHTED MATERIAL - Sanyo DRW500 | Instruction Manual - Page 4
National Electrical Code, ANSI/NFPA 70, provides information with regard to proper grounding of the mast and supporting structure, grounding operate normally by following the operating instructions. Adjust only those controls that are ELECTRIC SERVICE EQUIPMENT ANTENNA DISCHARGE UNIT (NEC SECTION - Sanyo DRW500 | Instruction Manual - Page 5
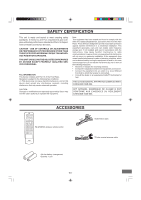
Health and Human Services. CAUTION - USE OF CONTROLS OR ADJUSTMENTS modifications not expressly approved by Sanyo may void the user's in accordance with the instructions, may cause harmful interference ACCESSORIES RB-DRW500 wireless remote control REMOTE CONTROLLER RB-DRW500 Audio/Video cable 75 - Sanyo DRW500 | Instruction Manual - Page 6
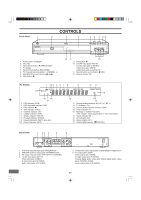
VIDEO) Video input jack (VIDEO) Audio input jacks (L-AUDIO-R) 11. Record button and indicator (m REC) 12. Remote sensor (IR) FL Display 1 23 4 5 6 7 8 RW TITLE CH CHP SHUFF PROG 19 sDIGITAL ST CD 9 REP 1 ALL A-B 10 11 REC HQ SP LP EP + SAP TV 12 18 16 17 1. DVD indicator (DVD) 2. DVD - Sanyo DRW500 | Instruction Manual - Page 7
25 24 23 22 REMOTE CONTROL 1. Open/Close button (OPEN/CLOSE) 2. Angle button (ANGLE) 3 3. TV/DVD select button (TV/DVD) 4. Power button ( TV channel scanning buttons (- CHANNEL +) 17 22. Record mode button (REC MODE) 23. Record button (m RECORD) 24. Clear button (CLEAR) 25. Edit button - Sanyo DRW500 | Instruction Manual - Page 8
be exposed to direct sunlight. • Because of the DVD recorder extremely low noise and wide dynamic range, there is the volume temporarily (muting) Press [MUTE] on the remote control. "MUTE" appears on the TV screen. To restore Sanyo Authorized Service Facility. Need help? Call 1-800-813-3435 -E7- - Sanyo DRW500 | Instruction Manual - Page 9
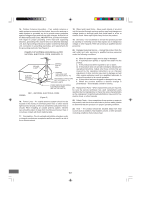
a VHF/UHF band combiner (not supplied) to connect the antenna to the unit. • If you are not sure about the connection, please consult your audio/video dealer. CAUTION: Do not connect the antenna and VCR as shown below. Your VCR doesn't work. VCR DVD recorder TV DVD recorder VCR TV -E8- - Sanyo DRW500 | Instruction Manual - Page 10
Example: Basic Antenna/Cable Connections RF OUTPUT CHANNEL DVD recorder 3 4 2 (Partial back panel) 1 or 75-ohm coaxial antenna cable (not supplied) 3 4 ANTENNA IN OUT RF OUTPUT CHANNEL VIDEO AV 1 IN L S-VIDEO R AUDIO VHF/UHF ANTENNA IN TV Cable TV wall jack 3 75-ohm coaxial antenna - Sanyo DRW500 | Instruction Manual - Page 11
box (not supplied) CATV 75-ohm coaxial antenna cable (not supplied) DVD recorder (Partial back panel) 3 4 ANTENNA IN OUT VIDEO AV 1 IN L S-VIDEO R AUDIO RF OUTPUT CHANNEL RF OUTPUT CHANNEL DVD recorder (Partial back panel) CATV 75-ohm coaxial antenna cable (not supplied) 3 4 ANTENNA - Sanyo DRW500 | Instruction Manual - Page 12
IN OUT RF OUTPUT CHANNEL VIDEO AV 1 IN L S-VIDEO R AUDIO COMPONENT VIDEO OUT VIDEO OUT L S-VIDEO R DIGITAL AUDIO AUDIO DVD recorder (Partial back panel) To VIDEO OUT jack (Yellow) AUDIO VIDEO INPUT 1 R-AUDIO-L VIDEO TV (Yellow) Audio/Video cable (supplied) Example: Connecting to - Sanyo DRW500 | Instruction Manual - Page 13
, see page E11. Example: Connecting to your TV (or Audio System) The built-in speakers in your TV will sound. DVD recorder (Partial back panel) COMPONENT VIDEO OUT VIDEO OUT L S-VIDEO R DIGITAL AUDIO AUDIO (White) L (Red) R *(Yellow) To AUDIO OUT jacks (Red) R (White) L TV with Audio - Sanyo DRW500 | Instruction Manual - Page 14
) DVD recorder (Partial back panel) To AUDIO OUT jacks COMPONENT VIDEO OUT VIDEO OUT L S-VIDEO R DIGITAL AUDIO AUDIO Front left speaker Surround left speaker Center speaker Front right speaker Subwoofer Surround right speaker Note: Please refer to your amplifier instruction manual - Sanyo DRW500 | Instruction Manual - Page 15
the AC power unless the power cord is unplugged from the AC outlet. 3 4 ANTENNA IN OUT RF OUTPUT CHANNEL VIDEO AV 1 IN L S-VIDEO R AUDIO COMPONENT VIDEO OUT VIDEO OUT L S-VIDEO R DIGITAL AUDIO AUDIO CAUTION: TO PREVENT ELECTRIC SHOCK, MATCH WIDE BLADE OF PLUG TO WIDE SLOT, FULLY INSERT - Sanyo DRW500 | Instruction Manual - Page 16
RF OUTPUT CHANNEL VIDEO AV 1 IN L S-VIDEO R AUDIO COMPONENT VIDEO OUT DVD recorder (Partial back panel) DVD recorder Open the lid. CAUTION: Almost all videos and DVD softwares on sale have a copyprotection. You cannot record them using this unit. Video Games cannot be recorded. *Please - Sanyo DRW500 | Instruction Manual - Page 17
(not supplied) To AUDIO OUT jacks IN L R AUDIO VIDEO OUT L COMPONENT VIDEO OUT S-VIDEO R DIGITAL AUDIO AUDIO DVD recorder (Partial back panel) CAUTION: Almost all videos and DVD softwares on sale have a copyprotection. You cannot record them using this unit. *Please consult your local - Sanyo DRW500 | Instruction Manual - Page 18
from an AC outlet. See also the owner's manual supplied with the connected equipment. A/V OUTPUT JACKS VIDEO R-AUDIO-L TO TV ANT. IN CHANNEL 34 To OUTPUT CHANNEL VIDEO AV 1 IN L S-VIDEO R AUDIO COMPONENT VIDEO OUT VIDEO OUT L S-VIDEO R DIGITAL AUDIO AUDIO DVD recorder (Partial back - Sanyo DRW500 | Instruction Manual - Page 19
Setup Menu". Menu Play/Edit Disc Recording Setup Record Program Setup Menu DVD Control 4 a General Video Audio 4. Press [ENTER] (or [a]). "Recording Setup" is highlighted. 5. Press [ENTER] (or [a]) again. "Recording Setup" screen appears. Recording Setup Record Mode Auto Chapter Set Clock - Sanyo DRW500 | Instruction Manual - Page 20
during this setting. If a message appears, please follow the instructions displayed on the TV screen. • For improvement, on-screen display subject to change without notice. 4, 5, a, b ENTER Setting "Channel Setup" 1. Open "Recording Setup" screen. (Repeat steps 1 ~ 5 of "To Set the Clock - Sanyo DRW500 | Instruction Manual - Page 21
then press [ENTER]. 3) Press [ENTER]. Auto memory channel scanning screen appears and starts to memorize all the channels available in your area. Record MoSdceanning for Channels (CATV) ... Auto Chapter b Auto CH Scan Total Channels Found: 001 5 Set Clock Channel List Channel Setup Modify - Sanyo DRW500 | Instruction Manual - Page 22
Program or SAP which broadcasters can use to transmit a second language for bilingual transmission or for other purposes. 1) Select "MTS Select". Recording Setup Record Mode Auto Chapter Set Clock Channel Setup Auto CH Scan Channel List Modify Channel Tuner Select 4 b MTS Select Press SETUP to - Sanyo DRW500 | Instruction Manual - Page 23
appears, please follow the instructions displayed on the TV screen. • For improvement, on-screen display subject to change without notice. SETUP POWER 4 5 Press SETUP to exit Menu Play/Edit Disc Record Program Setup Menu Recording Setup DVD Control 4 a General Video Audio AV Select Press - Sanyo DRW500 | Instruction Manual - Page 24
This is a setup for recording on a DVD+RW or DVD+R disc. Preparations (Recording Setup ---> Record Mode & Auto Chapter) 1. Select "Setup Menu" in "Menu" screen. See page E22. Menu Play/Edit Disc Record Program Setup Menu Recording Setup DVD Control 4 a General Video Audio AV Select Press SETUP - Sanyo DRW500 | Instruction Manual - Page 25
starts, the chapters in the title are made automatically on the disc by this setting. 1. Select "Auto Chapter". Recording Setup Record Mode Auto Chapter Set Clock Channel Setup 4 a 5 4 Min. 10 Min. 20 Min. 30 Min. OFF Press SETUP to exit Current selection 2. Press [ENTER] (or [a]) to - Sanyo DRW500 | Instruction Manual - Page 26
Disc Record Program Setup Menu Recording Setup DVD Control 4 a General Video Audio AV Select Press SETUP to exit 2. Press [ENTER] (or [a]). "Recording Setup" is highlighted. 3. Press [p] to select "DVD Control". 4. Press [ENTER] (or [a]). "DVD Control Setup" screen appears. DVD Control Setup - Sanyo DRW500 | Instruction Manual - Page 27
Setting "Angle Mark" To show the angle mark when playing back DVD-Video discs (recorded with multi-angle), select this setting. 1. Select "Angle Mark". DVD Control Setup Disc Menu Angle Mark Audio Subtitle Parental Control 4 a ON 5 OFF Press SETUP to exit Current selection 2. Press [ENTER] (or - Sanyo DRW500 | Instruction Manual - Page 28
instructions displayed on the TV screen. 1. Select "Parental Control". Menu Disc Menu Angle Mark Audio Subtitle Parental Control 4 a Choose Rating Set Password Press SETUP to exit 2. Press [ENTER] (or [a]) to select the sub menu. DVD Control . You cannot play DVD-Video discs rated higher than - Sanyo DRW500 | Instruction Manual - Page 29
abcdefghij klmnopqrst u v w x y z Space Done Back Press SETUP to exit Note: If you want to cancel it, select "Back", and then press [ENTER]. "DVD Control Setup" screen returns. 3) Enter the password. (Please refer to "Choosing Rating" on the previous page. If you use this unit for first time - Sanyo DRW500 | Instruction Manual - Page 30
"Setup Menu" in "Menu" screen. See page E22. Menu Play/Edit Disc Record Program Setup Menu Recording Setup DVD Control 4 a General Video Audio AV Select Press SETUP to exit 2. Press [ENTER] (or [a]). "Recording Setup" is highlighted. 3. Press [p] to select "General". 4. Press [ENTER] (or - Sanyo DRW500 | Instruction Manual - Page 31
size according to the aspect ratio of the TV, Preparations (Video ---> TV Display) 1. Select "Setup Menu" in "Menu" screen. See page E22. Menu Play/Edit Disc Record Program Setup Menu Recording Setup DVD Control 4 a General Video Audio AV Select Press SETUP to exit 2. Press [ENTER] (or - Sanyo DRW500 | Instruction Manual - Page 32
Menu" in "Menu" screen. See page E22. Menu Play/Edit Disc Record Program Setup Menu Recording Setup DVD Control 4 a General Video Audio AV Select Press SETUP to exit 2. Press [ENTER] (or [a]). "Recording Setup" is highlighted. 3. Press [p] to select "Audio". 4. Press [ENTER] (or [a]). "Audio - Sanyo DRW500 | Instruction Manual - Page 33
"Setup Menu" in "Menu" screen. See page E22. Menu Play/Edit Disc Record Program Setup Menu Recording Setup DVD Control 4 a General Video Audio AV Select Press SETUP to exit 2. Press [ENTER] (or [a]). "Recording Setup" is highlighted. 3. Press [p] to select "AV Select". 4. Press [ENTER] (or - Sanyo DRW500 | Instruction Manual - Page 34
remote control) to set the start and end times. Note: Press [a] or [b] to move the cursor. 4. Press [a] to select "Done". 5. Press [ENTER]. The record time is set. The screen returns. Example: Record Show Verify the settings. Press ENTER to edit. Start End Record Time 21:30 22:00 Record Day - Sanyo DRW500 | Instruction Manual - Page 35
3. Press [o] or [p] (or the number buttons on the remote control) to set the record date ("Year", "Month" and "Day"). Note: Press [a] or [b] to move the cursor. 4. the instructions displayed on the TV screen. Need help? Call 1-800-813-3435 Important Information To set the timer recording, leave - Sanyo DRW500 | Instruction Manual - Page 36
channel number does not appear. Skip this section. 1. Select "TV". Example: Record Show Verify the settings. Press ENTER to edit. Start End Record Time 21:30 22:00 Record Day 2004/05/03 Input Source Tuner TV 10 Record Mode SP Title 20040503 Press SETUP to exit Done Cancel 2. Press - Sanyo DRW500 | Instruction Manual - Page 37
settings. Quality 4 SP 5 Done Back Setting "Title" 1. Select "Title". Example: Record Show Verify the settings. Press ENTER to edit. Start End Record Time 21:30 22:00 Record Day 2004/05/03 Input Source Tuner TV 12 Record Mode HQ Title 20040503 Press SETUP to exit Done Cancel - Sanyo DRW500 | Instruction Manual - Page 38
etc. In these cases, please follow the instructions displayed on the TV screen. SETUP 4, 5, a, b ENTER Record List 1. Select "Record List" in "Menu" screen. (See pages E22 and E33.) Play/Edit Disc Record Program Setup Menu Menu Record Status 4 b Record List 2. Press [ENTER] (or [a]). "My - Sanyo DRW500 | Instruction Manual - Page 39
and logo mark DVD+RW DVD-Video TM DVD+R DVD+RW We recommend the discs as shown below. DVD+RW: Rewritable disc You can re-record/erase the disc approximately or disassembly is prohibited. Important Note: SANYO takes no responsibility for recording failure due to power cuts, defective discs - Sanyo DRW500 | Instruction Manual - Page 40
code) is built-in to the unit and DVD-Video discs. Region number "1" or "ALL" of DVD-Video discs can be used on this unit. 1 ALL DVD-Video Disc DVD-Video to the outside of the disc. • Never use chemicals such as record cleaning sprays, antistatic sprays or fluids, benzene or thinner to clean the - Sanyo DRW500 | Instruction Manual - Page 41
Preparations • This instruction manual explains the basic instruction of this unit using the remote control unit. • Turn on the TV and select the video input source. Refer to your TV's owner manual. • Check that the disc has enough available space for recording. • Set "Record Mode" and "Auto - Sanyo DRW500 | Instruction Manual - Page 42
Untitled 03:25 SP 05/01/04 Title number and Title name Record time and Record mode Record date Notes: • You cannot change the channel or record mode during recording. • The record time is estimate and actual time may differ. • Recording makes on open space on the disc. Data will not be overwritten - Sanyo DRW500 | Instruction Manual - Page 43
on the FL display. Use your original TV remote control to select the channel on your TV. Note: If you do not want to watch TV while recording, you can turn off the TV. If using a cable box, make sure to leave it on. TV/DVD AUDIO Recording stereo program and SAP (Second Audio Program - Sanyo DRW500 | Instruction Manual - Page 44
to start recording. Recording starts. To pause recording Press [k]. Press it again to restart recording. To stop recording Press [n]. For more details, see page E41. CAUTION: Almost all videos and DVD softwares on sale have a copyprotection. You cannot record them using this unit. Video Games cannot - Sanyo DRW500 | Instruction Manual - Page 45
DISC PLAYBACK Important Note: • This instruction manual explains the basic instruction of this unit using the remote control unit. • Some DVD-Video discs have different functions that may not be explained in this instruction manual. You may need extra instructions. In this case, please follow the - Sanyo DRW500 | Instruction Manual - Page 46
] [DVD+R] If a recorded DVD+RW or DVD+R disc is loaded, a title menu screen may appear. Example: 04 Titles SP Remain 01:00:03 Disc: Untitled Disc 01 Untitled 03:25 SP 05/01/04 02 Untitled 02:28 HQ 05/01/04 03 Untitled 03:21 SP 05/01/04 Stopping Playback [DVD-Video][DVD+RW][DVD+R] • Press - Sanyo DRW500 | Instruction Manual - Page 47
on the TV screen. Example: TITLE 01 / 28 CHAPTER 016 / 035 Notes: • You can skip only through the chapters, not over the title on the DVD-Video disc. • "NEXT" or "PREVIOUS" may appear during CD playback. Title or Chapter Search 1. Press [SEARCH MODE] once during playback or in the stop mode. The - Sanyo DRW500 | Instruction Manual - Page 48
4X v FR 8X v FR 16X (4 steps) Press [a] (Play) to return to normal playback. Note: The sound is muted during fast playback in DVD. Slow Motion Playback [DVD-Video] [DVD+RW] [DVD+R] Press [SLOW ] repeatedly to select the forward (or reverse) slow speed playback. SF 2X v SF 4X v SF 8X v SR 2X v SR - Sanyo DRW500 | Instruction Manual - Page 49
playback) of the title (or track) you want to repeat. Each time the button is pressed, the repeat mode will be changed as follows. [DVD-Video] [DVD+RW] [DVD+R] CHAPTER REPEAT ON/REP 1: Repeat of the chapter being played TITLE REPEAT ON/REP ALL: Repeat of the title being played REPEAT OFF: Normal - Sanyo DRW500 | Instruction Manual - Page 50
the subtitle language is not changed to the selected one. • When a disc supporting closed caption is played, the subtitle and the closed caption may overlap each is replaced, select the language again. • If the language is not recorded on the disc, only the available language on the disc will be - Sanyo DRW500 | Instruction Manual - Page 51
Time Press [DISPLAY] during playback. Each time the button is pressed, the various playing times will appear on the TV screen. Examples (DVD-Video, DVD+RW, DVD+R): TITLE 01/02 CHAPTER 015/035 00 : 50 : 09 TITLE REMAIN (Title remaining playing time) 01 : 10 : 20 CHAPTER ELAPSED (Chapter elapsed - Sanyo DRW500 | Instruction Manual - Page 52
through Z. CAUTION: • Some MP3 CDs cannot be played back depending on the recording conditions. • The CD has no music data or non-MP3 files cannot be required in order to download MP3 fils and music from the Internet. SANYO has no right to grant such permission. Permission should always be sought - Sanyo DRW500 | Instruction Manual - Page 53
Pause Press [k] during playback. • "Pause" appears on the TV screen. • "k" appears on the FL display. Note: The sound is muted. Press [a] (Play) (or [k]) to return to normal playback. File Skip Skipping forward Press [e] during playback to skip to the next file. "Next" appears briefly on the TV - Sanyo DRW500 | Instruction Manual - Page 54
files or folders and over is not available to this unit. • FUJICOLOR CD cannot be used. • Some discs cannot be played back depending on the recording conditions. • It would take 30 seconds or more for this unit to read KODAK Picture CDs depending on its structure. KODAK and Picture CD are - Sanyo DRW500 | Instruction Manual - Page 55
seconds or more for this unit to read the JPEG files depending on its structure. • Some JPEG files cannot be played back depending on the recording conditions. 1. Load the disc with the label facing up on the disc tray. (See the previous page.) • "SmartNAVI" screen appears. 2. To select the file, do - Sanyo DRW500 | Instruction Manual - Page 56
: • You may need extra operations during this editing. If a message appears, please follow the instructions displayed on the TV screen. • This unit may not be able to edit a disc if it was recorded on other DVD recorders or PCs. • For improvement, on-screen display subject to change without notice - Sanyo DRW500 | Instruction Manual - Page 57
01 UntitledTITLE 0R2EUNnAtMitlEed 03 Untitled 03:25 SPCANCE0L2:28 HQ 05/01/04 05/01/04 03:21 SP 05/01/04 TITLE RENAME [DVD+RW] [DVD+R] Note: Select the title first. See the previous page. 1) Select "TITLE RENAME". 04 Titles Disc: Untitled Disc PLAY TITLE TITLE DELETE 4 01 UntitledTITLE - Sanyo DRW500 | Instruction Manual - Page 58
+R] After you finalize the disc, you can play the disc on other DVD players. It can be used as DVD-Video disc. However, this is not guaranteed. CAUTION: After you finalize a DVD+R disc, you cannot edit or record on the disc. Finish all the editing before you start to finalize the disc. 1) Select - Sanyo DRW500 | Instruction Manual - Page 59
Disc Operations" screen returns. SETUP 4, 5, a, b ENTER Protect Disc [DVD+RW] You can protect a disc from accidental erasure or editing. 1) Select SETUP to exit 5) Press [b]. "Menu" screen returns. Menu Play/Edit Disc Record Program Setup Menu Play/Edit Titles 4 b Edit Disc Need help? Call - Sanyo DRW500 | Instruction Manual - Page 60
TROUBLESHOOTING GUIDE If you have followed the instructions and are having difficulty operating the unit, locate the SYMPTOM in the left column below. Check the corresponding POSSIBLE CAUSE and CORRECTIVE ACTION columns to locate and remedy the problem. Power SYMPTOM No power. POSSIBLE CAUSE The - Sanyo DRW500 | Instruction Manual - Page 61
with the audio cables. Adjust the volume control of your equipment. CORRECTIVE ACTION Load a Record Time correctly. See "Record Status" on page E33. The disc space is not enough. Load a new DVD+RW or DVD+R disc. SERVICING: Should this product require service, refer to the SANYO AUDIO/ VIDEO - Sanyo DRW500 | Instruction Manual - Page 62
DVD+RW DVD+R DVD-VIDEO DVD-R (Video mode) DVD-RW (Video mode) Audio CD (CD-DA) MP3 CD JPEG CD Kodak Picture CD Recordable discs DVD+RW DVD+R Video recording format DVD+RW Video Format Audio recording format MPEG Audio Recording time (DVD continuous improvement, Sanyo reserves the - Sanyo DRW500 | Instruction Manual - Page 63
sale, or sales slip from a Wal-Mart Store must be submitted to a Wal-Mart Store at the time warranty service is requested. EXCLUSIONS 1. This warranty does not cover (A) the adjustment of customer-operated controls as explained in the appropriate model's instruction manual EVENT SHALL SANYO OR THE - Sanyo DRW500 | Instruction Manual - Page 64
SANYO Electric Co., Ltd. Printed in China
-
 1
1 -
 2
2 -
 3
3 -
 4
4 -
 5
5 -
 6
6 -
 7
7 -
8
-
9
-
10
-
11
-
12
-
13
-
14
-
15
-
16
-
17
-
18
-
19
-
20
-
21
-
22
-
23
-
24
-
25
-
26
-
27
-
28
-
29
-
30
-
31
-
32
-
33
-
34
-
35
-
36
-
37
-
38
-
39
-
40
-
41
-
42
-
43
-
44
-
45
-
46
-
47
-
48
-
49
-
50
-
51
-
52
-
53
-
54
-
55
-
56
-
57
-
58
-
59
-
60
-
61
-
62
-
63
-
64
 |
 |

TM
REMOTE CONTROLLER RB-DRW500
®
TM
INSTRUCTION MANUAL
DVD Video Recorder
1AD6P1P2047--A
DRW-500, Issue Number 2
DRW-500
SANYO’S HELP-LINE
Call the toll-free number below if you have any difficulties operating this product.
1-800-813-3435 (Weekdays: 7:30 AM - 4:00 PM Central Time)
English
Please Read This Manual.
We recommend that you read this manual carefully before connecting your DVD Video Recorder and operating it for
the first time.
Keep the manual in a safe place for future reference.