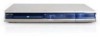
Sanyo DRW500 Instruction Manual - Page 9
Basic Connection - remote
 |
UPC - 961613071002
View all Sanyo DRW500 manuals
Add to My Manuals
Save this manual to your list of manuals |
Page 9 highlights
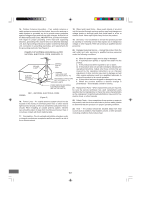
BASIC CONNECTION Notes: • Unpack the unit and insert the two AA size batteries in the remote control (See page E6). • Do not connect the power cord to a 120VAC 60Hz outlet until all connections have been made. Need help? Call 1-800-813-3435 Before Connection This guide will help you to connect the unit. Step 1: Connecting the Antenna Cable (See page E8.) Step 2: Connecting the Video Cables (See page E11.) Step 3: Connecting the Audio Cables (See page E12.) Step 4: Connecting the Power Cord (See page E14.) Step 1: Connecting the Antenna Cable First, select one of the following antenna connections that best suit you. If you use Antenna only (no cable TV), or cable without cable box Cable box with a few or many scrambled channels See Example: Basic Antenna/Cable connections (Page E9) Example: Connecting a Cable Box (Page E10) Note to CATV system installer: This reminder is provided to call the CATV system installer's attention to Section 820-40 of the NEC which provides guidelines for proper grounding and, in particular, specifies that the cable ground shall be connected to the grounding system of the building, as close to the point of cable entry as practical. Notes: • If the antenna is a flat cable (300-ohm twin lead cable), use a 300-75 ohm matching transformer (not supplied) to connect the antenna to the unit. • If you use separate VHF and UHF antenna cables, use a VHF/UHF band combiner (not supplied) to connect the antenna to the unit. • If you are not sure about the connection, please consult your audio/video dealer. CAUTION: Do not connect the antenna and VCR as shown below. Your VCR doesn't work. VCR DVD recorder TV DVD recorder VCR TV -E8-
-
 1
1 -
2
-
3
-
 4
4 -
 5
5 -
 6
6 -
 7
7 -
 8
8 -
 9
9 -
 10
10 -
 11
11 -
 12
12 -
 13
13 -
 14
14 -
15
-
16
-
17
-
18
-
19
-
20
-
21
-
22
-
23
-
24
-
25
-
26
-
27
-
28
-
29
-
30
-
31
-
32
-
33
-
34
-
35
-
36
-
37
-
38
-
39
-
40
-
41
-
42
-
43
-
44
-
45
-
46
-
47
-
48
-
49
-
50
-
51
-
52
-
53
-
54
-
55
-
56
-
57
-
58
-
59
-
60
-
61
-
62
-
63
-
64
 |
 |
