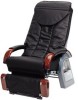
Sanyo HECSR1000K Service Manual - Page 10
Taiwan, Speed, Width
 |
UPC - 864830542112
View all Sanyo HECSR1000K manuals
Add to My Manuals
Save this manual to your list of manuals |
Page 10 highlights
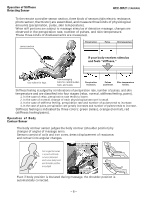
Problem Diagnosis Chart Troubled portion MANU LED SPEED WIDTH LED LED Troubled phenomenon ɹ Check item Counteraction method ɹ ELEVATION The elevation motion doesn't MOTOR move. ɾThe connection confirmation of Printed board (main) CN3 and CN4. ɾEach connector insertion. ɾThe connection confirmation of Printed board (UP/DOW Pulse) ɾEach connector insertion. CN401ʙCN404. ɾTrouble described left is ɾPull out CN404 on the Printed board (UP/DOW Pulse). ɾIf output from the both.---Replace the elevation motor. displayed 3 or 30 seconds and check for the red pin to gray pin output and blue pin to gray ɹIf no output, later after elevation pin output of the Printed board side CN404 ɹɹɹReplace the Printed board (main) or the elevation motor. (to be approx. AC100V respectively). *For checking after power ON,keep either vertical adjust button "UP" or "DOWN" as pressed. ɾTrouble described left is ɾThe connection confirmation of Printed board (Relay) CN203. ɾEach connector insertion. displayed 3 seconds later Check turning on confirmation main harness. after the power ON ɾCheck limit switches motion. ɾReplace the limit switch. < Under normal condition > Stop at the highest position(limit switch ON) CN203 connector open (ʿ) ɾCheck the Printed board (UP/DOW Pulse) IC401 and IC402 for tilt. ɾCorrect the tilted condition. ɾCheck the elevation magnet for the mounting direction or fall- down. ɾReplace the Printed board (UP/DOW Pulse). ɾCheck the belt (ROLLING) for dislocation and cut- off. ɾMount the magnet in normal condition. ɾMount or replace the belt. - 10 - RECLINING The back rest reclining MOTOR motion doesn't move. BACK REST ɾTrouble described left is displayed 3 seconds later after the power ON RECLINING The foot rest reclining MOTOR motion doesn't move. FOOT REST ɾTrouble described left is displayed 3 seconds later after the power ON ɾThe connection confirmation of Printed board (main) CN5. ɾCheck the CN5 output (to be approx. DC100V). ɾThe connection confirmation of Printed board (main) CN12. ɾPull out the CN12 connector. and check turning on confirmation of the motorized recliner side No1 to No2 pin and No3 to No4 pin. ɾThe connection confirmation of Printed board (Foot Rest) CN251 and CN252 and CN253. ɾCheck the CN252 output (to be approx. DC100V). ɾThe connection confirmation of Printed board (main) CN18. ɾPull out the CN18 connector. and check turning on confirmation of the motor side No1 to No2 pin and No3 to No4 pin. ɾConnector insertion. ɾIf output, ɹɹReplace the Motor (Elevation). ɹIf no output,---Replace the Printed board (main) ɾConnector insertion. ɾWhen the both are ʿ (open); ɹɹReplace the Motor (Elevation Each connector insertion. ɾIf output, ɹɹReplace the reclining motor(Leg Rest). ɹIf no output, ɹɹɹ Check the CN251 output (to be approx. AC100V). ɹɹɹ The relay (RY251) The operation confirmation. ɹɹIf extraordinary and not being. ɹɹɹɹɹReplace the Printed board (Foot Rest) ɹɹIf being extraordinarily. ɹɹɹɹɹReplace the Printed board (main) ɾWhen the both are ʿ (open) ɹɹReplace the reclining motor(Leg Rest). HEC-DR21 (TAIWAN)
-
 1
1 -
2
-
3
-
4
-
 5
5 -
 6
6 -
 7
7 -
 8
8 -
 9
9 -
 10
10 -
 11
11 -
 12
12 -
 13
13 -
 14
14 -
 15
15 -
16
-
17
-
18
-
19
-
20
 |
 |
