Sanyo HT28745 Owners Manual - Page 9
Digital A/v Connections - turns off
 |
View all Sanyo HT28745 manuals
Add to My Manuals
Save this manual to your list of manuals |
Page 9 highlights
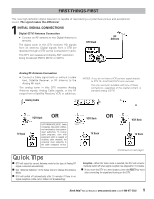
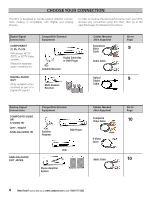
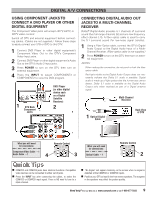
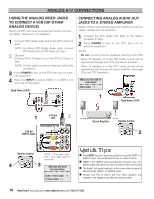
DIGITAL A/V CONNECTIONS USING COMPONENT JACKS TO CONNECT A DVD PLAYER OR OTHER DIGITAL EQUIPMENT The Component Video jacks will accept HDTV, EDTV, or SDTV video content. Switch off DTV and external equipment before connecting cables. (Cables are not supplied.) Follow these steps to easily connect your STB or DVD to this DTV: 1 Connect DVD Player or other digital equipment's Component Video Out to the DTV's Component Video Input jacks. 2 Connect DVD Player or other digital equipment's Audio Out to the DTV's Audio 3 Input jacks. 3 Press POWER to turn on the DTV, then turn on external equipment. 4 Press the INPUT to select COMPONENT3 or COMPONENT2 to view the DVD program. 1 DTV Back Component Jacks DVD Player (or other digital device such as a Digital Satellite Receiver) 2 CONNECTING DIGITAL AUDIO OUT JACKS TO A MULTI-CHANNEL RECEIVER Dolby® Digital Audio provides 5.1 channels of surround sound (five full-range channels [5] and one low-frequency effect channel [.1]). A fiber optics cable is used to carry the 5.1 surround sound (for low-noise signal transfer). 1 Using a Fiber Optics cable, connect the DTV's Digital Audio Output to the Digital Audio Input of a MultiChannel Receiver. (Fiber optics cable is not supplied.) 2 Press POWER to turn on the DTV, then turn on external equipment. NOTES: When making the connection, do not pinch or kink the fiber optics cable. Red light visible at the Digital Audio Output does not necessarily indicate that Dolby 5.1 audio is available. Digital audio is made up of light pulses that the human eye cannot detect. Dolby 5.1 audio is available at the Digital Audio Output only when received as part of a Digital antenna signal. Multi-Channel Receiver 1 Optical Digital Cable Back View of DTV What you will need for connections: Remote Control Component Video Cable - 1 Audio Cable - 1 4 3 What you will need for connections: Optical Cable - 1 Remote Control 2 I COMPO2 and COMPO3 jacks have identical functions. Compatible video devices can be connected to either set of jacks. I Press the INPUT key after connecting the cables, to select the COMPO2 or COMPO3 input signal. There is NO need to tune to a blank channel. I "No Signal" will appear randomly on the screen when no signal is detected at the COMPO2 or COMPO3 inputs. I Position your DTV at least 2 feet from stereo speakers. The magnets in the speakers may affect the picture quality. Need help? Visit our Web site at www.sanyoctv.com or Call 1-800-877-5032 9
-
 1
1 -
2
-
3
-
 4
4 -
 5
5 -
 6
6 -
 7
7 -
 8
8 -
 9
9 -
 10
10 -
 11
11 -
 12
12 -
 13
13 -
 14
14 -
15
-
16
-
17
-
18
-
19
-
20
-
21
-
22
-
23
-
24
-
25
-
26
-
27
-
28
-
29
-
30
-
31
-
32
-
33
-
34
-
35
-
36
-
37
-
38
-
39
-
40
-
41
-
42
-
43
-
44
-
45
-
46
-
47
-
48
-
49
-
50
-
51
-
52
-
53
-
54
-
55
-
56
-
57
-
58
-
59
-
60
-
61
-
62
-
63
-
64
-
65
-
66
-
67
-
68
-
69
-
70
-
71
 |
 |
