Sanyo PLC-WXU10N Owners Manual - Page 15
Remote Control, ON / STAND-BY, Four directional INPUT/AUTO PC, buttons, LIGHT, AUTO PC, NO SHOW
 |
UPC - 086483069420
View all Sanyo PLC-WXU10N manuals
Add to My Manuals
Save this manual to your list of manuals |
Page 15 highlights
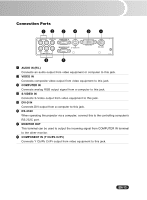
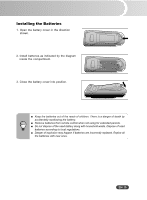
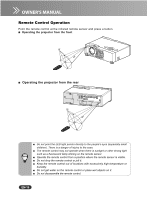
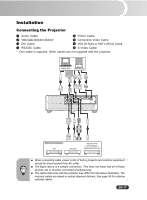
Remote Control 1 ON / STAND-BY Refer to "Powering On/Off the Projector". 2 Four directional (INPUT/AUTO PC) buttons - Use four directional buttons to select items or make adjustments to your selection. - Manually selects an input source. (Left button) - Automatically adjusts Fine Sync and Total Dots. This function is available for computer mode only. (Right button) 3 MENU Displays or exits the on-screen display menus. 4 LIGHT Press and hold this button to activate the LED light. If you press and hold the LIGHT button continuously or frequently, the batteries may terminate the life in a shorter period. 5 MUTE Cuts off the sound temporarily. Press again to cancel the MUTE function. 6 AUTO PC Automatically adjusts Fine Sync and Total Dots. This function is available for computer mode only. 7 NO SHOW Cuts off the screen temporarily. Press again to cancel the NO SHOW function. 8 ASPECT Switch the image aspect ratio. 9 INPUT Manually selects an input source. 10 KEYSTONE + / Adjusts image distortion caused by tilting the projector. 11 VOLUME + / Press Volume + button to increase the volume. Press Volume - button to reduce the volume. 12 FREEZE Press "FREEZE" to pause the screen image. Press again to cancel the FREEZE function. EN-14 LED light IR signal emission window 1 12 2 3 4 11 5 10 6 9 7 8
-
 1
1 -
2
-
3
-
4
-
5
-
6
-
7
-
8
-
9
-
 10
10 -
 11
11 -
 12
12 -
 13
13 -
 14
14 -
 15
15 -
 16
16 -
 17
17 -
 18
18 -
 19
19 -
 20
20 -
21
-
22
-
23
-
24
-
25
-
26
-
27
-
28
-
29
-
30
-
31
-
32
-
33
-
34
-
35
-
36
-
37
-
38
-
39
-
40
-
41
-
42
 |
 |
