Sanyo PLC-WXU10N Owners Manual - Page 39
Troubleshooting, EN-38
 |
UPC - 086483069420
View all Sanyo PLC-WXU10N manuals
Add to My Manuals
Save this manual to your list of manuals |
Page 39 highlights
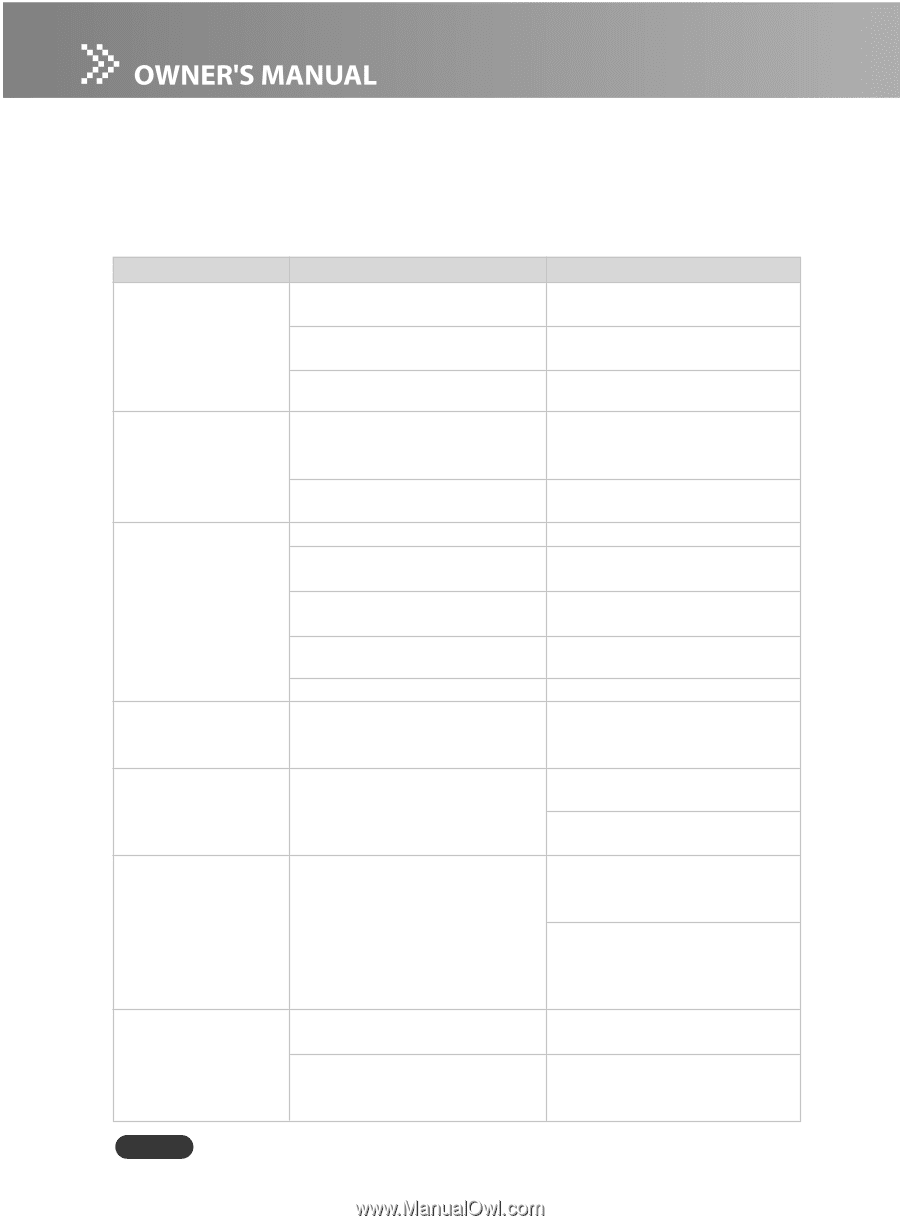
Troubleshooting Refer to the symptoms and measures listed below before sending the projector for repairs. If the problem persists, contact your local reseller or service center. Please refer to "LED Indicator Messages" (p.36) as well. Symptom Cause Solution No power. The AC power cord is not plugged Plug in the AC power cord. in. The AC power cord is not Connect the AC power cord to connected to the projector. the projector correctly. The lamp cover is loose. Tighten the screw on the lamp cover. Power goes out The temperature is too high. Unplug the AC power cord and during use. wait for a short while, then turn the power back on. The ventilation holes are blocked. Place the projector so that the ventilation holes are not blocked. No image appears The projector is not turned on. Turn the projector on. on screen. The connections setup is not Check that all connections are correctly. setup correctly. The connected devices are not Check that all connected devices functioning properly. are functioning properly. Lens cap is not removed. Remove the lens cap and turn the projector on. "NO SHOW" function is activated. Cancel "NO SHOW" function. (p. 14) Partial, scrolling The input signal is not supported Press remote control's "AUTO PC" o r i n c o r r e c t l y by the projector. button. (p. 12, 14, 27) displayed image. Image is unstable or The signal timing of the display Use "Fine Sync" to correct it. Refer flickering. does not synchronize with the to Picture section. (p. 12, 14, 24) graphic card. Change the monitor color setting from your computer. Image has vertical The display data frequency does Use "Total Dots" to make an flickering bar. not match the frequency of your adjustment. Refer to Picture computer's graphic card. section. (p. 12, 14, 24) Check and reconfigure the display mode of your graphic card to make it compatible with the product. I m a g e i s o u t o f The lens focus is not adjusted Adjust the focus with the focus focus. optimally. ring. (p. 20) The projection distance is not Place the projector within the within the projector's supported supported range. range. EN-38
-
 1
1 -
2
-
3
-
4
-
5
-
6
-
7
-
8
-
9
-
10
-
11
-
12
-
13
-
14
-
15
-
16
-
17
-
18
-
19
-
20
-
21
-
22
-
23
-
24
-
25
-
26
-
27
-
28
-
29
-
30
-
31
-
32
-
33
-
 34
34 -
 35
35 -
 36
36 -
 37
37 -
 38
38 -
 39
39 -
 40
40 -
 41
41 -
 42
42
 |
 |