Sanyo PLC-XP57L User Manual - Page 36
List Mode, Color Selection Mode, Color Selection Mode Continued, Color M., Color Palette, All Del
 |
View all Sanyo PLC-XP57L manuals
Add to My Manuals
Save this manual to your list of manuals |
Page 36 highlights
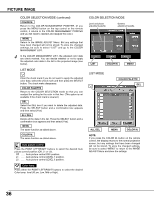
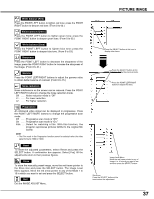
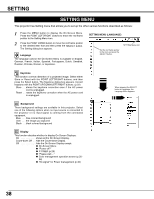
PICTURE IMAGE COLOR SELECTION MODE (continued) COLOR M. Return to the COLOR MANAGEMENT POINTER. (If you press the MENU button on the top control or the remote control, it returns to the COLOR MANAGEMENT POINTER and you will need to reselect and readjust the color.) MENU Return to the IMAGE ADJUST Menu. But any settings that have been changed will not be stored. To store the changed settings, be sure to select "LIST" and go to the COLOR MANAGEMENT LIST. 4 In the COLOR MANAGEMENT LIST, the adjusted color data are check marked. You can decide whether or not to apply the adjusted color data in the list to the projected image (see below). LIST MODE Clear the check mark if you do not want to apply the adjusted color data; select the check mark and then press the SELECT button. The check make disappears. COLOR PALETTE Return to the COLOR SELECTION mode so that you can readjust the setting for the color in that line. (This option is not available if the check mark is cleared.) DEL Select the DEL box if you want to delete the adjusted data. Press the SELECT button and a confirmation box appears and then select [Yes] ALL DEL Delete all the data in the list. Press the SELECT button and a confirmation box appears and then select [Yes]. MENU The same function as stated above. COLOR M. The same function as stated above. Auto picture control Press the POINT LEFT/RIGHT buttons to select the desired Auto picture control position (Off, L1 or L2). Off . . . . Auto picture control OFF position. L1 . . . . . Auto picture control LEVEL 1 position. L2 . . . . . Auto picture control LEVEL 2 position. Color temp. Press either the POINT LEFT/RIGHT buttons to select the desired Color temp. level (XLow, Low, Mid or High). COLOR SELECTION MODE Level and phase adjustment palette. Gamma adjustment palette. LIST COLOR M. MENU LIST MODE COLOR PALETTE DEL ALL DEL MENU COLOR M. NOTE: If you press the COLOR M. button on the remote control, the display returns to the normal projection screen, but any settings that have been changed will not be stored. To store the changed settings, be sure to select "MENU" to return to the IMAGE ADJUST Menu and store the settings. 36
-
 1
1 -
2
-
3
-
4
-
5
-
6
-
7
-
8
-
9
-
10
-
11
-
12
-
13
-
14
-
15
-
16
-
17
-
18
-
19
-
20
-
21
-
22
-
23
-
24
-
25
-
26
-
27
-
28
-
29
-
30
-
 31
31 -
 32
32 -
 33
33 -
 34
34 -
 35
35 -
 36
36 -
 37
37 -
 38
38 -
 39
39 -
 40
40 -
 41
41 -
42
-
43
-
44
-
45
-
46
-
47
-
48
-
49
-
50
-
51
-
52
-
53
-
54
-
55
-
56
-
57
-
58
-
59
-
60
-
61
-
62
 |
 |
