Sanyo PLC-XT11 Owners Manual - Page 35
VIDEO, INPUT, SCREEN MENU, Reset, Store
 |
View all Sanyo PLC-XT11 manuals
Add to My Manuals
Save this manual to your list of manuals |
Page 35 highlights
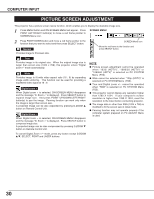
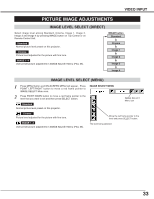
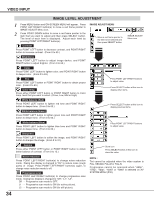
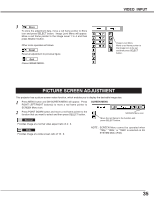
3 Store To store the adjustment data, move a red frame pointer to Store icon and press SELECT button. Image Level Menu will appear. Move a red frame pointer to the Image Level 1 to 4 and then press SELECT button. Other icons operates as follows. Reset Reset all adjustment to previous figure. Quit Closes IMAGE MENU. VIDEO INPUT Image Level Menu Move a red frame pointer to the image icon to be set and then press SELECT button. PICTURE SCREEN ADJUSTMENT This projector has a picture screen resize function, which enables you to display the desirable image size. 1 Press MENU button and ON-SCREEN MENU will appear. Press POINT LEFT/RIGHT button(s) to move a red frame pointer to SCREEN Menu icon. SCREEN MENU 2 Press POINT DOWN button and move a red frame pointer to the function that you want to select and then press SELECT button. Normal Provides image at a normal video aspect ratio of 4 : 3. Wide Provides image at a wide screen ratio of 16 : 9. SCREEN Menu icon Move the red frame to the function and press SELECT button. NOTE : SCREEN Menu cannot be operated when "720p," "1035i," or "1080i" is selected on AV SYSTEM Menu (P32). 35
-
 1
1 -
2
-
3
-
4
-
5
-
6
-
7
-
8
-
9
-
10
-
11
-
12
-
13
-
14
-
15
-
16
-
17
-
18
-
19
-
20
-
21
-
22
-
23
-
24
-
25
-
26
-
27
-
28
-
29
-
 30
30 -
 31
31 -
 32
32 -
 33
33 -
 34
34 -
 35
35 -
 36
36 -
 37
37 -
 38
38 -
 39
39 -
 40
40 -
41
-
42
-
43
-
44
-
45
-
46
-
47
-
48
 |
 |
