Schwinn 430 Elliptical Assembly Manual - Page 16
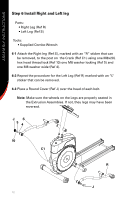
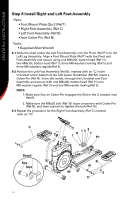
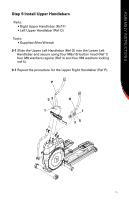
Step 7 Install Right and Left Lower Handlebars - console
 |
View all Schwinn 430 Elliptical manuals
Add to My Manuals
Save this manual to your list of manuals |
Page 16 highlights
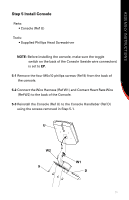
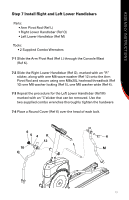
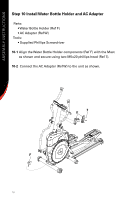
ASSEMBLY INSTRUCTIONS Step 7 Install Right and Left Lower Handlebars Parts Arm Pivot Rod (Ref L Right Lower Handlebar (Ref Q Left Lower Handlebar (Ref M) Tools 2 Supplied Combo Wrenches 7-1 Slide the Arm Pivot Rod (Ref L) through the Console Mast (Ref K). 7-2 Slide the Right Lower Handlebar (Ref Q), marked with an "R" sticker, along with one M8 wave washer (Ref 12) onto the Arm Pivot Rod and secure using one M8x20L hexhead threadlock (Ref 10) one M8 washer locking (Ref 5), one M8 washer wide (Ref 4). 7-3 Repeat the procedure for the Left Lower Handlebar (Ref M) marked with an "L"sticker that can be removed. Use the two supplied combo wrenches thoroughly tighten the hardware 7-4 Place a Round Cover (Ref 6) over the head of each bolt. 6 54 K 6 12 L 10 M Q 13
-
 1
1 -
2
-
3
-
4
-
5
-
6
-
7
-
8
-
9
-
10
-
 11
11 -
 12
12 -
 13
13 -
 14
14 -
 15
15 -
 16
16 -
 17
17 -
 18
18 -
 19
19 -
 20
20 -
 21
21
 |
 |
