Seagate OneTouch II OneTouch II SBE Install Guide - Page 23
Connecting and Disconnecting the Drive, Naming Your Maxtor OneTouch II, Small Business Edition Drive - usb device
 |
View all Seagate OneTouch II manuals
Add to My Manuals
Save this manual to your list of manuals |
Page 23 highlights
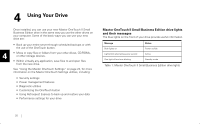
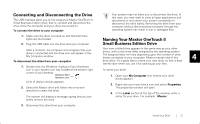
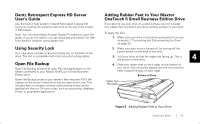
Connecting and Disconnecting the Drive The USB interface allow you to hot swap your Maxtor OneTouch II Small Business Edition drive; that is, connect and disconnect the drive while the computer and your drive are turned on. To connect the drive to your computer 1. Make sure the drive is turned on and that both blue lights are illuminated. 2. Plug the USB cable into the drive and your computer. After a moment, the computer will recognize that your drive is connected and the drive icon will appear in the My Computer window. To disconnect the drive from your computer 1. Double-click the Windows Unplug or Eject Hardware icon in your system icon tray located at the bottom right corner of your desktop. Unplug or Eject Hardware icon A list of device choices appears. 2. Select the Maxtor drive and follow the on-screen directions to eject the drive. The system will display a message saying that you can safely remove the drive. 3. Disconnect the drive from your computer. Your system may not allow you to disconnect the drive. In this case, you may need to close all open applications and documents or shut down your system completely to disconnect the drive safely. Removing the drive from your computer without disconnecting it properly through the operating system can result in lost or damaged files. Naming Your Maxtor OneTouch II Small Business Edition Drive Your new untitled drive appears in the same way as your other drives, with a new drive letter assigned by the operating system. The assigned letter will vary depending upon the number of other drives connected to your computer. Make a mental note of this 4 drive letter. It's a good idea to name your new drive, so that is easy identify later when you use it for backing up your files. To name your drive: 1. Open your My Computer icon (where your other drives appear.) 2. Right-click your new drive's icon and select Properties. The properties window will open. 3. In the Label section at the top of the window, enter a name for your drive. For example: 'Maxtor.' Using Your Drive 21
-
 1
1 -
2
-
3
-
4
-
5
-
6
-
7
-
8
-
9
-
10
-
11
-
12
-
13
-
14
-
15
-
16
-
17
-
 18
18 -
 19
19 -
 20
20 -
 21
21 -
 22
22 -
 23
23 -
 24
24 -
 25
25 -
 26
26 -
 27
27 -
 28
28 -
29
-
30
-
31
-
32
-
33
-
34
-
35
-
36
-
37
-
38
-
39
 |
 |