Sennheiser freePORT Instrument Set Instructions for Use - Page 10
Setting up the system
 |
View all Sennheiser freePORT Instrument Set manuals
Add to My Manuals
Save this manual to your list of manuals |
Page 10 highlights
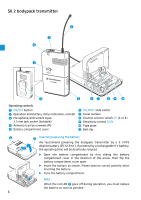
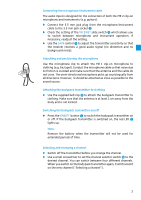
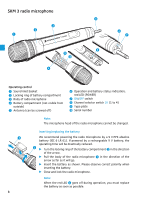
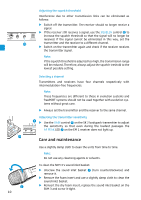
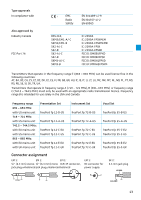
Switching the radio microphone on/off ̈ Use the ON/OFF switch ¶ to switch the radio microphone on or off. If the radio microphone is switched on, the red LED ² lights up. Note: Remove the battery when the transmitter will not be used for extended periods of time. Selecting and changing a channel ̈ Switch off the radio microphone. ̈ Open the radio microphone ("Inserting/replacing the battery"). ̈ Use a small screwdriver to set the channel selector switch º to the desired channel. You can switch between four different channels ("Selecting a channel"). ̈ Close and lock the radio microphone. ̈ Switch on the radio microphone again. Sensitivity of the radio microphone You can vary the bass reproduction by increasing/decreasing the talking distance. Setting up the system Before starting transmission, do a soundcheck and set up the system as follows: Setting up the reception » The receiver's four LEDs (RF LEVEL) » indicate the level of the received RF signal. With the transmitter, walk up and down the transmission area and check if the received RF signal is sufficient everywhere. Reception is good if all four LEDs light up. Please observe the following: y Transmission range depends to a large extent on location and can be up to 100 m. Observe a minimum distance of 3 m between transmitter and receiver. There should be a "free line of sight" between transmitting and receiving antennas. y Do not operate the system close to metal objects such as cross members or reinforced-concrete walls. Computers or mobile phones in direct proximity to the antenna will interfere with the reception. y Each transmitter requires a receiver. When using several trans- mission links simultaneously, make sure that all transmission links operate on different channels. 9
-
 1
1 -
2
-
3
-
4
-
 5
5 -
 6
6 -
 7
7 -
 8
8 -
 9
9 -
 10
10 -
 11
11 -
 12
12 -
 13
13 -
 14
14 -
 15
15 -
16
 |
 |