Sennheiser freePORT Instrument Set Instructions for Use - Page 8
Selecting and changing a channel
 |
View all Sennheiser freePORT Instrument Set manuals
Add to My Manuals
Save this manual to your list of manuals |
Page 8 highlights
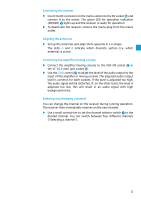
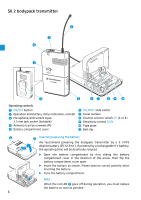
Connecting the microphone/instrument cable The audio input is designed for the connection of both the ME 2 clip-on microphone and instruments (e.g. guitars). ̈ Connect the 3.5 mm jack plug from the microphone/instrument cable to the 3.5 mm jack socket ». ̈ Check the setting of the MIC/INST slide switch ² which allows you to switch between microphone and instrument operation. If necessary, readjust the setting. ̈ Use the GAIN control ¾ to adjust the transmitter sensitivity so that the receiver receives a good audio signal (no distortion and no background noise). Attaching and positioning the microphone Use the microphone clip to attach the ME 2 clip-on microphone to clothing (e.g. tie, lapel). Conduct the microphone cable so that noise due to friction is avoided and make sure that the antenna and the cable do not cross. The omni-directional microphone picks up sound equally from all directions. However, it should be attached as close as possible to the sound source. Attaching the bodypack transmitter to clothing ̈ Use the supplied belt clip ¸ to attach the bodypack transmitter to clothing. Make sure that the antenna is at least 1 cm away from the body and is not kinked. Switching the bodypack transmitter on/off ̈ Press the ON/OFF button ³ to switch the bodypack transmitter on or off. If the bodypack transmitter is switched on, the red LED · lights up. Note: Remove the battery when the transmitter will not be used for extended periods of time. Selecting and changing a channel ̈ Switch off the transmitter before you change the channel. ̈ Use a small screwdriver to set the channel selector switch º to the desired channel. You can switch between four different channels. When you switch on the bodypack transmitter again, it will transmit on the new channel ("Selecting a channel"). 7
-
 1
1 -
2
-
 3
3 -
 4
4 -
 5
5 -
 6
6 -
 7
7 -
 8
8 -
 9
9 -
 10
10 -
 11
11 -
 12
12 -
 13
13 -
14
-
15
-
16
 |
 |
