Sharp AR-F152 AR-F152 Operation Manual - Page 26
Toner Cartridge Replacement - user guide
 |
View all Sharp AR-F152 manuals
Add to My Manuals
Save this manual to your list of manuals |
Page 26 highlights
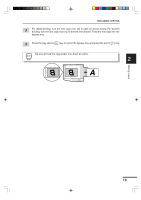
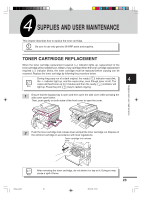
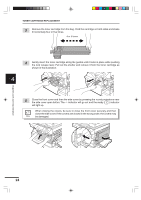
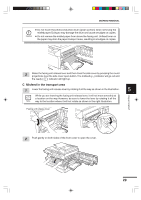
Supplies and user maintenance TONER CARTRIDGE REPLACEMENT Remove the toner cartridge from the bag. Hold the cartridge on both sides and shake it horizontally four or five times. 4 or 5 times Gently insert the toner cartridge along the guides until it locks in place while pushing the lock release lever. Pull out the shutter and remove it from the toner cartridge as shown in the illustration 4 Close the front cover and then the side cover by pressing the round projections near the side cover open button. The indicator will go out and the ready ( ) indicator will light up. When closing the covers, be sure to close the front cover securely and then close the side cover. If the covers are closed in the wrong order, the covers may be damaged. 24
-
 1
1 -
2
-
3
-
4
-
5
-
6
-
7
-
8
-
9
-
10
-
11
-
12
-
13
-
14
-
15
-
16
-
17
-
18
-
19
-
20
-
 21
21 -
 22
22 -
 23
23 -
 24
24 -
 25
25 -
 26
26 -
 27
27 -
 28
28 -
 29
29 -
 30
30 -
 31
31 -
32
-
33
-
34
-
35
-
36
-
37
-
38
-
39
-
40
-
41
-
42
-
43
-
44
-
45
-
46
-
47
-
48
-
49
-
50
-
51
-
52
 |
 |

24
4
Supplies and user maintenance
TONER CARTRIDGE REPLACEMENT
Remove the toner cartridge from the bag.
Hold the cartridge on both sides and shake
it horizontally four or five times.
4 or 5 times
Gently insert the toner cartridge along the guides until it locks in place while pushing
the lock release lever. Pull out the shutter and remove it from the toner cartridge as
shown in the illustration
Close the front cover and then the side cover by pressing the round projections near
the side cover open button. The
indicator will go out and the ready (
) indicator
will light up.
When closing the covers, be sure to close the front cover securely and then
close the side cover. If the covers are closed in the wrong order, the covers may
be damaged.