Sharp DV-SR45U Operation Manual - Page 9
Functional overview cont'd
 |
UPC - 074000354449
View all Sharp DV-SR45U manuals
Add to My Manuals
Save this manual to your list of manuals |
Page 9 highlights
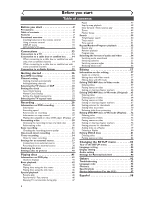
Before you start Before you start Connections Getting started Recording Playing discs Functional overview (cont'd) Remote Control 1 2 3 4 65 7 8 9* 10 11* 13 12 14 15 POWER DISPLAY OPEN/CLOSE TIMER PROG. A .@/: 1 CH REC MONITOR GHI 4 PQRS 7 REC MODE CLEAR REC PAUSE F ABC 2 JKL 5 TUV 8 SPACE 0 DEF 3 MNO 6 WXYZ 9 CM SKIP SKIP H G B PLAY REV h STOP C SETUP TOP MENU K FWD g MENU/LIST REPEAT ENTER { B ZOOM RETURN L 16* 17 18 19 20 21 22 23 24 25 (*) The unit can also be turned on by pressing these buttons. 1. POWER button Press to turn the DVD recorder on and off. If timer programmings have been set, press to set the unit in timer-standby mode. 2. DISPLAY button Press to display or change the on-screen display. 3. CH K / L buttons Press to change the channel up and down. 4. REC MONITOR button Press to check the video signal to be recorded before attempting. 5. REC MODE button Press to switch the recording speed. 6. CLEAR button Press to clear the password once entered or to cancel the programming for CD or to clear the selecting marker number in the marker setup mode or to clear the program once entered in the timer recording setting mode,etc. 7. REC button Press once to start a recording. Press repeatedly to start a One-Touch timer Recording. 8. PAUSE F button Press to pause play or recording. 9. PLAY B button* Press to start or resume play. 10. REV E button During playback, press to fast reverse. Or when playback is paused, press to play slow reverse. 11. STOP C button* Press to stop play or recording. 12. SETUP button Press to display the setup menu. During DVD playback, press and hold for more than 3 seconds to switch to the progressive scanning mode or the interlace mode. 13. TOP MENU button Press to display the top menu. 14. REPEAT button Press to display the repeat setting menu. 15. ZOOM button During playback, press to enlarge the picture on the screen. 16. OPEN/CLOSE A button* Press to open or close the disc tray. 17. TIMER PROG. button Press to display the timer program setting menu. 18. Number buttons Press to select channel numbers. Press to select a title/chapter/track on display or a TV channel. Or press to enter values for the settings in the SETUP menu. 19. CM SKIP button During playback, press to skip 30 seconds. 20. SKIP H button During playback, press to skip to the previous chapter or track. Or when playback is paused, press to play reverse step by step. SKIP G button During playback, press to skip to the next chapter or track. Or when playback is paused, press to play forward step by step. 21. FWD D button During playback, press to play fast forward. Or when playback is paused, press to play slow forward. 22. MENU/LIST button Press to display the Disc menu. To change ORIGINAL and PLAYLIST on the TV screen. (VR mode only) 23. ENTER button Press to confirm or select menu items. 24. K / L / { / B buttons Press to select items or settings. 25. RETURN button Press to return to the previously displayed menu screen. 9 Editing Changing the SETUP menu Others Español
-
 1
1 -
2
-
3
-
 4
4 -
 5
5 -
 6
6 -
 7
7 -
 8
8 -
 9
9 -
 10
10 -
 11
11 -
 12
12 -
 13
13 -
 14
14 -
15
-
16
-
17
-
18
-
19
-
20
-
21
-
22
-
23
-
24
-
25
-
26
-
27
-
28
-
29
-
30
-
31
-
32
-
33
-
34
-
35
-
36
-
37
-
38
-
39
-
40
-
41
-
42
-
43
-
44
-
45
-
46
-
47
-
48
-
49
-
50
-
51
-
52
-
53
-
54
-
55
-
56
-
57
-
58
-
59
-
60
-
61
-
62
-
63
-
64
-
65
-
66
-
67
-
68
-
69
-
70
-
71
-
72
-
73
-
74
-
75
-
76
-
77
-
78
-
79
-
80
-
81
-
82
-
83
-
84
-
85
-
86
-
87
-
88
-
89
-
90
-
91
-
92
-
93
-
94
-
95
-
96
-
97
-
98
-
99
-
100
-
101
-
102
 |
 |
