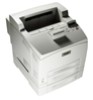
Sharp DX-B350P DX-B350P DX-B450P Operation Manual - Page 15
Using the Operator Panel or EWS, select the Transparency Media Type and correct Media - dx
 |
View all Sharp DX-B350P manuals
Add to My Manuals
Save this manual to your list of manuals |
Page 15 highlights
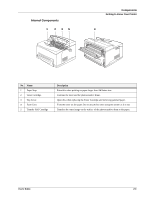
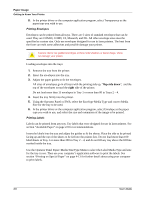
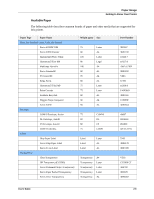
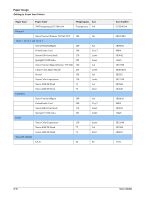
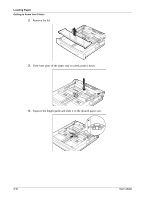
Paper Usage Getting to Know Your Printer Paper Types Thick 3 DX-B450P only Fuser Mode Thick3 Thin (64-67 gsm) DX-B450P only Thin Restrictions No duplex Half Speed on DX-B450P Not available on DX-B350P Not available on DX-B350P You should set your printer Media Type to Thick1 or any of the other paper types that use Thick1 fuser mode for any paper that is from 106 gsm to 159 gsm. If your paper is 160 gsm to 216 gsm, you should set your printer Media Type to Thick2 or Cardstock. If you do not get satisfactory results using Thick1 or Thick2 on some paper types with rough or uneven surfaces, it is possible you will get improved results using Thick3 on the DX-B450P because of the lower fuser temperature and slower paper speed in the printer. The fuser temperature progression is DX-B350P: (Low) Transparency Normal Thick1 Thick2 (High) and DX-B450P: (Low) Transparency Thin Thick3 Normal Thick1 Thick2 (High) Printing Transparencies Transparencies can be printed from all trays, but they can not be printed on two sides using the Duplex Module. Only use transparencies designed for laser printers so they can withstand the heat required for fusing. It is possible to damage your printer by using unsupported transparencies. Loading transparencies into the trays: 1. Remove the tray from the printer. 2. Remove all paper from a tray before loading transparencies. 3. Fan the stack of new transparencies before putting them in the tray. 4. Insert the transparencies into the tray. Place the transparencies in the input tray with the side to be printed facing up. Do not fully load a tray with transparencies. The printer supports loading 100 transparencies or less in a tray. Handle them by the edges with both hands and avoid getting fingerprints and creases on them. 5. Adjust the paper guides to fit the transparencies. 6. Insert the tray firmly into the printer. 7. Using the Operator Panel or EWS, select the Transparency Media Type and correct Media Size for the tray to be used. User's Guide 2-7
-
 1
1 -
2
-
3
-
4
-
5
-
6
-
7
-
8
-
9
-
 10
10 -
 11
11 -
 12
12 -
 13
13 -
 14
14 -
 15
15 -
 16
16 -
 17
17 -
 18
18 -
 19
19 -
 20
20 -
21
-
22
-
23
-
24
-
25
-
26
-
27
-
28
-
29
-
30
-
31
-
32
-
33
-
34
-
35
-
36
-
37
-
38
-
39
-
40
-
41
-
42
-
43
-
44
-
45
-
46
-
47
-
48
-
49
-
50
-
51
-
52
-
53
-
54
-
55
-
56
-
57
-
58
-
59
-
60
-
61
-
62
-
63
-
64
-
65
-
66
-
67
-
68
-
69
-
70
-
71
-
72
-
73
-
74
-
75
-
76
-
77
-
78
-
79
-
80
-
81
-
82
-
83
-
84
-
85
-
86
-
87
-
88
-
89
-
90
-
91
-
92
-
93
-
94
-
95
-
96
-
97
-
98
-
99
-
100
-
101
-
102
-
103
-
104
-
105
-
106
-
107
-
108
-
109
-
110
-
111
-
112
-
113
-
114
-
115
-
116
-
117
-
118
-
119
-
120
-
121
-
122
-
123
-
124
-
125
-
126
-
127
-
128
-
129
-
130
-
131
-
132
-
133
-
134
-
135
-
136
-
137
-
138
-
139
-
140
-
141
-
142
-
143
-
144
-
145
-
146
 |
 |
