Sharp FU-40SES Operation Manual - Page 9
Removing The Unit
 |
View all Sharp FU-40SES manuals
Add to My Manuals
Save this manual to your list of manuals |
Page 9 highlights
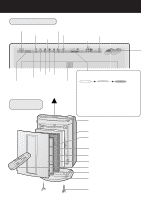
2 Mount mounting bracket 1 • Install it after you ask a specialist and you can get the confirmation of the strength. • Mount the bracket using the included wood screws (long screws) so that it level. Use 4 wood screws (long screws) Mounting bracket 1 Wood screws (4 units) Wood Use 3 wood screws (long screws) 4 Place the 2 cushions Cushions (2 units) 5 Mount the main unit (1) Align the horizontal positions of mounting brackets 1 and 2 and hook the bracket 2 to bracket 1. (2) Hold the bottom of the main unit, pull the unit towards you and then pull down. ENGLISH Mounting bracket 1 Wood screws (3 units) Wood 6 Check the installation • Check to make sure that the tabs on mounting bracket 2 are securely mounted to the tabs on mounting bracket 1. • Check that the power cord is not pinched. 3 Mount mounting bracket 2 to the main unit Mount the bracket to the back of the main unit using the included small screws (2 units). Do not use wood screws (long screws) Mounting bracket 2 Small screws (2 units) REMOVING THE UNIT Pull the bottom of the unit towards you and then lift. NOTES • When removing the unit, use a firm stand. • Disconnect the power cord before removing the unit. E-7
-
 1
1 -
2
-
3
-
 4
4 -
 5
5 -
 6
6 -
 7
7 -
 8
8 -
 9
9 -
 10
10 -
 11
11 -
 12
12 -
 13
13 -
 14
14 -
15
-
16
-
17
-
18
 |
 |
