Sharp LC-20D30U LC-20D30U Operation Manual - Page 24
Basic Adjustment Settings Continued
 |
View all Sharp LC-20D30U manuals
Add to My Manuals
Save this manual to your list of manuals |
Page 24 highlights
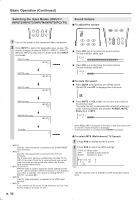
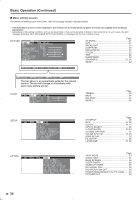
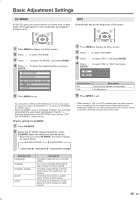
Basic Adjustment Settings (Continued) BACKLIGHT You can adjust the brightness of the picture. PICTURE Adjustments You can adjust the picture to your preference with the following picture settings. 1 Press MENU to display the Menu screen. 2 Press \/| to select "PICTURE". 3 Press '/" to select "BACKLIGHT". PICTURE�� AUDIO� � SETUP� ��OPTION AV�MODE���[DYNAMIC OPC OFF] B A C K L I G H T � [ BRIGHT C O N T R A S T 4 �0 B R I G H T N E S S 0 COLOR 5 TINT 0 S H A R P N E S S 0 ADVANCED RESET 4 Press \/| to adjust the item to the desired position. 5 Press MENU to exit. A • "BACKLIGHT" cannot be adjusted while "OPC" is set to "ON". Directly setting the BACKLIGHT 1 Press BACKLIGHT to display the BACKLIGHT screen. OPC�ON BACKLIGHT[AUTO] 2 Press BACKLIGHT to change the setting. OPC OFF BACKLIGHT [BRIGHT] OPC OFF BACKLIGHT [NORMAL] OPC ON BACKLIGHT [AUTO] OPC OFF BACKLIGHT [VARIABLE] OPC OFF BACKLIGHT [DARK] A • The BACKLIGHT screen automatically disappears in 3 seconds. • [BRIGHT]: Maximum brightness [NORMAL]: Suitable for viewing in a well-lit area. Saves energy. [DARK]: Sufficiently bright when viewing in dim areas. [VARIABLE]:The brightness can be adjusted to suit your preference using \/|. [AUTO]: Screen brightness adjusts according to the ambient light of the room to conserve power consumption. The OPC indicator lights up green. • When set to "AUTO", make sure no object obstructs the OPC sensor, which could affect its ability to sense surrounding light. 1 Press MENU to display the Menu screen. 2 Press \/| to select "PICTURE". 3 Press '/" to select a specific adjustment item. PICTURE�� AUDIO� � SETUP�� �OPTION AV�MODE���[DYNAMIC] OPC OFF] B A C K L I G H T � [ BRIGHT�] C O N T R A S T 4 �0 ] B R I G H T N E S S 0 COLOR 5 TINT 0 ] S H A R P N E S S 0 ADVANCED RESET 4 Press \/| to adjust the item to the desired position. 5 Press MENU to exit. Selected item \ button BACKLIGHT The screen dims CONTRAST For less contrast BRIGHTNESS For less brightness COLOR For less color intensity TINT Skin tones become purplish SHARPNESS For less sharpness | button The screen brightens For more contrast For more brightness For more color intensity Skin tones become greenish For more sharpness A • Select "ADVANCED", and press ENTER to set "COLOR TEMP.", "I/P SETTING", "NOISE CLEAN", "FILM MODE" or "QUICK SHOOT". See pages 23 and 24. • The items on the "ADVANCED" menu (except for "COLOR TEMP.") cannot be set when the PC mode is selected as an input mode. • When resetting all adjustment items (except for the items on the "AV MODE", "OPC" and "ADVANCED" menus) to factory preset values, perform the following procedure. 1 Press '/" to select "RESET" in the PICTURE screen, and press ENTER. 2 Press '/" to select "YES", and press ENTER. 22
-
 1
1 -
2
-
3
-
4
-
5
-
6
-
7
-
8
-
9
-
10
-
11
-
12
-
13
-
14
-
15
-
16
-
17
-
18
-
 19
19 -
 20
20 -
 21
21 -
 22
22 -
 23
23 -
 24
24 -
 25
25 -
 26
26 -
 27
27 -
 28
28 -
 29
29 -
30
-
31
-
32
-
33
-
34
-
35
-
36
-
37
-
38
-
39
-
40
-
41
-
42
-
43
-
44
-
45
 |
 |
