Sharp LC-45GD7U LC-45GD7U Operation Manual
Sharp LC-45GD7U Manual
 |
View all Sharp LC-45GD7U manuals
Add to My Manuals
Save this manual to your list of manuals |
Sharp LC-45GD7U manual content summary:
- Sharp LC-45GD7U | LC-45GD7U Operation Manual - Page 1
LC-45GD7U LIQUID CRYSTAL TELEVISION ENGLISH OPERATION MANUAL • The illustrations and on-screen displays in this operation manual are for explanation purposes and may vary slightly from the actual operations BACK). NO USER-SERVICEABLE PARTS INSIDE. REFER SERVICING TO QUALIFIED SERVICE PERSONNEL. The - Sharp LC-45GD7U | LC-45GD7U Operation Manual - Page 2
STAND, TRIPOD, BRACKET, OR TABLE RECOMMENDED BY THE MANUFACTURER OR SOLD WITH THE PRODUCT. FOLLOW THE MANUFACTURER'S INSTRUCTIONS WHEN INSTALLING THE PRODUCT AND USE MOUNTING SHARP LIQUID CRYSTAL TELEVISION, MODEL LC-45GD7U This device complies with Part 15 of the FCC Rules. Operation /TV technician - Sharp LC-45GD7U | LC-45GD7U Operation Manual - Page 3
not sure of the type of power supply to your home, consult your product dealer or local power company. For products intended to operate from battery power, or other sources, refer to the operating instructions. 16) Overloading - Do not overload wall outlets, extension cords, or integral convenience - Sharp LC-45GD7U | LC-45GD7U Operation Manual - Page 4
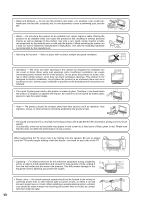
as damage to the product. Use only a cart, stand, tripod, bracket or table recommended by the manufacturer or sold with the product. When mounting the product on a wall, be sure to follow the manufacturer's instructions. Use only the mounting hardware recommended by the manufacturer. • Selecting the - Sharp LC-45GD7U | LC-45GD7U Operation Manual - Page 5
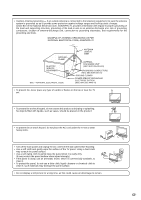
INSTRUCTIONS • Outdoor Antenna Grounding - If an outside antenna is connected to the television 810-21) GROUND CLAMPS POWER SERVICE GROUNDING ELECTRODE SYSTEM (NEC ART 250, PART H) • To prevent the TV set or other heavy items. • Turn off the main power and unplug the AC cord from the wall outlet - Sharp LC-45GD7U | LC-45GD7U Operation Manual - Page 6
. The AQUOS television is designed for AC use only and should be used with supplied AC cord PARTS OF ANY CABLES WITH THE AC CORD CONNECTED. POWER B) POWER indicator on the front of the AQUOS television lights blue. POWER indicator NOTE • The TV can be swiveled 5 degrees right and left with TV stand - Sharp LC-45GD7U | LC-45GD7U Operation Manual - Page 7
does not light up, press TV POWER on the remote control to turn the power on. IMPORTANT: IF THE UNIT DOES NOT POWER ON - UNPLUG THE AQUOS TELEVISION FROM THE OUTLET AND REPEAT THE INSTALLATION STEPS. IF YOU STILL ENCOUNTER NO POWER, PLEASE CONTACT US AT 1-800-BE-SHARP. Please refer to the BASIC - Sharp LC-45GD7U | LC-45GD7U Operation Manual - Page 8
QUICK REFERENCE TV GUIDE ON SCREEN™ QUICK SETUP SHEET Once you set up the TV according to this operation manual, you are ready to set up TV Guide On Screen! Note: TV Guide On Screen™ interactive program guide supports cable-ready, cable box and digital cable services as well as over-the-air - Sharp LC-45GD7U | LC-45GD7U Operation Manual - Page 9
Setup • TV Guide uses setup information to provide TV listings and lineups. 5 The first two screens ask you about your 9 This screen asks you about a VCR. location. Follow the on-screen instructions have successfully completed setup for TV Guide On Screen. Important: Power off your recorder - Sharp LC-45GD7U | LC-45GD7U Operation Manual - Page 10
11 Supplied accessories 12 Part names 13 TV (Front 13 TV (Rear 14 Remote control unit 15 Preparation 16 Using the remote control unit 16 Cautions regarding remote control unit ... 16 Antennas 16 Watching TV 17 Turning on the power 17 Turning off the power 17 Initial setup 18 Using the TV - Sharp LC-45GD7U | LC-45GD7U Operation Manual - Page 11
of the program 74 Picture and still image 74 Presetting remote control function 74 Appendix 79 Removing speakers 79 Removing the stand 80 Setting the TV on the wall 80 Troubleshooting 81 Troubleshooting-TV Guide On Screen ......... 82 Troubleshooting-Digital broadcasting ......... 83 PC - Sharp LC-45GD7U | LC-45GD7U Operation Manual - Page 12
are provided with the product. Remote control unit (g1) "AAA" size battery (g2) AC cord (g1) Page 7 Cable clamp (g1) Page 7 Cable tie (g1) Page 6 G-LINK cable (g1) Page 6 Operation manual (g1) Page 6 Page 8 NOTE • Always use the AC cord supplied with the LCD-TV. • AC cords enclosed in this - Sharp LC-45GD7U | LC-45GD7U Operation Manual - Page 13
as a/b in TV Guide On Screen Remote control sensor OPC sensor POWER indicator OPC indicator SLEEP indicator DL indicator Headphone jack (When connecting headphones, the sound from the speakers is muted.) NOTE • See page 17 for the TV status indicator. *OPC: Optical Picture Control (See page 41 - Sharp LC-45GD7U | LC-45GD7U Operation Manual - Page 14
Part names TV (Rear) MONITOR OUT/ REC. OUT terminals INPUT 3 terminals INPUT 1 terminals off • Image position initializes ** Press SYSTEM RESET if the TV does not operate after starting up. NOTE • Pressing RESET will not work if the TV is in standby mode. • Pressing RESET will not delete channel - Sharp LC-45GD7U | LC-45GD7U Operation Manual - Page 15
Part names Remote control unit 1 17 2 3 18 4 19 5 20 6 21 7 22 8 23 9 24 10 25 11 26 27 12 28 13 29 14 30 15 31 16 32 1 TV POWER: Switches the Liquid Crystal Television power remote control for TV, CBL/ SAT, VCR, DVD and AUDIO operation 25 TV GUIDE: Displays TV Guide - Sharp LC-45GD7U | LC-45GD7U Operation Manual - Page 16
direct sunlight or strong lighting. In such cases, change the angle of the lighting or the TV, or operate the remote control unit closer to the remote control sensor. Antennas To enjoy a clearer picture, use an outdoor antenna. The following is a brief explanation of the types of connections that - Sharp LC-45GD7U | LC-45GD7U Operation Manual - Page 17
Watching TV Simple operations for watching a TV program Turning on the power POWER OPC indicator DL indicator POWER indicator TV POWER Press POWER on the TV or press TV POWER on the remote control. • POWER indicator (Blue): The TV is on. (After a few seconds, a window appears with sound.) NOTE - Sharp LC-45GD7U | LC-45GD7U Operation Manual - Page 18
Watching TV Initial setup When you turn on the TV for the first time, it will automatically memorize the broadcasting channels where you live. Perform the following steps before you press TV POWER on the remote control unit. 1. Insert the batteries into the remote control unit. (See page 7.) 2. - Sharp LC-45GD7U | LC-45GD7U Operation Manual - Page 19
TV (TV Guide On Screen) Using the TV Guide On Screen™ (Interactive Program Guide) The TV Guide On Screen system is a free, on-screen interactive television program guide ("IPG") built into your LCD-TV. The TV Guide On Screen system was developed to help today's TV the remote control. TV Guide On - Sharp LC-45GD7U | LC-45GD7U Operation Manual - Page 20
follow the instructions below. The TV must be off to download information. Leave your TV off overnight to receive the initial download in your area. (Refer to Troubleshooting-TV Guide On Screen on page 82 for details.) TV Guide On Screen Initial setup The Guide uses Setup information to provide - Sharp LC-45GD7U | LC-45GD7U Operation Manual - Page 21
your cable box turned on, and then press ENTER. 2 Indicate the cable service connection. Press a/b to select "Yes" or "No", and then press ENTER. • is "No", skip to step 11. NOTE • To receive TV program listings in the TV Guide On Screen system, please ensure to connect your cable box to - Sharp LC-45GD7U | LC-45GD7U Operation Manual - Page 22
-date listings will begin loading over the next 24 hours when your LCD-TV is powered off. (Do not unplug the AC cord.) • It may take more cord.) • You must redo the TV Guide On Screen system setup if you: - Move your LCD-TV to a new ZIP or postal code. - Cancel cable service or change cable boxes. - - Sharp LC-45GD7U | LC-45GD7U Operation Manual - Page 23
area. The options and features illustrated in this manual are subject to change when updates are downloaded from the TV Guide On Screen service to your TV. • The TV Guide On Screen system does not display program listings for satellite TV systems. Choosing a program to watch - Using the LISTINGS - Sharp LC-45GD7U | LC-45GD7U Operation Manual - Page 24
Watching TV (TV Guide On Screen) Searching programs You can search for programs alphabetically, by category - HDTV, MOVIES, SPORTS, CHILDREN, the LISTINGS screen is displayed, press MENU. Press a/b to select "go to Service Bar" from the "Episode Options" menu, and press ENTER. 2 Press - Sharp LC-45GD7U | LC-45GD7U Operation Manual - Page 25
TV (TV Guide On Screen) Edit keyword This Guide stores all the keywords you created. 1 When the LISTINGS screen is displayed, press MENU. Press a/b to select "go to Service to select "tune to channel". You can watch the program on the LCD-TV. NOTE • On the "Episode Options", if you want to set - Sharp LC-45GD7U | LC-45GD7U Operation Manual - Page 26
ENTER to display "Record Options". Using RECORD button on the remote control 1 Press a/b/c/d to select the program you want to record as a recording device. Setup items Selectable items Description frequency once/regularly/weekly/ off power on TV yes/no auto tune TV yes/no when on time - Sharp LC-45GD7U | LC-45GD7U Operation Manual - Page 27
Watching TV (TV Guide On sort Record and Remind programs in Press a/b to select "go to Service Bar", and SCHEDULE list. then press ENTER. 2 Press c/d to reminder one time. Indicates the program is set to remind daily (manual remind setting only). Set a program reminder every time the program airs - Sharp LC-45GD7U | LC-45GD7U Operation Manual - Page 28
Watching TV (TV Guide On Screen) Delete recording 1 Repeat steps 1 and 2 in Using SCHEDULE function. 2 Press a/b to select the program you want to delete. 3 Press MENU to display "Schedule Options". New manual recording Aside from setting recordings using the program LISTINGS menus, you can - Sharp LC-45GD7U | LC-45GD7U Operation Manual - Page 29
Press a/b to select "new manual reminder" and then press ENTER. Changing system settings After you initially complete Guide Setup, you can make changes to System settings in the "SETUP" screen. 1 Press TV GUIDE and then press MENU. 2 Press a/b to select "go to Service Bar" in "Episode Options - Sharp LC-45GD7U | LC-45GD7U Operation Manual - Page 30
- the channel is only displayed when program information is available 1 Press TV GUIDE and then press MENU. 7 Press a/b to select "done", and being received you may be able to select "service". 30 Setup items Info box size box cycle auto guide Selectable items last used/no/small/ large all/ - Sharp LC-45GD7U | LC-45GD7U Operation Manual - Page 31
TV (TV Guide On Screen) Record default options 1 Press TV GUIDE and then press MENU. Remind Default Options 1 Press TV GUIDE and then press MENU. 2 Press a/b to select "go to Service set the following items. Setup items power on TV Selectable items yes/no auto tune TV yes/no when on time - Sharp LC-45GD7U | LC-45GD7U Operation Manual - Page 32
methods below . Method 1 Using CHr/s on the remote control unit or on the TV. Method 2 1. Press FLASHBACK to switch to the 1 NOTE • When you enter 0-9 only, channel selection will be made if there is no operation for a few seconds. • If you push "0" by itself, nothing will happen. • Complete the - Sharp LC-45GD7U | LC-45GD7U Operation Manual - Page 33
volume, press VOL k. • To decrease the volume, press VOL l. Volume adjustment 20 Mute 20 NOTE • VOL l/kon the TV operates the same as VOL k/l on the remote control unit. Audio status Output device Speaker Output Select Fixed Variable Variable sound Mute MONITOR OUT Constant as specified - Sharp LC-45GD7U | LC-45GD7U Operation Manual - Page 34
sound.) If stereo sound is difficult to hear. • Obtain a clearer sound by manually switching to fixed mono-sound mode. NOTE • MTS only operates while in TV mode. You can change MTS as shown below to match the television broadcast signal. Setting Digital broadcasting audio mode The types of audio - Sharp LC-45GD7U | LC-45GD7U Operation Manual - Page 35
Setup HDTV programs. (See page 49.) s When you change your address (See page 78.) s About EAS (Emergency Alert System) (See page 78.) Conditional Access Pairing Information Diagnostic Screen ECM 1 Turn on the power of the TV operator cable service for a/b on your remote control to display the rest - Sharp LC-45GD7U | LC-45GD7U Operation Manual - Page 36
Balance Page 43 Dolby Virtual Page 43 Power Control No Signal Off Page 44 No Operation Off Page 44 Setup EZ Setup Page 37 CH Setup Pages 37, 38 Antenna Setup-DIGITAL Page 38 Input Label Page 61 Parental CTRL Pages 68-73 Position Page 58 Picture Flip Page 61 Standby Mode Page 39 Language - Sharp LC-45GD7U | LC-45GD7U Operation Manual - Page 37
9. Channel Setup If initial setup does not memorize all the channels in your region, follow the instructions below to manually memorize the move down. Select "Search Start", and then press ENTER. • This operation makes the TV search for both ANALOG, DIGITAL (Air) and DIGITAL (Cable) channels. - Sharp LC-45GD7U | LC-45GD7U Operation Manual - Page 38
• Off: Does not skip channels. (Channel selection enabled using CHr/s.) NOTE • Make sure what kind of connection is made with your TV. Antenna Setup - DIGITAL - Air In order to receive digital air broadcasts, you need a digital broadcast antenna. You can confirm the antenna configuration through - Sharp LC-45GD7U | LC-45GD7U Operation Manual - Page 39
1 Press MENU and the MENU screen displays. 2 Press c/d to select "Setup". 2 Press a/b to select "1 Data Clear", and then press ENTER. then press ENTER. Selected item Description Mode1 Starting TV is quick from standby. Mode2 Power consumption is small at the standby. Favorite channel - Sharp LC-45GD7U | LC-45GD7U Operation Manual - Page 40
for AV source MENU [Picture] Picture Audio OPC Off On Backlight [+16] -16 Contrast [+30] 0 Brightness [ 0] -30 Color [ 0] -30 Tint [ 0] -30 Sharpness [ 0] -10 Advanced Reset On : Display +16 +40 +30 +30 +30 +10 3 Press a/b to select a specific adjustment item. 4 Press c/d to - Sharp LC-45GD7U | LC-45GD7U Operation Manual - Page 41
screen displays. 2 Press c/d to select "Picture". 3 Press a/b to select "Advanced", and then press ENTER. 4 Press a/b to select a specific adjustment item. • You can select "C.M.S-Hue", "C.M.S- Saturation", "C.M.S-Value", "Color Temp.", "Sharpness Enhancement", "Automatic Contrast", "3D - Sharp LC-45GD7U | LC-45GD7U Operation Manual - Page 42
with more depth by adjusting background sharpness. NOTE • The higher the number of the level, the more sharpness and depth you will get in images analyzes it then recreates each still film frame for high-definition picture quality. Selected item Description Off Normal viewing mode On Detects, - Sharp LC-45GD7U | LC-45GD7U Operation Manual - Page 43
Power Control specific remote control unit. • Audio menu is grayed out when Output Select is set to "Variable". • "Balance", "Treble" and "Bass" are grayed out when Dolby Virtual is set to "On". • For some discs, setup may be required on your DVD. In this case, please refer to the operation manual - Sharp LC-45GD7U | LC-45GD7U Operation Manual - Page 44
using the PC and the signal inputs again, the TV stays off. • The TV turns on again by pressing TV POWER on the remote control unit. (See page 17). • Pressing POWER on the TV will have the same result. • If no signal inputs for 8 seconds, the TV enters standby mode. • When you start using the PC - Sharp LC-45GD7U | LC-45GD7U Operation Manual - Page 45
• "Manual" is factory preset value. REC Picture Size Picture Size 4 : 3 TV 16 : 9 TV 5 Press c/d to select the desired picture size, and then press ENTER. Selected item 4:3 TV 16:9 TV Description Bars may appear on the top and bottom with some programs Displays in full screen Audio Setup - Sharp LC-45GD7U | LC-45GD7U Operation Manual - Page 46
remote control unit or on the TV. (See page 60.) INPUT SOURCE TV CableBox [TV On] Caption Setup Program Title operation manual (DVD player, PC, etc.) carefully before making connections. • Each time INPUT is pressed, the input source toggles. • Refer to your external equipment operation manual - Sharp LC-45GD7U | LC-45GD7U Operation Manual - Page 47
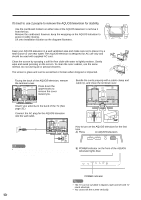
Using external equipment Connecting a DVD player You can use the INPUT 1, INPUT 2, INPUT 4 or INPUT 5 terminals when connecting to a DVD player and other audiovisual equipment. When using component cable. Audio cable (commercially available) Component video cable (commercially available) When - Sharp LC-45GD7U | LC-45GD7U Operation Manual - Page 48
connection is necessary if you want to use the recording features of the TV Guide On Screen system with your VCR. G-LINK cable S-video cable (commercially whether for the purpose of viewing or not, will cause an inferior quality picture to be displayed. This is not a fault of the equipment. Please - Sharp LC-45GD7U | LC-45GD7U Operation Manual - Page 49
composite cable. Cable box connection (for TV Guide On Screen) G-LINK cable AV cable (commercially available) Digital TV STB G-LINK cable This end is connected to the TV. Cable Box 1 inch G-LINK wand NOTE • To receive TV program listings in the TV Guide On Screen system, please connect your - Sharp LC-45GD7U | LC-45GD7U Operation Manual - Page 50
select "INPUT4" from "INPUT SOURCE" menu using INPUT on the remote control unit or on the TV. (See page 60.) INPUT SOURCE 5 Press a/b to select the HDMI Setup", and then • Refer to your external equipment operation manual for press ENTER. the signal type. MENU [Option ... HDMI Setup] - Sharp LC-45GD7U | LC-45GD7U Operation Manual - Page 51
a PC Use the INPUT 5 terminal to connect a PC. NOTE • Refer to page 83 for a list of PC signals compatible with the TV. ø 3.5 mm stereo minijack cable (commercially available) DVI cable (commercially available) PC with DVI terminal ø 3.5 mm stereo minijack cable (commercially available) RGB - Sharp LC-45GD7U | LC-45GD7U Operation Manual - Page 52
specifications for this TV and therefore cannot be connected via i.LINK. Even for the types of i.LINK device mentioned above, device recognition, control, recording and playback operations This TV can relay data during power off, by selecting "Active" in the "Standby Mode" option in "i.LINK Setup". ( - Sharp LC-45GD7U | LC-45GD7U Operation Manual - Page 53
during stand-by mode. Data cannot be relayed at this 5 Press c/d to select "Auto" or "Pass setting. through", and then press ENTER. NOTE • Normally, this should be set to "Pass through". • When the main power of the TV is in standby mode (POWER indicator lights off), i.LINK control commands - Sharp LC-45GD7U | LC-45GD7U Operation Manual - Page 54
TV's operation of an i.LINK device • By disabling the TV's operation of an i.LINK device, the device can be operated from another i.LINK device. 1 Press i.LINK to display the i.LINK control be automatically set as a recording device in the TV Guide On Screen system and may be used to record - Sharp LC-45GD7U | LC-45GD7U Operation Manual - Page 55
compatible device can be controlled from the TV using the i.LINK control panel on the screen. • The steps in "i.LINK Setup" on page 53 need to be completed beforehand. • Please also refer to the operation manual of the i.LINK device to be used with this TV. Basic operation 1 Press i.LINK to display - Sharp LC-45GD7U | LC-45GD7U Operation Manual - Page 56
the recording may fail. Do not use the TV's control panel to operate the D-VHS deck during timer recording. • To record the picture and sound of a digital program which the TV is receiving, use D-VHS tape. VHS or S-VHS tape will not record. Notes specifically on i.LINK connection of AV-HDD recorder - Sharp LC-45GD7U | LC-45GD7U Operation Manual - Page 57
, the steps in "i.LINK Setup" on page 53 need to be completed beforehand. • Please also refer to the operation manual of the AVHDD recorder/Blu-ray Disc recorder to be used with this TV. 1 Select a digital program to be recorded. 2 Press i.LINK to display the i.LINK control panel. 3 Press - Sharp LC-45GD7U | LC-45GD7U Operation Manual - Page 58
picture's horizontal and vertical position. 1 Press MENU and the MENU screen displays. 2 Press c/d to select "Setup Once the TV shuts down or enters standby mode, the setting is erased. To move the picture around the screen power is switched off the image will return to the previously memorized - Sharp LC-45GD7U | LC-45GD7U Operation Manual - Page 59
picture as necessary to change image position using Auto Sync. In some cases, however, manual adjustment is needed to optimize the image. 2 Press c/d to select "Setup while executing Auto Sync. • Be sure to connect the PC to the TV and switch it on before starting Auto Sync. 5 Press c/d to adjust - Sharp LC-45GD7U | LC-45GD7U Operation Manual - Page 60
connect the equipment beforehand. • When the CableBox is selected in TV Guide On Screen setting, CableBox will be displayed in the INPUT SOURCE set INPUT1 and INPUT2 to Auto, the TV will automatically select the input signal. • Check the operation manual of the external equipment for the signal type - Sharp LC-45GD7U | LC-45GD7U Operation Manual - Page 61
and the MENU screen displays. 3 Press c/d to select "Setup". 4 Press a/b to select "Input Label", and then press ENTER. 5 Press a/b/c/d to select the new name for the input mode, and then press ENTER. INPUT SOURCE TV CableBox [TV] DVD INPUT2 INPUT3 INPUT4 INPUT5 i.LINK (Example) NOTE • You - Sharp LC-45GD7U | LC-45GD7U Operation Manual - Page 62
DYNAMIC AV MODE: DYNAMIC (Fixed) AV MODE: GAME AV MODE: USER S.Stretch (Smart stretch): Suitable for stretching 4:3 programs to fill the different AV MODE item for each input mode. (For example, select STANDARD for TV input and DYNAMIC for VIDEO input.) 62 Stretch: This mode is useful for 1. - Sharp LC-45GD7U | LC-45GD7U Operation Manual - Page 63
Useful adjustment settings a View Mode Normal Zoom Stretch Dot by Dot View mode (for PC input mode) You can select the screen size. NOTE • Connect the PC before making adjustments. (See page 51.) • Selectable screen size may vary with input signal type. 1 Press VIEW MODE. • The View mode menu - Sharp LC-45GD7U | LC-45GD7U Operation Manual - Page 64
received. In such case, you have to set the correct signal manually. After setting once, it will display when the same signal ( Off High Low NOTE • You can only select the "Input Signal" on the Setup menu when receiving one of the 6 input signals listed above. Mosquito Noise Reduction Reduces - Sharp LC-45GD7U | LC-45GD7U Operation Manual - Page 65
MONITOR OUT terminal is not adjustable and constantly outputs. • Sound via the MONITOR OUT terminal is adjusted with VOL k/l on the remote control unit or VOL l/k on the TV. • Sound via speaker is muted. Quick Shoot Use Quick Shoot to view fast-action video more clearly. 1 Repeat steps 1 and 2 in - Sharp LC-45GD7U | LC-45GD7U Operation Manual - Page 66
some VHS home video tapes, at the election of the program provider. • Digital Closed Caption service is a new caption service available only on digital TV programs (also at the election of the service provider). It is a more flexible system than the original Closed Caption system, because it allows - Sharp LC-45GD7U | LC-45GD7U Operation Manual - Page 67
. 1 Press MENU and the MENU screen displays. 2 Press c/d to select "Option". 3 Press a/b to select "Caption Setup", and then press ENTER. 4 Press a/b to select a specific adjustment item. • You can choose 7 items here; they are, 1 "Caption Size", 2 "Font Style", 3 "Foreground Color - Sharp LC-45GD7U | LC-45GD7U Operation Manual - Page 68
71 and 73 for details.) Setting parental control status Used to enable or disable the parental control function. 1 Repeat steps 1 to 3 Press a/b to select "Status", and then press ENTER. 2 Press c/d to select "Setup". 3 Press a/b to select "Parental CTRL", and then press ENTER. 4 Press a/b - Sharp LC-45GD7U | LC-45GD7U Operation Manual - Page 69
5 Input the old 4-digit number you have set using 0 - 9. MENU [Setup ... Parental CTRL ... Secret No.] Yes No New Secret No. Secret No. Clear your secret number, initialize the Liquid Crystal Television to return all settings except for the TV channel settings to factory preset values. (See - Sharp LC-45GD7U | LC-45GD7U Operation Manual - Page 70
your TV. This tool gives parents a great degree of control over Motion Picture Association of America (MPAA) as watched on cable TV and not edited for television. in the data of older movies. MENU [Setup ... Parental CTRL ... V-Chip] MPAA TV Guidelines Can. English Ratings Can. French Ratings - Sharp LC-45GD7U | LC-45GD7U Operation Manual - Page 71
Useful adjustment settings TV Parental Guidelines (TV Guidelines) Voluntary movie rating system (MPAA) 1 Press MENU and the MENU screen displays. 2 Press c/d to select "Setup". 3 Press a/b to select "Parental CTRL", and then press ENTER. • Secret number setting menu displays only when " - Sharp LC-45GD7U | LC-45GD7U Operation Manual - Page 72
Useful adjustment settings Canadian Rating Systems • The TV rating systems in Canada are based on the Canadian Radio-Television and Telecommunications Commission (CRTC) policy on violence in television programming. • While violence is the most important content element to be rated, the structure - Sharp LC-45GD7U | LC-45GD7U Operation Manual - Page 73
c/d to select "Setup". 3 Press a/b 0 - 9. MENU [Setup ... Parental CTRL] Setup Option Secret No. ---- (See page 68.) Example MPAA TV Guidelines Can. English Ratings Can. shown below. MPAA TV Guidelines Can. English Select "V-Chip" setting ("MPAA", "TV Guidelines", PG 14+ "Can. - Sharp LC-45GD7U | LC-45GD7U Operation Manual - Page 74
audio via digital audio output terminals, is restricted. You can operate the connected AV products (AV Receiver, Cable Box, SAT tuner, DTV, VCR, DVD, LD) using the presetting manufacturer function for your remote control unit. Icon Description Digital copying prohibited One digital copy only - Sharp LC-45GD7U | LC-45GD7U Operation Manual - Page 75
, 17, 18, 20, 21, 24, 25 08, 10, 29, 30, 43*, 46 04, 05 16, 27, 44*, 45* 01, 26 28 04, 05, 09, 15, 17, 18, 20, 21, 24, 25 06, 14 NOTE • Numbers marked with * are SAT codes, all others are CATV codes. AUDIO BRAND Sharp REMOTE CONTROL CODE NUMBER 01 75 - Sharp LC-45GD7U | LC-45GD7U Operation Manual - Page 76
Other viewing options 1 2 3 4 1 2 3 Cable control buttons When the FUNCTION is set to CBL/SAT the cable converter connected to the TV can operate using 1 to 4. 1 SOURCE POWER Turns the cable converter power on and off. 2 0-9 Press a button (or buttons) that corresponds to the channel that you wish - Sharp LC-45GD7U | LC-45GD7U Operation Manual - Page 77
FUNCTION of the remote control unit is set to VCR. • When the input selector button having the same number as the input terminal connecting the VCR is pressed, the VCR can operate using 1 to 8. 1 CH r/s Press to select the channel of the TV tuner on the VCR. 2 SOURCE POWER Turns the power of the VCR - Sharp LC-45GD7U | LC-45GD7U Operation Manual - Page 78
the user can still change the channel. • If the unit is force tuned to a channel that has been blocked by Parental Control, the Parental Control alert text message does not output from MONITOR OUT terminal. • While TV Guide On Screen is on display, force tuning and alert text messages are NOT - Sharp LC-45GD7U | LC-45GD7U Operation Manual - Page 79
. Perform the same steps for both sides. CAUTION • Do not remove the stand and speaker from the TV unless using an optional bracket to mount it. • Before performing work spread cushioning over the base area to lay the TV on. This will prevent it from being damaged. NOTE • To attach the speakers - Sharp LC-45GD7U | LC-45GD7U Operation Manual - Page 80
themselves. SHARP bears no responsibility for improper mounting or mounting that results in accident or injury. Using an optional bracket to mount the TV • You can ask a qualified service professional about using an optional bracket to mount the TV to the wall. • Carefully read the instructions that - Sharp LC-45GD7U | LC-45GD7U Operation Manual - Page 81
Troubleshooting Problem • No power Possible Solution • Check if you pressed TV POWER on the remote control unit. (See page 17.) If the indicator on the TV is off, press POWER on the TV. • Is the AC cord disconnected? (See page 6.) • Unit cannot be operated • Is picture adjustment correct? trouble - Sharp LC-45GD7U | LC-45GD7U Operation Manual - Page 82
Appendix Troubleshooting-TV Guide On Screen Problem Possible Solution • LISTINGS disappeared after a • You should begin to receive listings again within 24 hours. power failure. • Some channel numbers in the TV • You can correct them using "Changing channel display" under SETUP. Guide On Screen - Sharp LC-45GD7U | LC-45GD7U Operation Manual - Page 83
• Displayed when the device you have selected is already being used by another i.LINK connected device. To operate the selected device from the TV, you will first have to override control from the other device. PC compatibility chart PC/MAC PC MAC13" MAC16" MAC19" Resolution Horizontal Frequency - Sharp LC-45GD7U | LC-45GD7U Operation Manual - Page 84
specifications PC Control of the TV • When a program is set, the TV can be controlled the supplied Din/D-Sub RS-232C for the connections. NOTE • This operation system control: None Communication procedure Send the control commands from the PC via the RS-232C connector. The TV operates according - Sharp LC-45GD7U | LC-45GD7U Operation Manual - Page 85
operate. CONTROL ITEM COMMAND PARAMETER CONTROL CONTENTS POWER operation in inside. 1 _ _ _ STANDARD 2 _ _ _ MOVIE 3 _ _ _ GAME 4 _ _ _ USER Part numbers, 5-digit, more than 10,000) CH UP C H U P x _ _ _ The channel number of TV ם1 If it is not TV display, it will input-switch to TV - Sharp LC-45GD7U | LC-45GD7U Operation Manual - Page 86
Operation manual (m1), Remote control unit (m1), AC cord (m1), "AAA" size battery (m2), Cable clamp (m1), G-LINK cable (m1), Cable tie (m1) Operating temperature e32°F to e104°F (0°C to e40°C) • As part of policy of continuous improvement, SHARP reserves the right to make design and specification - Sharp LC-45GD7U | LC-45GD7U Operation Manual - Page 87
TV. All setting items (except TV channel) return to the factory presetting. NOTE • Running the factory presetting operation also clears the secret number. You can run the EZ Setup again by using the following steps. 1 Turn on the power of the TV from this manual, and keep it in a familiar place. 87 - Sharp LC-45GD7U | LC-45GD7U Operation Manual - Page 88
VARY FROM STATE TO STATE. Model Specific Section Your Product Model Number & Description: LC-45GD7U Color Television (Be sure to have this information available when you need service for your Product.) Warranty Period for this Product: One (1) year parts and labor from the date of purchase - Sharp LC-45GD7U | LC-45GD7U Operation Manual - Page 89
of abusive operation, negligence, accident, improper installation or inappropriate use as outlined in the owner's manual. (b) Any Sharp product tampered with, modified, adjusted or repaired by any party other than Sharp, Sharp's Authorized Service Centres or Sharp's Authorized Servicing Dealers
-
 1
1 -
 2
2 -
 3
3 -
 4
4 -
 5
5 -
 6
6 -
 7
7 -
8
-
9
-
10
-
11
-
12
-
13
-
14
-
15
-
16
-
17
-
18
-
19
-
20
-
21
-
22
-
23
-
24
-
25
-
26
-
27
-
28
-
29
-
30
-
31
-
32
-
33
-
34
-
35
-
36
-
37
-
38
-
39
-
40
-
41
-
42
-
43
-
44
-
45
-
46
-
47
-
48
-
49
-
50
-
51
-
52
-
53
-
54
-
55
-
56
-
57
-
58
-
59
-
60
-
61
-
62
-
63
-
64
-
65
-
66
-
67
-
68
-
69
-
70
-
71
-
72
-
73
-
74
-
75
-
76
-
77
-
78
-
79
-
80
-
81
-
82
-
83
-
84
-
85
-
86
-
87
-
88
-
89
 |
 |
1
ENGLISH
LIQUID CRYSTAL TELEVISION
ENGLISH
OPERATION MANUAL
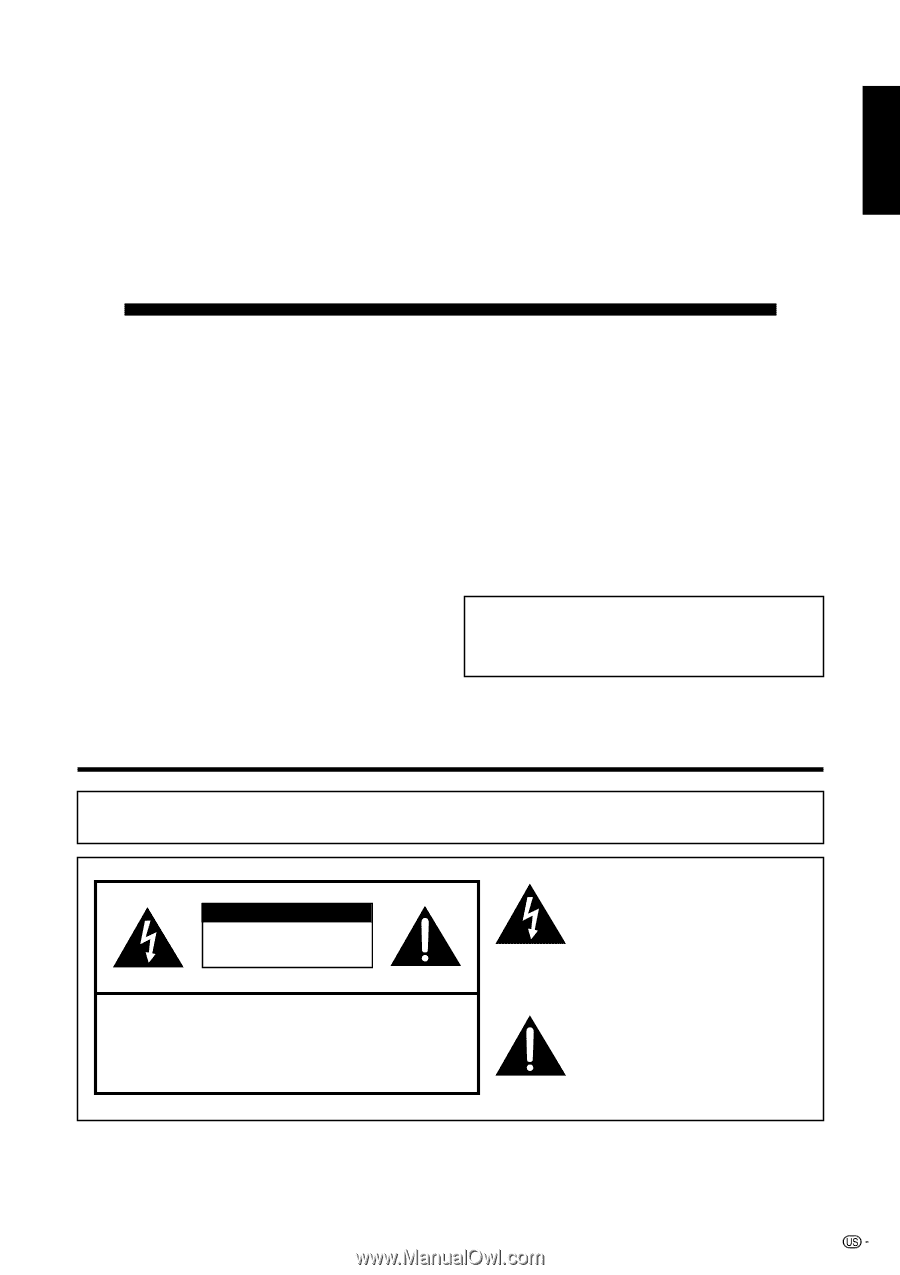
IMPORTANT INFORMATION
WARNING:
TO REDUCE THE RISK OF FIRE OR ELECTRIC SHOCK, DO
NOT EXPOSE THIS PRODUCT TO RAIN OR MOISTURE.
CAUTION
RISK OF ELECTRIC SHOCK
DO NOT OPEN
CAUTION: TO REDUCE THE RISK OF ELECTRIC SHOCK,
DO NOT REMOVE COVER (OR BACK).
NO USER-SERVICEABLE PARTS INSIDE.
REFER SERVICING TO QUALIFIED SERVICE
PERSONNEL.
The lightning flash with arrow-head
symbol, within an equilateral
triangle, is intended to alert the user
to the presence of uninsulated
“dangerous voltage” within the
product’s enclosure that may be of
sufficient magnitude to constitute a
risk of electric shock to persons.
The exclamation point within a
triangle is intended to alert the user
to the presence of important
operating and maintenance
(servicing) instructions in the
literature accompanying the product.
IMPORTANT:
To aid reporting in case of loss or theft, please record
the TV’s model and serial numbers in the space
provided. The numbers are located at the rear of the
TV.
Model No.:
Serial No.:
•
The illustrations and on-screen displays in this operation
manual are for explanation purposes and may vary slightly
from the actual operations.
•
Menu items that are not selectable are grayed out.
LC-45GD7U