Sharp MX-4140N Quick Start Guide - Page 14
Overview Of Copy Operation
 |
View all Sharp MX-4140N manuals
Add to My Manuals
Save this manual to your list of manuals |
Page 14 highlights
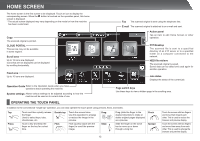
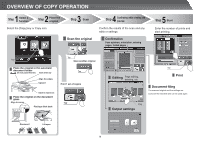
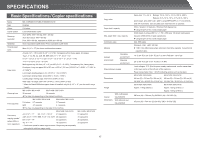
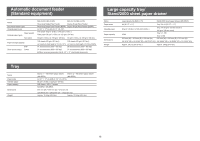
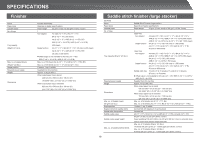
OVERVIEW OF COPY OPERATION 1 Step Select a function 2 Step Place the original Select the [Copy] key or Copy icon. 3 Step Scan Scan the original 4 Step Confirming while viewing the preview Confirm the results of the scan and any edits or settings. Confirmation Face up/down, orientation, missing pages, folded pages 5 Step Start Enter the number of prints and start printing. Tap Place the original in the automatic document feeder Do not pass this line Insert all the way Align the edges Upward Tap Scan another original Tap Print 1 set of copies Adjust to original size Place the original on the document glass Align to corner Tap Placing a thick book Editing Page editing, deleting, etc. Tap Print Document filing The scanned original and the settings are saved on the hard disk and can be used again. Drag Output settings Downward Lift open 14
-
 1
1 -
2
-
3
-
4
-
5
-
6
-
7
-
8
-
 9
9 -
 10
10 -
 11
11 -
 12
12 -
 13
13 -
 14
14 -
 15
15 -
 16
16 -
 17
17 -
 18
18 -
 19
19 -
20
-
21
-
22
-
23
-
24
-
25
-
26
-
27
-
28
 |
 |
