Sharp MX-M260 MX-PB12 Printer Expansion Kit for the MX-M260 MX-M310 - Page 37
MAC OS 9.0 - 9.2.2
 |
View all Sharp MX-M260 manuals
Add to My Manuals
Save this manual to your list of manuals |
Page 37 highlights
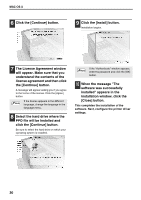
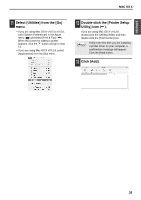
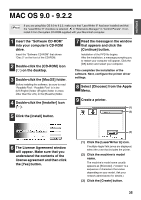
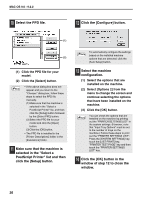
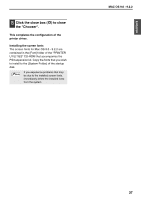
ENGLISH MAC OS 9.0 - 9.2.2 If you are using Mac OS 9.0 to 9.2.2, make sure that "LaserWriter 8" has been installed and that Note the "LaserWriter 8" checkbox is selected in "Extensions Manager" in "Control Panels". If not, install it from the system CD-ROM supplied with your Macintosh computer. 1 Insert the "Software CD-ROM" into your computer's CD-ROM drive. Insert the "Software CD-ROM" that shows "Disc 2" on the front of the CD-ROM. 2 Double-click the [CD-ROM] icon ( ) on the desktop. 3 Double-click the [MacOS] folder. Before installing the software, be sure to read "ReadMe First". "ReadMe First" is in the [US-English] folder ([English] folder in areas other than the U.S.) in the [Readme] folder. 4 Double-click the [Installer] icon ( ). 5 Click the [Install] button. 7 Read the message in the window that appears and click the [Continue] button. Installation of the PPD file begins. After the installation, a message prompting you to restart your computer will appear. Click the [OK] button and restart your computer. This completes the installation of the software. Next, configure the printer driver settings. 8 Select [Chooser] from the Apple Menu. 9 Create a printer. (1) (2) 6 The License Agreement window will appear. Make sure that you understand the contents of the license agreement and then click the [Yes] button. (3) (1) Click the [LaserWriter 8] icon. If multiple AppleTalk zones are displayed, select the zone that includes the printer. (2) Click the machine's model name. The machine's model name usually appears as [SCxxxxxx]. ("xxxxxx" is a sequence of characters that varies depending on your model. Ask your network administrator for details.) (3) Click the [Create] button. 35
-
 1
1 -
2
-
3
-
4
-
5
-
6
-
7
-
8
-
9
-
10
-
11
-
12
-
13
-
14
-
15
-
16
-
17
-
18
-
19
-
20
-
21
-
22
-
23
-
24
-
25
-
26
-
27
-
28
-
29
-
30
-
31
-
 32
32 -
 33
33 -
 34
34 -
 35
35 -
 36
36 -
 37
37 -
 38
38 -
 39
39 -
 40
40 -
 41
41 -
 42
42 -
43
-
44
-
45
-
46
-
47
-
48
-
49
-
50
-
51
-
52
-
53
-
54
-
55
-
56
-
57
-
58
-
59
-
60
-
61
-
62
-
63
-
64
-
65
-
66
-
67
-
68
-
69
-
70
-
71
-
72
-
73
-
74
-
75
-
76
-
77
-
78
-
79
-
80
-
81
-
82
-
83
-
84
-
85
-
86
-
87
-
88
-
89
-
90
-
91
-
92
-
93
-
94
-
95
-
96
-
97
-
98
-
99
-
100
-
101
-
102
-
103
-
104
-
105
-
106
-
107
-
108
-
109
-
110
-
111
-
112
-
113
-
114
-
115
-
116
-
117
-
118
-
119
-
120
-
121
-
122
-
123
-
124
-
125
-
126
-
127
-
128
-
129
-
130
-
131
-
132
-
133
-
134
-
135
-
136
-
137
-
138
-
139
-
140
-
141
-
142
-
143
-
144
-
145
-
146
-
147
-
148
-
149
-
150
-
151
-
152
-
153
-
154
-
155
-
156
-
157
-
158
-
159
-
160
-
161
-
162
-
163
-
164
-
165
-
166
-
167
-
168
-
169
-
170
-
171
-
172
 |
 |
