Sharp PG-C20XE Operation Manual
Sharp PG-C20XE - Notevision SXGA LCD Projector Manual
 |
View all Sharp PG-C20XE manuals
Add to My Manuals
Save this manual to your list of manuals |
Sharp PG-C20XE manual content summary:
- Sharp PG-C20XE | Operation Manual - Page 1
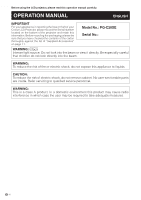
OPERATION MANUAL MODEL PG-C20XE LCD PROJECTOR Important Information Setup & Connections Operation Useful Features Maintenance & Troubleshooting Appendix - Sharp PG-C20XE | Operation Manual - Page 2
This equipment complies with the requirements of Directives 89/336/EEC and 73/23/EEC as amended by 93/68/EEC. Dieses Gerät entspricht den Anforderungen der EG-Richtlinien 89/336/ EWG und 73/23/EWG mit Änderung 93/68/EWG. Ce matériel répond aux exigences contenues dans les directives 89/ 336/CEE et - Sharp PG-C20XE | Operation Manual - Page 3
, Spanisch, Italienisch, Niederländisch, Chinesisch, Koreanisch und Arabisch. Bitte lesen Sie die Bedienungsanleitung vor der Verwendung des LCD-Projektors sorgfältig durch. Le CD-ROM fourni contient les instructions de fonctionnement en anglais, allemand, français, suédois, espagnol, italien - Sharp PG-C20XE | Operation Manual - Page 4
LCD Projector, please record the Serial Number located on the bottom of the projector and retain this information. Before recycling the packaging, please be sure that you have checked the contents of the carton thoroughly against the list of "Supplied Accessories" on page 11. Model No.: PG-C20XE - Sharp PG-C20XE | Operation Manual - Page 5
. REPLACE WITH SAME SHARP LAMP UNIT TYPE BQC-PGC20X // 1 ONLY. UV RADIATION : CAN CAUSE EYE DAMAGE. TURN OFF LAMP BEFORE SERVICING. MEDIUM PRESSURE LAMP : RISK OF EXPLOSION. POTENTIAL HAZARD OF GLASS PARTICLES IF LAMP HAS RUPTURED. HANDLE WITH CARE. SEE OPERATION MANUAL. PRECAUTIONS A OBSERVER LORS - Sharp PG-C20XE | Operation Manual - Page 6
specifications. If you are not sure of the type of power supplied to your home, consult your LCD Projector dealer or local power company. 11. Do not place the LCD Projector where the cord will be abused by persons walking on it. 12. Follow all warnings and instructions marked on the LCD Projector - Sharp PG-C20XE | Operation Manual - Page 7
LH 4. EASY-TO-USE GRAPHICAL USER INTERFACE (GUI) A multi-colour menu system allows for simple image adjustments. (Page 23) 5. AUTO SYNC HIGH RESOLUTION PRESENTATIONS With XGA (1,024 ן768) resolution, this projector can display very detailed presentation information. 10. SXGA COMPATIBLE SXGA (1, - Sharp PG-C20XE | Operation Manual - Page 8
/Maintenance Indicators 39 Replacing the Projection Lamp 40 Using the Kensington Lock 42 Troubleshooting 42 Appendix Attaching the Lens Cap 43 Connection Pin Assignments 44 RS-232C Port Specifications 45 Computer Compatibility Chart 47 Specifications 48 Dimensions 49 Glossary 50 Index 51 - Sharp PG-C20XE | Operation Manual - Page 9
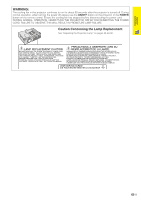
Important Information Usage Guidelines Caution Concerning the Lamp Unit Potential hazard of glass particles if lamp ruptures. Please have Sharp Authorised LCD Projector Dealer or Service Centre replace lamp if rupture occurs. See "Replacing the Projection Lamp" on pages 40 and 41. CAUT I ON ATTENT - Sharp PG-C20XE | Operation Manual - Page 10
folder. 4 Double click on the "manuals" folder. 4 Double click on the "pg-c20xe" folder. 5 Double click on the "pg-c20xe" folder. 6 Double click on the language (name of the folder) that you want to view. 7 Double click on the "c20" pdf file to access the projector manuals. 5 Double click on the - Sharp PG-C20XE | Operation Manual - Page 11
the part names refer to the main pages in this manual where the topic is explained. Projector Front and Top View ON/OFF button 16 POWER indicator 16 17 INPUT/BACK button 23 KEYSTONE/Adjustment 20 (∂/ƒ) buttons 23 ZOOM knob 17 ON/OFF POWER LAMP TEMP. KEYSTONE INPUT AUTO SYNC BACK ENTER MENU - Sharp PG-C20XE | Operation Manual - Page 12
Part Names Remote Control Front View Mouse (∂/ƒ)/ 22 Adjustment (∂/ƒ) buttons 23 Mouse (ß) button 22 MOUSE button 22 FREEZE button 30 MENU button 23 INPUT button 17 KEYSTONE buttons 20 VOLUME buttons 17 Rear View 22 Mouse (©) button 16 POWER button 22 RIGHT-CLICK/ 23 ENTER button - Sharp PG-C20XE | Operation Manual - Page 13
Setup & Connections Setup & Connections 10 - Sharp PG-C20XE | Operation Manual - Page 14
. Computer RGB cable Computer audio cable DIN-D-sub RS-232C cable Remote mouse receiver PS/2 mouse control cable USB mouse control cable Extra air filter Lens cap Lens cap strap CD-ROM LCD projector operation manual LCD projector quick reference guides 11 - Sharp PG-C20XE | Operation Manual - Page 15
signals compatible with the projector. Use with computer signals other than those listed may cause some of the functions not to work. • A Macintosh adaptor may be required for use with some Macintosh computers. Contact your nearest Sharp Authorised LCD Projector Dealer or Service Centre. 12 - Sharp PG-C20XE | Operation Manual - Page 16
one end of the video cable to the VIDEO INPUT 3 terminal on the projector and the video output terminal on the video source. 2 To use the RCA connectors to the corresponding red and white AUDIO INPUT terminals on the projector and the audio output terminals on the video source. The S-VIDEO INPUT - Sharp PG-C20XE | Operation Manual - Page 17
cable or the HD15-RGB cable to the COMPUTER INPUT 1 port on the projector. 2 Connect the other end to the corresponding terminals on the video source. The image quality may become lower depending on DTV signal compatibility. Projector RS-232C INPUT 1 AUDIO COMPUTER HD-15/RCA cable (sold - Sharp PG-C20XE | Operation Manual - Page 18
is not correctly set up. Please refer to the operation manual of the computer for details on setting up/installing the correct mouse driver. • A Macintosh adaptor may be required for use with some Macintosh computers. Contact your nearest Sharp Authorised LCD Projector Dealer or Service Centre. 15 - Sharp PG-C20XE | Operation Manual - Page 19
Operation Basic Operations Maintenance indicators ON/OFF POWER LAMP TEMP. KEYSTONE Projector ON/OFF POWER LAMP TEMP. KEYSTONE INPUT AUTO SYNC BACK ENTER MENU Remote control 2 Maintenance indicators ON/OFF POWER LAMP TEMP. KEYSTONE 1 Make the necessary connections before - Sharp PG-C20XE | Operation Manual - Page 20
becomes clear. Projector ON/OFF POWER LAMP TEMP. KEYSTONE INPUT AUTO SYNC BACK ENTER MENU EXAMPLE 5 button on the projector or the POWER button on the remote control. Ensure the cooling fan has stopped before disconnecting the power cord. DURING NORMAL OPERATION, NEVER TURN THE PROJECTOR - Sharp PG-C20XE | Operation Manual - Page 21
with all feet flat and level to achieve an optimal image. Move the projector forward or backward if the edges of the image are distorted. • The projector lens should be centred in the middle of the screen. If the lens centre is not perpendicular to the screen, the image will be distorted, making - Sharp PG-C20XE | Operation Manual - Page 22
without firmly holding the projector. • Do not hold the lens when lifting or lowering the projector. • When lowering the projector, be careful not Sharp ceiling-mount bracket for this installation. • Before mounting the projector, contact your nearest Sharp Authorised LCD Projector Dealer or Service - Sharp PG-C20XE | Operation Manual - Page 23
. • Straight lines and the edges of the displayed image may appear jagged, when adjusting the keystone setting. Projector ON/OFF POWER LAMP TEMP. KEYSTONE INPUT AUTO SYNC BACK ENTER MENU Remote control Using the KEYSTONE buttons 1 Press KEYSTONE to adjust the setting. 1 Operation 20 - Sharp PG-C20XE | Operation Manual - Page 24
damage your computer. • Do not connect both the PS/2 and USB mouse control cables to the remote mouse receiver. • Windows 95 does not support USB mouse driver software. • The minimum system requirements for the USB type mouse system are shown below. Windows Hardware: PC/AT compatible machine with - Sharp PG-C20XE | Operation Manual - Page 25
control can be used to control the projector within the ranges shown below. • mode is for about ten seconds while the buttons are lighting. • When MENU or ENLARGE is pressed, MOUSE mode is released operation manual for details of setting up/ installing the mouse driver. • For one-button mouse systems - Sharp PG-C20XE | Operation Manual - Page 26
INPUT 2 (S-VIDEO) or 3 (VIDEO)) that allow you to adjust the image and various projector settings. These menu screens can be operated from the projector or the remote control with the following buttons. Projector Remote control 7 ON/OFF POWER LAMP TEMP. KEYSTONE INPUT AUTO SYNC BACK ENTER - Sharp PG-C20XE | Operation Manual - Page 27
127 ON OFF Blue None ON OFF Items on the INPUT 1 (COMPONENT) Mode Menu Bar Main menu Picture1 Picture2 Options Language Sub menu Contrast Bright Red Blue Reset Color Tint Sharp Reset Signal Info Lamp Timer Keystone Auto Power Off Background Power Save Mode English Deutsch Español Nederlands Fran - Sharp PG-C20XE | Operation Manual - Page 28
Screens Items on the INPUT 2 (S-VIDEO) or INPUT 3 (VIDEO) Mode Menu Bar Main menu Picture1 Picture2 Options Language Sub menu Contrast Bright Red Blue Reset Color Tint Sharp Reset Signal Info Lamp Timer Keystone Auto Power Off Background Power Save Mode English Deutsch Español Nederlands Fran - Sharp PG-C20XE | Operation Manual - Page 29
Mode (INPUT 2 or 3 mode only) Projector ON/OFF POWER LAMP TEMP. KEYSTONE INPUT AUTO SYNC BACK ENTER MENU Remote control 2, 3 2, 4 1, 5 (GUI) On-screen Display The video input system mode is preset to "Auto"; however, it can be changed to a specific system mode, if the selected system - Sharp PG-C20XE | Operation Manual - Page 30
BACK ENTER MENU 2, 3, 4 2, 3 1, 5 (GUI) On-screen Display INPUT 1 (RGB) mode You can adjust the projector's picture to your preferences with the following picture settings. Description of Adjustment Items Selected item Contrast Bright Red Blue Reset Color Tint Sharp ƒ button ∂ button For - Sharp PG-C20XE | Operation Manual - Page 31
Adjustments (INPUT 1 mode only) Projector ON/OFF POWER LAMP TEMP. KEYSTONE INPUT AUTO SYNC BACK ENTER MENU Remote control 1 On-screen Display Auto Sync Adjustment • Used to automatically adjust a computer image. • Auto Sync adjustment can be made manually by pressing AUTO SYNC. • The - Sharp PG-C20XE | Operation Manual - Page 32
(INPUT 1 mode only) Projector Remote control ON/OFF POWER LAMP TEMP. KEYSTONE INPUT AUTO SYNC BACK ENTER MENU 2, 3, 4 2, input mode with INPUT.) 1 Press MENU. 2 Press ∂/ƒ to select "Fine Sync", and then press ENTER. 3 Press ∂/ƒ to select a specific adjustment item, and then press ENTER - Sharp PG-C20XE | Operation Manual - Page 33
Useful Features Useful Features Freeze Function Remote control 1, 2 On-screen Display This function allows you to instantly freeze a moving image. This is useful when you want to display a still image from a computer or video, giving you more time to explain the image to the audience. You can - Sharp PG-C20XE | Operation Manual - Page 34
Digital Image Magnification Remote control 2 1 On-screen Display This function allows you to magnify a specific portion of an image. This is useful when you want to display a detailed portion of the image. 1 Press ENLARGE on the remote control. Each time - Sharp PG-C20XE | Operation Manual - Page 35
Gamma Correction Remote control 1 STANDARD On-screen Display s GAMMA 1 s GAMMA 2 • Gamma is an image quality enhancement function that offers a richer image by brightening the darker portions of the image without altering the brightness of the brighter portions. • Three gamma settings are - Sharp PG-C20XE | Operation Manual - Page 36
Selecting the Picture Display Mode Remote control 1 This function allows you to modify or customise the picture display mode to enhance the input image. Depending on the input signal, you can choose the picture display mode preferred. 1 Press RESIZE on the remote control. Each time RESIZE is - Sharp PG-C20XE | Operation Manual - Page 37
after approximately 900 hours of usage. See pages 40 and 41 for lamp replacement. Automatic Power Shutoff Function Projector Remote control ON/OFF POWER LAMP TEMP. KEYSTONE INPUT AUTO SYNC BACK ENTER MENU 2, 3, 4 2, 3 1, 5 (GUI) On-screen Display When no input signal is detected for - Sharp PG-C20XE | Operation Manual - Page 38
. 4 Press ∂/ƒ to select "Blue" or "None". 5 To exit from the GUI, press MENU. Power Save Mode Function Projector Remote control ON/OFF POWER LAMP TEMP. KEYSTONE INPUT AUTO SYNC BACK ENTER MENU 2, 3, 4 2, 3 1, 5 (GUI) On-screen Display Function with toggle switch to control the quantity - Sharp PG-C20XE | Operation Manual - Page 39
for the reversed image and ceilingmount setups. See page 19 for these setups. Special Mode Adjustment Projector ON/OFF POWER LAMP TEMP. KEYSTONE INPUT AUTO SYNC BACK ENTER MENU Remote control 2, 3 2, 4 1, 5 (GUI) On-screen Display Ordinarily, the type of input signal is detected and the - Sharp PG-C20XE | Operation Manual - Page 40
should be cleaned every 100 hours of use. Clean the filters more often when the projector is used in a dusty or smoky location. • Have your nearest Sharp Authorised LCD Projector Dealer or Service Centre exchange the filter (PFILD0123CEZZ) when it is no longer possible to clean it. 1 Disconnect - Sharp PG-C20XE | Operation Manual - Page 41
power cord from the AC socket. 2 3 Remove the filter cover. Remove the air filter. Turn over the projector. Press the tab and remove the filter cover in the direction of the arrow. 1 Remove the air filter will not turn on unless it is correctly installed. Maintenance & Troubleshooting 38 - Sharp PG-C20XE | Operation Manual - Page 42
the current type BQCPGC20X//1 from your nearest Sharp Authorised LCD Projector Dealer or Service Centre. • Replace the lamp. (See pages 40 and 41.) If you wish, you may have the lamp replaced at your nearest Sharp Authorised LCD Projector Dealer or Service Centre. Maintenance & Troubleshooting 39 - Sharp PG-C20XE | Operation Manual - Page 43
Sharp Authorised LCD Projector Dealer or Service Centre. Then carefully change the lamp by following the instructions below. If you wish, you may have the lamp replaced at your nearest Sharp Authorised LCD Projector Dealer or Service filter cover into position. Tab Maintenance & Troubleshooting 40 - Sharp PG-C20XE | Operation Manual - Page 44
of the arrow. Then tighten the user service screw. Maintenance & Troubleshooting Resetting the lamp timer 1 Connect the power cord. Plug the power cord into the AC socket of the projector. 2 Reset the lamp timer. 1 Press KEYSTONE ∂ and KEYSTONE ƒ on the projector at the same time. 2 Press INPUT - Sharp PG-C20XE | Operation Manual - Page 45
that came with the system for instructions on how to use it to secure the projector. Troubleshooting Problem No picture and no sound. Sound by temperature changes. This will not affect operation or performance. • Refer to "Lamp/Maintenance Indicators" on page 39. • Adjust the "Phase" setting. (See - Sharp PG-C20XE | Operation Manual - Page 46
to prevent the loss of the lens cap. 1 Attach the lens cap strap to the lens cap. 2 Attach the lens cap strap to the projector. 3 Attach the lens cap to the projector with the lens cap eyelet facing up. CAUTION • Do not lift or carry the projector by the lens or the lens cap as this may damage - Sharp PG-C20XE | Operation Manual - Page 47
Connection Pin Assignments COMPUTER INPUT 1 Port: 15-pin mini D-sub female connector Computer Input Analog 1. Video input (red) 2. Video input (green/sync on green) 5 1 3. Video input (blue) 10 6 4. Not connected 15 11 5. Composite sync 6. GND (red) 7. GND (green/sync on green) 8. - Sharp PG-C20XE | Operation Manual - Page 48
Specifications PC control A computer can be used to control the projector by connecting an RS-232C cable (null modem, cross type, sold separately) to the projector (0DH) Problem response ( menu and checking the status with the On-screen Display. If the projector receives a command other than a menu - Sharp PG-C20XE | Operation Manual - Page 49
Specifications Commands EXAMPLE • When "BRIGHT" of INPUT 1 (RGB) IMAGE ADJUSTMENT is set to מ10. Computer RABR _מ1 0 → ← Projector (מ30 - ם30) R A T I _ * * * TINT (מ30 - ם30) R A S H _ _ _ * SHARPNESS (0 - 7) R A R E _ _ _ 2 RESET A D J S _ _ _ 1 AUTO SYNC START CONTROL ITEM VIDEO - Sharp PG-C20XE | Operation Manual - Page 50
mode. Should this occur, turn off the LCD display on the notebook computer and output the display data in "CRT only" mode. Details on how to change display modes can be found in your notebook computer's operation manual. • This projector can receive 640 ן350 VESA format VGA signals, however, "640 - Sharp PG-C20XE | Operation Manual - Page 51
RS-232C cable (15 cm), Remote mouse receiver, Extra air filter, Lens cap (attached), Lens cap strap, CD-ROM, LCD projector operation manual, LCD projector quick reference guide Replacement parts Lamp unit (Lamp/cage module) (BQC-PGC20X//1), Remote control (RRMCG1613CESA), AAA size batteries, Power - Sharp PG-C20XE | Operation Manual - Page 52
49 Appendix Front View Bottom View 118 58 8 42 82 32 Side View 260 FOCUS ZOOM ON/OFF POWER LAMP TEMP. KEYSTONE INPUT AUTO SYNC BACK ENTER MENU 207 169.5 INPUT 2 INPUT 3 S-VIDEO VIDEO AUDIO INPUT (S-VIDEO, VIDEO INPUT) L R Top View RS-232C INPUT 1 AUDIO COMPUTER OUTPUT - Sharp PG-C20XE | Operation Manual - Page 53
graphics that allow easier operation. Intelligent compression and expansion High quality resizing of lower and higher resolution images to fit the projector's native resolution. Magnification Digitally zooms in on a portion of an image. Power save mode function Function with toggle switch to control - Sharp PG-C20XE | Operation Manual - Page 54
compression and expansion 4 K Kensington Security Standard connector 42 KEYSTONE buttons 20 L LAMP REPLACEMENT indicator 39 Lamp timer 34 LEFT-CLICK button 22 Lens cap 43 M MENU button 23 MOUSE button 22 Mouse buttons 22 O ON/OFF button 17 On-screen display language 26 P PDF 7 Phase - Sharp PG-C20XE | Operation Manual - Page 55
SHARP CORPORATION
-
 1
1 -
 2
2 -
 3
3 -
 4
4 -
 5
5 -
 6
6 -
 7
7 -
8
-
9
-
10
-
11
-
12
-
13
-
14
-
15
-
16
-
17
-
18
-
19
-
20
-
21
-
22
-
23
-
24
-
25
-
26
-
27
-
28
-
29
-
30
-
31
-
32
-
33
-
34
-
35
-
36
-
37
-
38
-
39
-
40
-
41
-
42
-
43
-
44
-
45
-
46
-
47
-
48
-
49
-
50
-
51
-
52
-
53
-
54
-
55
 |
 |
LCD PROJECTOR
MODEL
PG
-
C20XE
Important
Information
Setup & Connections
Operation
Useful Features
Maintenance &
Troubleshooting
Appendix
OPERATION MANUAL