Sharp PN-655UP PNG655U Operation Manual - Page 14
Preparing the Remote Control Unit, Connecting the Power Cord
 |
View all Sharp PN-655UP manuals
Add to My Manuals
Save this manual to your list of manuals |
Page 14 highlights
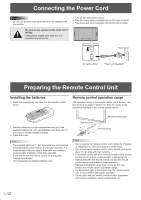
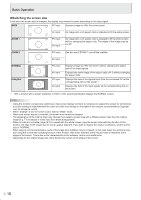
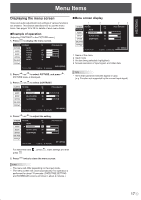
Connecting the Power Cord Caution • Do not use a power cord other than the one supplied with the monitor. Be sure to use a power outlet of AC 120 V (60 Hz). Using power supply other than the one specified may cause fire. 1. Turn off the main power switch. 2. Plug the power cord (supplied) into the AC input terminal. 3. Plug the power cord (supplied) into the AC power outlet. Main power switch 1 2 AC input terminal Power outlet 3 Power cord (Supplied) Preparing the Remote Control Unit Installing the batteries 1. Press the cover gently and slide it in the direction of the arrow. Remote control operation range The operation range of the remote control unit is approx. 16.4 feet (5 m) at an angle of approx 10° from the center to the top/bottom/right/left of the remote control sensor. 2. See the instructions in the compartment and put in the supplied batteries (2 "AA" size batteries) with their plus (+) and minus (-) sides oriented correctly. 3. Close the cover. TIPS • The supplied batteries (2 "AA" size batteries) may become exhausted faster depending on the storage condition. It is recommended that you replace them with new batteries (commercially available) earlier than specified. • If you will not use the remote control for a long time, remove the batteries. • Use manganese or alkaline batteries only. Remote control sensor 16.4 feet (5 m) 10° 16.4 feet (5 m) 10° 16.4 feet (5 m) TIPS • Do not expose the remote control unit to shock by dropping or stepping on it. This could lead to a malfunction. • Do not expose the remote control unit to liquids, and do not place it in an area with high humidity. • The remote control unit may not work properly if the remote control sensor is under direct sunlight or strong lighting. • Objects between the remote control unit and the remote control sensor may prevent proper operation. • Replace the batteries when they run low as this may shorten the remote control's operation range. • If a fluorescent light is illuminated near the remote control unit, it may interfere with proper operation. • Do not use it with the remote control of other equipment such as air conditioner, stereo components, etc. E 12
-
 1
1 -
2
-
3
-
4
-
5
-
6
-
7
-
8
-
 9
9 -
 10
10 -
 11
11 -
 12
12 -
 13
13 -
 14
14 -
 15
15 -
 16
16 -
 17
17 -
 18
18 -
 19
19 -
20
-
21
-
22
-
23
-
24
-
25
-
26
-
27
-
28
-
29
-
30
-
31
-
32
-
33
-
34
-
35
-
36
-
37
-
38
-
39
-
40
-
41
-
42
-
43
-
44
-
45
-
46
-
47
-
48
-
49
-
50
-
51
-
52
-
53
-
54
-
55
-
56
-
57
-
58
-
59
-
60
-
61
-
62
-
63
-
64
-
65
-
66
-
67
-
68
-
69
-
70
-
71
-
72
-
73
-
74
-
75
-
76
 |
 |
