Sharp R-21LC Owners Manual for R-21LC - Page 5
Grounding Instructions, Installation
 |
View all Sharp R-21LC manuals
Add to My Manuals
Save this manual to your list of manuals |
Page 5 highlights
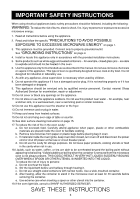
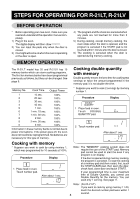
GROUNDING INSTRUCTIONS This appliance must be grounded. This oven is equipped with a cord having a grounding wire with a grounding plug. It must be plugged into a wall receptacle that is properly installed and grounded in accordance with the National Electrical Code and local codes and ordinances. In the event of an electrical short circuit, grounding reduces risk of electric shock by providing an escape wire for the electric current. WARNING - Improper use of the grounding plug can result in a risk of electric shock. Electrical Requirements The electrical requirements are a 120 volt 60 Hz, AC only, 15 amp. or more protected electrical supply. It is recommended that a separate circuit serving only this appliance be provided. The oven is equipped with a 3-prong grounding plug. It must be plugged into a wall receptacle that is properly installed and grounded. Should you only have a 2-prong outlet, have a qualified electrician install a correct wall receptacle. A 3-prong adapter may be purchased and used temporarily if local codes allow. Follow package directions. A short power-supply cord is provided to reduce risk of becoming entangled in or tripping over a longer cord. Extension Cord If it is necessary to use an extension cord, use only a 3-wire extension cord that has a 3-blade grounding plug and a 3-slot receptacle that will accept the plug on the microwave oven. The marked rating of the extension cord should be AC 115-120 volt, 15 amp. or more. Be careful not to drape the cord over the countertop or table where it can be pulled on by children or tripped over accidentally. Notes: 1. If you have any questions about the grounding or electrical in- structions, consult a qualified electrician or service person. 2. Neither Sharp nor the dealer can accept any liability for damage to the oven or personal injury resulting from failure to observe the correct electrical connection procedures. l l ed l I ll ed l Radio or TV Interference Should there be any interference caused by the microwave oven to your radio or TV, check that the microwave oven is on a different electrical circuit, relocate the radio or TV as far away from the oven as feasible or check position and signal of receiving antenna. INSTALLATION Because your Sharp Commercial Microwave Oven will be used frequently, place it so that there is easy access for all users. 1. Be sure all electrical requirements are met. See above. 2. Air intake openings are on the back of the unit. Install the unit at least 2 inches (5.1 cm) away from the nearest wall to permit adequate ventilation for proper cooling and air flow in the oven. 3. Install the unit where no excessive heat or steam are generated. Do not place next to an oven or cooking surface. 4. The unit may be secured to a countertop or stand. There is a screw hole in the bottom of the unit. After the oven is permanently placed, drill a hole through the counter top for a 3/16 inch (0.48 cm) self-tapping screw. The hole should be 1 inch (2.5 cm) from the left side of the outer case cabinet and 7-1/8 (20.1 cm) inches back from the front edge of the cavity face plate. 71/8" (20.1 cm) 1" (2.5 cm) Hole 4
-
 1
1 -
 2
2 -
 3
3 -
 4
4 -
 5
5 -
 6
6 -
 7
7 -
 8
8 -
 9
9 -
 10
10 -
 11
11 -
12
-
13
-
14
-
15
-
16
-
17
-
18
-
19
-
20
-
21
-
22
-
23
-
24
 |
 |
