Sharp R-21LC Owners Manual for R-21LC - Page 8
Steps For Operating For R-21lc
 |
View all Sharp R-21LC manuals
Add to My Manuals
Save this manual to your list of manuals |
Page 8 highlights
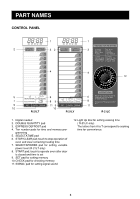
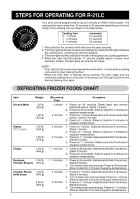
STEPS FOR OPERATING FOR R-21LC 40 50 30 E D 1 F G 1.5 H 20 C B 2 I J 10 A K 0 L 2.5 M 3 N O T 6 SR 5 Q P 4 Your oven can be programmed for up to 6 minutes on HIGH (100%) power. The cooking time input varies from 10 seconds to 30 seconds depending on the total length of the cooking time as shown in the table below. Cooking time 0 - 1 minute 1 - 3 minutes 3 - 6 minutes Increment 10 seconds 15 seconds 30 seconds 1. Place food on the ceramic shelf and close the door securely. 2. Turn the Light Up Dial to the desired cooking time. Note that the light indicates the cooking time. Cooking will start immediately. 3. The oven light and the cooling fan will be on throughout any cooking operation. 4. When the Light Up Dial reaches "0" and the audible signal is heard, oven operation ceases, the light goes out and the fan stops. NOTE: • The Light Up Dial can be set to operate the oven within 1 minute after a cooking cycle ends or after closing the door. • When the oven door is opened during cooking, the oven stops and any remaining cooking time is canceled. If necessary, turn the Light Up Dial to the desired cooking time again. DEFROSTING FROZEN FOODS CHART Item Ground Meat Weight .50 lb. (225 g) 1.00 lb. (450 g) Steaks 3/4" (1.9 cm) 1.00 lb. (450 g) 1.50 lb. (675 g) Chops 1.00 lb. (450 g) Boneless 1.00 lb. Chicken Breasts (450 g) Chicken Pieces 1.00 lb. (with bone) (450 g) 2.00 lb. (900 g) Microwave Time Procedure 1 minute 2 minutes 2 minutes 3 minutes 1 1/2 minutes 1 1/2 minutes 2 minutes 3 minutes 1. Power on 30 seconds. Break apart and remove defrosted pieces. Stand 1 minute. 2. Power on 30 seconds. Allow to stand for 5 minutes to equalize temperatures. 1. Power on 1 minute. Break apart and remove defrosted pieces. Stand 2 minutes. 2. Power on 1 minute. Allow to stand for 5 minutes to equalize temperatures. 1. Power on 1 minute. Separate and shield, if necessary. Stand 1 minute. 2. Power on 1 minute. Allow to stand for 5 minutes to equalize temperatures. 1. Power on 1 1/2 minutes. Separate and shield, if necessary. Stand 2 minutes. 2. Power on 1 1/2 minutes. Allow to stand for 5 minutes to equalize temperatures. 1. Power on 45 seconds. Separate and shield, if necessary. Stand 2 minutes. 2. Power on 45 seconds. Allow to stand for 5 minutes to equalize temperatures. 1. Power on 45 seconds. Separate and shield, if necessary. Stand 2 minutes. 2. Turn chicken over and rearrange. Power on 45 seconds. Allow to stand for 3 minutes to equalize temperatures. 1. Power on 1 minute. Separate and shield, if necessary. Stand 2 minutes. 2. Turn chicken over and rearrange. Power on 1 minute. Allow to stand for 3 minutes to equalize temperatures. 1. Power on 1 1/2 minutes. Separate and shield, if necessary. Stand 2 minutes. 2. Turn chicken over and rearrange. Power on 1 1/2 minutes. Allow to stand for 3 minutes to equalize temperatures. 7
-
 1
1 -
2
-
 3
3 -
 4
4 -
 5
5 -
 6
6 -
 7
7 -
 8
8 -
 9
9 -
 10
10 -
 11
11 -
 12
12 -
 13
13 -
14
-
15
-
16
-
17
-
18
-
19
-
20
-
21
-
22
-
23
-
24
 |
 |