Sharp T19D1-B Operation Manual - Page 12
Turning the power on, Connecting the monitor to a power, source
 |
UPC - 074000047808
View all Sharp T19D1-B manuals
Add to My Manuals
Save this manual to your list of manuals |
Page 12 highlights
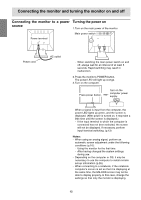
Connecting the monitor and turning the monitor on and off Connecting the monitor to a power Turning the power on source 1.Turn on the main power of the monitor. Main power switch Power terminal Power cord AC outlet - When switching the main power switch on and off, always wait for an interval of at least 5 seconds. Rapid switching may result in malfunction. 2.Press the monitor's POWER button. The power LED will light up orange. 3.Turn on the computer. Press power button. Turn on the computer power supply. ON When a signal is input from the computer, the power LED lights up green, and the screen is displayed. (After power is turned on, it may take a little time until the screen is displayed.) - If the input terminal to which the computer is connected has not been selected, the screen will not be displayed. If necessary, perform input terminal switching. (p.13) Notes: - When using an analog signal, perform an automatic screen adjustment under the following conditions (p.16): - Using the monitor for the first time. - After having changed the system settings during use. - Depending on the computer or OS, it may be necessary to use the computer to install monitor set-up information (p.26). - When connecting to a notebook, if the notebook computer's screen is set so that it is displaying at the same time, the MS-DOS screen may not be able to display properly. In this case, change the settings so that only the monitor is displaying. 12
-
 1
1 -
2
-
3
-
4
-
5
-
6
-
 7
7 -
 8
8 -
 9
9 -
 10
10 -
 11
11 -
 12
12 -
 13
13 -
 14
14 -
 15
15 -
 16
16 -
 17
17 -
18
-
19
-
20
-
21
-
22
-
23
-
24
-
25
-
26
-
27
-
28
-
29
-
30
-
31
-
32
-
33
-
34
-
35
-
36
-
37
-
38
-
39
-
40
-
41
-
42
-
43
-
44
-
45
-
46
-
47
-
48
-
49
-
50
-
51
-
52
-
53
-
54
-
55
-
56
-
57
-
58
-
59
-
60
-
61
-
62
-
63
-
64
-
65
-
66
-
67
-
68
-
69
-
70
-
71
-
72
-
73
-
74
-
75
-
76
-
77
-
78
-
79
-
80
-
81
-
82
-
83
-
84
-
85
-
86
-
87
-
88
-
89
-
90
-
91
-
92
-
93
-
94
-
95
-
96
-
97
-
98
-
99
-
100
-
101
-
102
-
103
-
104
-
105
-
106
-
107
-
108
-
109
-
110
-
111
-
112
-
113
-
114
-
115
-
116
-
117
-
118
-
119
-
120
-
121
-
122
-
123
-
124
-
125
-
126
-
127
-
128
-
129
-
130
-
131
-
132
 |
 |
