Sharp XL-HP500 Operation Manual - Page 10
System connections continued
 |
View all Sharp XL-HP500 manuals
Add to My Manuals
Save this manual to your list of manuals |
Page 10 highlights
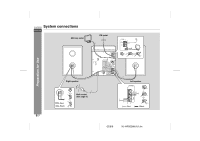
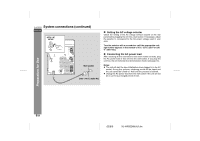
XL-HP500W System connections (continued) ENGLISH 230V 240V Wall socket (230 - 240 V, 50/60 Hz) ! Setting the AC voltage selector Check the setting of the AC voltage selector located on the rear panel before plugging the unit into a wall socket. If necessary, adjust the selector to correspond to the AC power voltage used in your area. Turn the selector with a screwdriver until the appropriate voltage number appears in the window (110 V, 127 V, 220 V or 230 V - 240 V AC). ! Connecting the AC power lead After checking all the connections have been made correctly, plug the AC power lead of this unit into the wall socket. If you plug the unit first, the unit will enter the demonstration mode (see page 10). Notes: " The unit will start the tape initialisation when plugged in to the AC socket. During this process, initialising sound will be heard and the unit cannot be turned on. Wait until the process is finished. " Unplug the AC power lead from the wall socket if the unit will not be in use for a prolonged period of time. Preparation for Use E-9 02/8/6 XL-HP500W(A)1.fm
-
 1
1 -
2
-
3
-
4
-
 5
5 -
 6
6 -
 7
7 -
 8
8 -
 9
9 -
 10
10 -
 11
11 -
 12
12 -
 13
13 -
 14
14 -
 15
15 -
16
-
17
-
18
-
19
-
20
-
21
-
22
-
23
-
24
-
25
-
26
-
27
-
28
-
29
-
30
-
31
-
32
-
33
-
34
-
35
-
36
 |
 |
