Singer 1 One Instruction Manual 26
Singer 1 One Manual
 |
View all Singer 1 One manuals
Add to My Manuals
Save this manual to your list of manuals |
Singer 1 One manual content summary:
- Singer 1 One | Instruction Manual 26 - Page 1
14T967DC Instruction Book - Singer 1 One | Instruction Manual 26 - Page 2
to this Instruction Book for proper use and optimum service. To get the most out of your sewing machine, read the entire Instruction Book before attempting or accessories of this sewing machine when considered necessary without notification or obligation. This SINGER sewing machine, model 14T967DC, - Singer 1 One | Instruction Manual 26 - Page 3
care is required around the sewing machine needle. * Do not pull or push fabric while stitching. It may deflect the needles causing them to break. * For double insulated machines, when servicing, use only identical replacement parts. See instructions for Servicing of Double-Insulated Appliances - Singer 1 One | Instruction Manual 26 - Page 4
has cooled off before changing with a new one. * Do not dismantle or modify the Instruction Book. * The appliance is not intended for use by young children or infirm persons without supervision. * Young childen should be supervised to ensure that they do not play with the appliance. * SERVICING - Singer 1 One | Instruction Manual 26 - Page 5
sewing 12 9. Removal and Replacement of Waste Tray 13 10. Preparation for Threading 14 *Setting up the thread guide sew standard overedge 37 *To sew rolled hem 37 Page 21. Chaining Off and Test Sewing 38 22. Settings and Sewing Instructions Troubleshooting Chart 69 29. Relationship between Cloth, Thread - Singer 1 One | Instruction Manual 26 - Page 6
1. SELECTION OF STITCHES & AUTO TENSION This machine is capable of producing various types of stitches according to the combination of Auto Tension Selected, needle positions, threading methods, and the use of convertible right looper/spreader. Stitch Type ATD : Auto Tension Dial Selected - Singer 1 One | Instruction Manual 26 - Page 7
48 A narrow seam is formed by using right Needle. Overege and seaming can be done in one operation on non-stretch fabrics. 2-needle, 3-thread cover stitch is suitable for stretchy fabrics such as middle, and right needles. 1-needle 3-thread stitch is used for sewing narrow rolled hems. 55 6 - Singer 1 One | Instruction Manual 26 - Page 8
* Depending on the needle positions used, this machine can sew 2-thread and 3-thread standard width 4 mm overedge and a 6 mm wide overedge seams. Also, for overedging heavyweight fabrics, the seam width can be increased still more - Singer 1 One | Instruction Manual 26 - Page 9
cover (A) into (B). *Auto tension settings are based on medium weight fabric and standard # 60 polyester spun thread. It can satisfy most requirements for sewing. If using a different thread weight or fabric and the result is not as you expected, please adjust tension in small increments. 8 - Singer 1 One | Instruction Manual 26 - Page 10
flat shank industrial needle that eliminates the possibility of inserting the needle backwards. Do not attempt to use a standard household sewing machine needle of any size or type in this overlock. Singer needle #2022 size 14/90 is furnished with the machine. Only use Needle #2022 size 14/90 and 11 - Singer 1 One | Instruction Manual 26 - Page 11
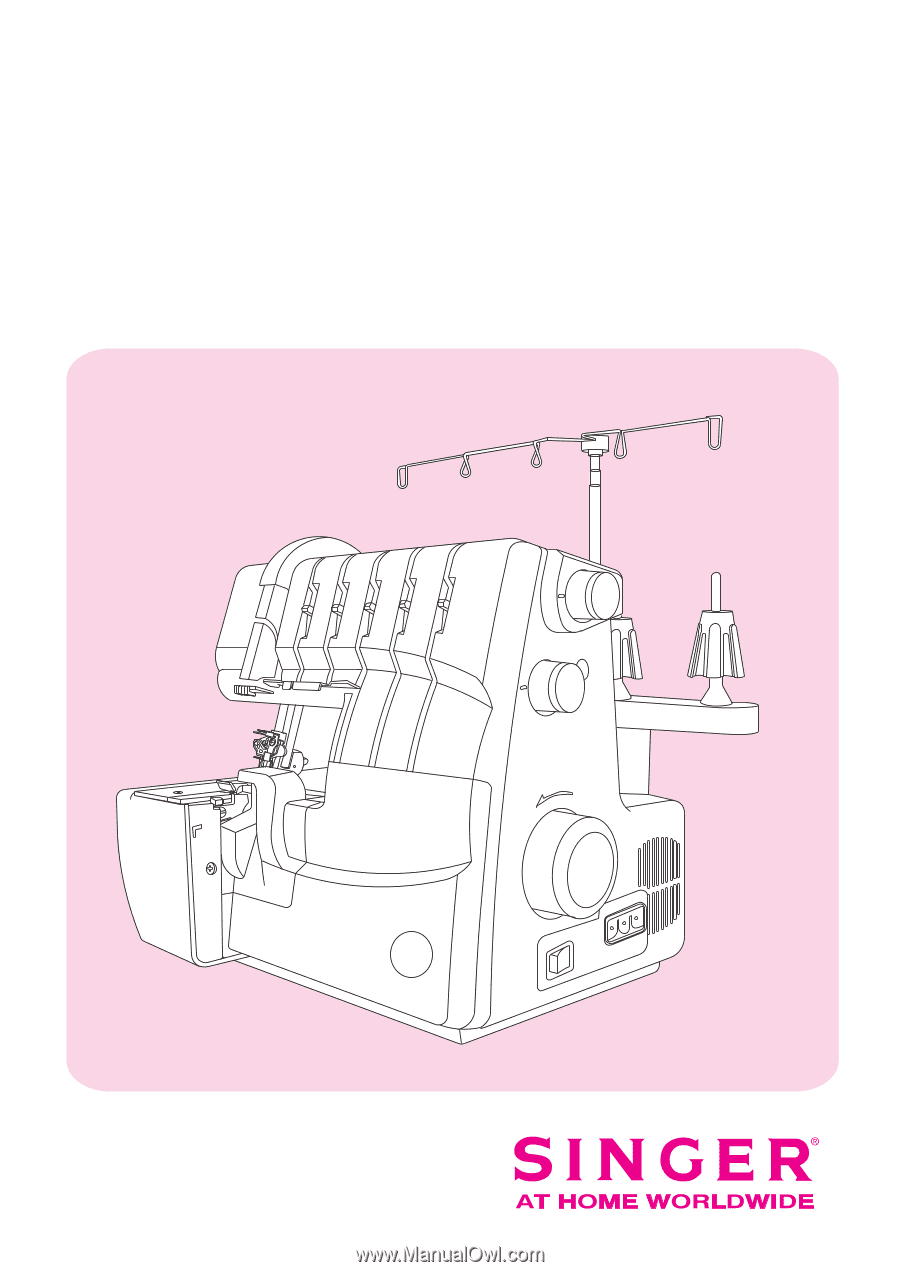
5. PRINCIPAL PARTS 1. Thread guides and holder 2. Handle 3. Left needle thread tension fine tuning lever (orange) 4. Right needle thread tension fine tuning lever (blue) 5. Upper looper thread tension fine tuning - Singer 1 One | Instruction Manual 26 - Page 12
PRINCIPAL PARTS 19. Presser bar lifter and tension release 20. Differential feed adjusting dial 21. Cutting width dial 22. Presser foot pressure adjusting dial 22 19 20 21 11 - Singer 1 One | Instruction Manual 26 - Page 13
Push the cover to the right as far as it will go. Pull cover down toward you. Caution: Be sure looper cover is closed when sewing. Note: Machine will not operate when Looper Cover is open. 1 2 7. PRINCIPAL PARTS BEHIND THE LOOPER COVER 73 21 8 1. Upper looper 2. Moveable Upper knife 3. Presser - Singer 1 One | Instruction Manual 26 - Page 14
POLARIZED PLUG INFORMATION (FOR U.S.A. & CANADA ONLY) This appliance has a polarized plug (one blade wider than the other). To reduce the risk of electric shock, this plug is intended to fit in a polarized outlet only way. If the - Singer 1 One | Instruction Manual 26 - Page 15
click into place when they are correctly positioned. Center the thread guides above the spool pins. Place thread over the cone adapters on the spool pins. Note: Your new machine is threaded to sew Triple Cover Stitch. Refer to Page 30 for instructions on tying on to the threads. Anti-spill Net When - Singer 1 One | Instruction Manual 26 - Page 16
but only one or two or three needles are to be used for sewing. Do not attempt to use four or five needles. The Instruction Book refers . After inserting the needles equally tighten both screws. This machine uses Singer #2022 needles. Do not use Standard Household Needles. Overedge left needle - Singer 1 One | Instruction Manual 26 - Page 17
12. THREADING THE MACHINE Threading Diagram: Overlock and Safety Stitches A color coded threading diagram is located inside the looper cover for quick reference. Thread the machine in the order 1 to 5 as shown. Note: Threads go through the take-up lever cover for Overlock and Chain stitching as - Singer 1 One | Instruction Manual 26 - Page 18
turn off power switch. Note: The instructions on this page and the following pages will guide you through the proper threading for each fabric when sewing. Pass thread from back to the front through the thread guide 1. 1 2 3 4 9 5 8 7 6 C L 1 Thread the top cover thread guide by pulling - Singer 1 One | Instruction Manual 26 - Page 19
. 8 4 9 9 5 8 7 6 1 2 3 4 10 5 9 8 7 6 Pass thread from back to the front through the thread guide 1. 1 Thread the top cover thread guide by pulling 2 the thread towards the left until it slips under guide. Then pull thread along the right side of 2 button as illustrated. 18 - Singer 1 One | Instruction Manual 26 - Page 20
until the lower looper extends out 5~10mm from the needle plate edge. Thread the looper area of the machine following the red color coded thread guides 4~10. Note: Use tweezers provided in the accessory case to aid in threading the looper. Place the thread with the point of the tweezers slightly - Singer 1 One | Instruction Manual 26 - Page 21
Tension discs. 10 11 9 Pass thread from back to the front through the thread guide 1. 1 2 3 4 5 6 7 8 1 Thread the top cover thread guide by pulling the thread towards the left until it slips under guide. Then pull thread along the right side of 2 button as illustrated. While holding - Singer 1 One | Instruction Manual 26 - Page 22
the chain stitch looper extends out 10mm from the needle plate edge. Thread the looper area of the machine following the brown color-coded thread guides 4~11. Note: Use the tweezers provided in the accessory case to aid in threading the looper. Place the thread with the point of the tweezers - Singer 1 One | Instruction Manual 26 - Page 23
make certain it is properly located in between the tension discs 3. 3 2 3 Continue to thread points 4~8. Note: Slip thread into the rear slot on the thread guide 5 and the slot of take-up lever cover 6. Then slip thread into the right slot on the thread - Singer 1 One | Instruction Manual 26 - Page 24
needle 9. Note: Use of tweezers in the accessory case will make needle eye threading easy. The position of the thread must be behind the thread guide. Draw about 10cm(4 inches) of thread through needle eye towards the rear of machine. Place the thread to the back, under the presser foot - Singer 1 One | Instruction Manual 26 - Page 25
threading eye of needle, make sure thread is in front of thread guide located on the bottom of the needle clamp. Thread the eye of needle eye threading easy. The position of the thread must be behind the the thread guide. Draw about 10cm (4 inches) of thread through needle eye to hang free. Place - Singer 1 One | Instruction Manual 26 - Page 26
to release Tension discs. Pass thread from back to the front through the thread guide 1. 1 2 3 6 7 8 54 9 1 Thread the top cover thread guide by pulling the thread towards the left until it slips under 2 guide. Then pull thread along the right side of button as illustrated. While - Singer 1 One | Instruction Manual 26 - Page 27
5 and slot of take-up lever cover 6. Then slip thread into left slots of thread guides 7 and 8. Before threading eye of needle, make sure thread is in front of thread guide located on the bottom of the needle clamp. 7 6 8 4 5 9 Thread the eye of the left needle 9. Note: Use of tweezers in - Singer 1 One | Instruction Manual 26 - Page 28
make certain it is properly located in between the tension discs 3. 3 2 3 Continue to thread points 4~8. Note: Slip thread into the middle slot of the thread guide 5 and into the slot of take-up lever cover 6. Then continue by slipping thread into the middle slot of the thread - Singer 1 One | Instruction Manual 26 - Page 29
release Tension discs. Pass thread from back to the front through the thread guide 1. 9 1 6 7 8 5 2 3 4 9 1 Thread the top cover thread guide by pulling 2 the thread towards the left until it slips under guide. Then pull thread along the right side of 2 button as illustrated. 28 - Singer 1 One | Instruction Manual 26 - Page 30
to make certain it is properly located in between the tension discs 3. 3 3 Continue to thread points 4~8. Note: Slip thread into the rear slot on thread guides 5. Slip the thread into the slot of the Take-up Lever Cover 6. Slip the thread into the right slots for thread - Singer 1 One | Instruction Manual 26 - Page 31
. Raise Presser foot by lowering presser bar lifter to release Tension discs. Pull the threads through the machine one at a time. If threads do not pull easily, check for tangles on thread guides or looping under thread stand. When pulling thread through the needles, STOP when the knot is in front - Singer 1 One | Instruction Manual 26 - Page 32
The stitch length dial should be set on the N setting for most sewing conditions. 4 Adjust the stitch length to N~ 4 when sewing 3 heavy weight fabrics. N Adjust the stitch length to 2~N when sewing 2 lightweight fabrics to obtain excellent seams without puckering. 15. HOW TO ADJUST - Singer 1 One | Instruction Manual 26 - Page 33
16. HOW TO ADJUST THE PRESSER FOOT PRESSURE The presser foot pressure of this machine is pre-adjusted at the factory to suit the sewing of medium weight fabrics. Most of the materials do not require adjustment of 5 presser foot pressure. However, there are some instances where adjustment is - Singer 1 One | Instruction Manual 26 - Page 34
of adjusting dial depends on material being sewn as well as the amount of desired gather. Therefore, set dial to suit the N fabric and test sew before sewing your garment. 0.8 Note: For normal overedge stitching, set differential feed adjusting dial to graduation "N". 0.6 33 - Singer 1 One | Instruction Manual 26 - Page 35
knit and woven fabrics. To set the differential feed adjusting dial for stretch Set differential feed adjusting lever knob above setting "N". 2.0 1.5 N 0.8 0.6 To sew a seam, apply gentle tension to the fabric by holding the seam lightly in front and back of the presser foot. Note: *if - Singer 1 One | Instruction Manual 26 - Page 36
18. HOW TO DISENGAGE MOVABLE UPPER KNIFE Caution: Be sure to turn off power switch. To place movable knife in nonworking position Open looper cover (page 12). Pull the movable knife holder to the right as far as it will go. Turn the holder toward counter clockwise until the knife clicks into a lock - Singer 1 One | Instruction Manual 26 - Page 37
19. TO CONVERT UPPER LOOPER TO SPREADER Caution: Be sure to turn off power switch. When not threading the upper looper, the spreader must be engaged into the upper looper eye. To Use the Spreader To engage the spreader, raise the white handle on the spreader to insert the tip into the eye of upper - Singer 1 One | Instruction Manual 26 - Page 38
. Note: Be sure to push seam width finger knob as far as it will go in the direction of setting N. N R To Sew Rolled Hem Set seam width finger knob to R to retract the seam width finger and set it for rolled hem. Note: Be sure to push - Singer 1 One | Instruction Manual 26 - Page 39
SEWING Note: The following instructions do not apply to cover stitch. For instructions on cover stitch, see page 49 "How to Sew presser foot and sew a test sample. Note: Do not pull on the fabric while sewing as this may rethreaded the machine always chain off and sew a text sample to test tensions - Singer 1 One | Instruction Manual 26 - Page 40
Stitch length for double chain stitch should be set at over 2mm. Correct Balance Set auto tension dial to D shown at right and test sew on a sample of your fabric. ATD:D NEEDLE POSITION SEAM WIDTH FINGER KNOB STITCH LENGTH DRIVING CULTCH POSITION R 2~4 C Needle thread Topside Chain stitch looper - Singer 1 One | Instruction Manual 26 - Page 41
How to Sew The double chain stitch is sewn with 2 threads, one needle and one looper. Normally, the machine trims the fabric edge the chain stitch seam guide plate Caution: Be sure to turn off the power switch. a) Move knife into nonworking position See page 35 for instructions on placing upper - Singer 1 One | Instruction Manual 26 - Page 42
thickness of fabric 2) Needle size 3) Size, type and fibre content of thread Correct Balance Set auto tension dial to D or G shown at right and test sew on a sample of your fabric. How to Balance When the lower looper thread tension is too tight or needle thread tension is too loose; -Move - Singer 1 One | Instruction Manual 26 - Page 43
of fabric 2) Needle size 3) Size, type and fibre content of thread * See page 36 for instructions on converting upper looper to spreader. Correct Balance Set auto tension dial to E shown at right and test sew on a sample of your fabric. ATD:E NEEDLE POSITION SEAM WIDTH FINGER KNOB STITCH LENGTH - Singer 1 One | Instruction Manual 26 - Page 44
2) Needle size 3) Size, type and fibre content of thread Correct Balance Set auto tension dial to A or B shown at right and test sew on a sample of your fabric. NEEDLE POSITION SEAM WIDTH FINGER KNOB N STITCH LENGTH 2~4 SPREADER N/A Upper looper thread Needle thread Topside Lower looper - Singer 1 One | Instruction Manual 26 - Page 45
2) Needle size SPREADER N/A 3) Size, type and fibre content of thread Correct Balance Set auto tension dial to F shown at right and test sew on a sample of your fabric. Needle thread Upper looper thread Topside Needle thread Lower looper thread Underside Fabric Tension Dial Orange Blue Green - Singer 1 One | Instruction Manual 26 - Page 46
of fabric 2) Needle size 3) Size, type and fibre content of thread Correct Balance Set auto tension dial to G shown at right and test sew on a sample of your fabric. ATD:G NEEDLE POSITION SEAM WIDTH FINGER KNOB STITCH LENGTH SPREADER Right Needdle thread N 2~4 USE Left Needle thread Topside - Singer 1 One | Instruction Manual 26 - Page 47
of fabric 2) Needle size 3) Size, type and fibre content of thread Correct Balance Set auto tension dial to A shown at right and test sew on a sample of your fabric. ATD:A NEEDLE POSITION SEAM WIDTH FINGER KNOB N STITCH LENGTH 2~4 SPREADER N/A Upper looper thread Right Needle thread Left - Singer 1 One | Instruction Manual 26 - Page 48
and thickness of fabric 2) Needle size 3) Size, type and fibre content of thread Correct Balance Set auto tension dial to I shown at right and test sew on a sample of your fabric. How to Balance When the lower looper thread appears on the top of the fabric; -Move the lower looper thread - Singer 1 One | Instruction Manual 26 - Page 49
SEAM WIDTH FINGER KNOB STITCH LENGTH SPREADER Upper looper thread N 2~4 N/A Lower looper thread Correct Balance Set auto tension dial to B shown at right and test sew on a sample of your fabric. How to Balance When the upper looper thread lies on the underside of the fabric; -Move the upper looper - Singer 1 One | Instruction Manual 26 - Page 50
breakage and or skipping. If you experience skipping or thread breakage sewing denim change needles first and then adjust the tensions little by little seam guide plate. (See page 40) The graduations on seam guide plate indicate the distance from cover stitch middle needle. Use it as a guide when - Singer 1 One | Instruction Manual 26 - Page 51
Additional Information About Cover Stitch Start and end of sewing Note: Follow the instructions given below when sewing cover stitches because chaining-off at the end of sewing is not possible. At start of sewing Raise presser foot by lowering the presser bar lifter. Place material under presser - Singer 1 One | Instruction Manual 26 - Page 52
thread * Stitch length for cover stitch should be set at over N (2.5 mm). Correct Balance Set auto tension dial to K or H shown at right and test sew on a sample of your fabric. How to Balance When the cover stitch looper thread is too loose; -Move the cover stitch looper thread tension fine - Singer 1 One | Instruction Manual 26 - Page 53
* Stitch length for cover stitch should be set at over N (2.5 mm). Correct Balance Set auto tension dial to J shown at right and test sew on a sample of your fabric. ATD:J NEEDLE POSITION SEAM WIDTH FINGER KNOB R STITCH LENGTH N~4 DRIVING CLUTCH POSTION C Cover stitch right needle thread - Singer 1 One | Instruction Manual 26 - Page 54
fabric edge, knot the needle threads (2 or 3 threads) together first, as shown on the illustration. Then, tie these threads with the looper threads. When sewing is stopped halfway, pull out the needle threads (2 or 3 threads) on the underside of the fabric and knot the threads in the same manner as - Singer 1 One | Instruction Manual 26 - Page 55
A ROLLED HEM This machine can sew four types of rolled hems. Rolled hemming is done by cover stitch needle(s). Move seam width finger knob to setting R. Align left face of seam width finger support plate with R mark on needle plate by turning seam width adjustment knob, as required. Set stitch - Singer 1 One | Instruction Manual 26 - Page 56
lower looper with lightweight regular thread. 1) 3-thread Standard Rolled Hem Stitching Correct Balance Set auto tension dial to A shown at right and test sew on a sample of your fabric. 2) 3-thread Upper Looper Thread Wrapped Rolled Hem Stitching Correct Balance Set auto tension dial to C shown at - Singer 1 One | Instruction Manual 26 - Page 57
to spreader. (See page 36) 3) 2-thread Standard Rolled Hem Stitching Correct Balance Set auto tension dial to E as shown on illustration and test sew on a sample of your fabric. 4) 2-thread Lower Thread Wrapped Rolled Hem Stitching Correct Balance Set auto tension dial to D as shown on illustration - Singer 1 One | Instruction Manual 26 - Page 58
to keep it from curling into the seam. Place a slight tension on the material in the sewing direction and a finer seam finish can be obtained. The minimum overedge stitch width that can be obtained for rolled hemming is approximately 1.5 mm (1/16 inch) - Singer 1 One | Instruction Manual 26 - Page 59
overedge (page 42) or 3-thread flatlock stitch ATD-F (page 44). 2) Flatlocking a Seam Place the fabric wrong sides together to sew a decorative stitch on the right side of the garment. Sew the seam, trimming the excess fabric. The needle thread (orange or blue) will form a V on the underside of the - Singer 1 One | Instruction Manual 26 - Page 60
thread in the flatlock stitch. Place a decorative thread in the upper looper and inconspicuous threads in the lower looper and needle. For a ladder stitch, sew seam with right sides together. The needle thread will be the prominent thread that creates the ladder (A). 59 1 2 A Underside Topside - Singer 1 One | Instruction Manual 26 - Page 61
Blind Hem The excess fabric is trimmed and the hem is sewn and the raw edges are overlocked in one operation. The overlock blind hem is best suited for sewing knit wear. It provides a durable finish that is almost invisible. Use overedge right needle and adjust machine for a narrow 3-thread - Singer 1 One | Instruction Manual 26 - Page 62
the same direction. Turning Square Corners (1) Outside Corner Cut out approximately 2cm (51/64 inch) from the corner, in line with the overedge seam edge. Sew one stitch beyond point (A) and stop. Raise needle and presser foot. Pull the fabric to the rear of the machine just enough to release the - Singer 1 One | Instruction Manual 26 - Page 63
are away from the cutting action of the knives. Caution: Sewing over pins will damage and /or destroy the cutting edge of the knives. Securing the Thread Chain Thread a large eye, hand sewing needle (such as a tapestry needle) with the thread chain. Insert the needle - Singer 1 One | Instruction Manual 26 - Page 64
. Insert the tape through the hole in the front of the foot. Position the tape under the foot to the back of the machine and sew the garment seam. The tape is attached as the seam is sewn. Braiding by Chaining off Place the movable upper knife in nonworking position. Insert - Singer 1 One | Instruction Manual 26 - Page 65
lubricating your machine, disconnect power line plug from the wall receptacle. The oiling points shown in the diagram, should be oiled periodically. Note: Use only sewing machine oil. Do not use any other oil or damage could result. 64 A B C D - Singer 1 One | Instruction Manual 26 - Page 66
dull. The moveable upper knife can be replaced according to the directions provided, however if there are any difficulties experienced, consult your Singer representative to make the replacement. Be sure that the power line plug is disconnected from the electric source. Open the looper cover and - Singer 1 One | Instruction Manual 26 - Page 67
before re-lamping. Light bulb is available at your Singer shop. Take old bulb to the Singer shop and ask for the same bulb. If voltage : Be sure the light bulb has cooled off before changing with a new one. Warning: Replace the light cover first before connecting the power line plug. Replace - Singer 1 One | Instruction Manual 26 - Page 68
27. OPTIONAL ACCESSORIES The following optional presser feet specially prepared for this machine are available at extra-charge. Note: Do not use presser foot made for other machines. Use of such presser foot may result in interference with the needle and knife and can be hazardous. A The snap-on - Singer 1 One | Instruction Manual 26 - Page 69
skirts, etc. This foot is also suited for sewing two fabrics together and gathering the bottom fabric in one operation. 4) Pearl/Sequin Foot This foot is used for sewing on beads, etc. 5) Piping/ Cording Foot This sewing foot is suited for sewing welting between two plies of fabric. 6) Taping Foot - Singer 1 One | Instruction Manual 26 - Page 70
TROUBLESHOOTING CHART Problem Fabric does not feed well Solution - Lengthen stitch length. - Increase presser foot pressure for heavy weight fabric. - Decrease presser foot pressure for lightweight fabric. Needle breaks - Insert needle correctly. - Do not pull fabric while sewing only Singer - Singer 1 One | Instruction Manual 26 - Page 71
WOVEN Lightweight Lawn, Organdy, Voile, Crepe, etc. Type of Thread Cotton: #100 Silk/ Rayon: #100 Spun: #80 ~ #90 Polyester: #80 ~ #100 Needle Singer Cat. #2022 #11/80 Medium Weight Muslin, Seersucker, Satin, Gabardine, Broadcloth, etc Cotton: #60 ~ #80 Silk/ Rayon: #50 Spun: #60 ~ #80 Polyester - Singer 1 One | Instruction Manual 26 - Page 72
30. SPECIFICATION Item Sewing speed Stitch length (feed amount) Differential feed ratio Overedge stitch width , ordinary overedge 3.0 ~ 9.8 mm (Standard 4 mm) Two needles: 2.8 mm (narrow), 5.6 mm (wide) Triple needles: 5.6 mm 27 mm 4.5 mm Singer #2022 (EL x 705) #14, #11 2~5 360 290 300 9.0 kgs 71
-
 1
1 -
 2
2 -
 3
3 -
 4
4 -
 5
5 -
 6
6 -
 7
7 -
8
-
9
-
10
-
11
-
12
-
13
-
14
-
15
-
16
-
17
-
18
-
19
-
20
-
21
-
22
-
23
-
24
-
25
-
26
-
27
-
28
-
29
-
30
-
31
-
32
-
33
-
34
-
35
-
36
-
37
-
38
-
39
-
40
-
41
-
42
-
43
-
44
-
45
-
46
-
47
-
48
-
49
-
50
-
51
-
52
-
53
-
54
-
55
-
56
-
57
-
58
-
59
-
60
-
61
-
62
-
63
-
64
-
65
-
66
-
67
-
68
-
69
-
70
-
71
-
72
 |
 |
14T967DC
Instruction Book