Singer 1 One Instruction Manual 38 - Page 11
Remove, Replace, Cloth, Plate, Cylinder, Cover
 |
View all Singer 1 One manuals
Add to My Manuals
Save this manual to your list of manuals |
Page 11 highlights
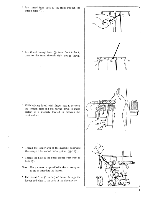
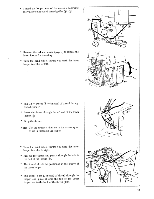
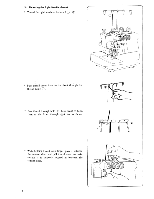
9. HOW TO REMOVE AND REPLACE CLOTH PLATE * Remove cloth plate for free arm sewing (tublar work) * To remove, pull cloth plate to the left while pressing the push botton on underside of cloth plate upward. * To replace, guide latch on cloth plate into hole in cylinder cover and push cloth plate to the right as far as it will go. 10. HOW TO REMOVE AND REPLACE CYLINDER COVER * Removing the cylinder cover exposes the lower looper for easy threading and cleaning of the machine. * Cylinder cover can be removed together with the cloth plate by pulling the cylinder cover to the left. * To replace the cylinder cover together with the cloth plate, push cloth plate with the cylinder cover attached, to the right as far as it will go. * To remove the cylinder cover when cloth plate is not fitted on the machine, it can be removed easily by lifting it upward while pulling to the left. * To replace only the cylinder cover, place tab on top of cylinder cover under the throat plate and press cover downward and to the right. Warning: Do not hold the cylinder cover when lifting or carrying the machine. Caution: Be sure cylinder coveris replaced when sewing. Hole Latch Push Button oe 0 9
-
 1
1 -
2
-
3
-
4
-
5
-
 6
6 -
 7
7 -
 8
8 -
 9
9 -
 10
10 -
 11
11 -
 12
12 -
 13
13 -
 14
14 -
 15
15 -
 16
16 -
17
-
18
-
19
-
20
-
21
-
22
-
23
-
24
-
25
-
26
-
27
-
28
-
29
-
30
-
31
-
32
-
33
-
34
-
35
-
36
-
37
-
38
-
39
-
40
-
41
-
42
-
43
-
44
-
45
-
46
-
47
-
48
 |
 |
