Singer 1 One Instruction Manual 38 - Page 12
Threading, Machine, Diagram, Understanding, Color, Stitch, Thread, Correctly, Threading, Upper,
 |
View all Singer 1 One manuals
Add to My Manuals
Save this manual to your list of manuals |
Page 12 highlights
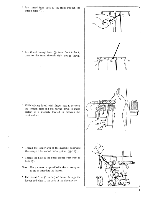
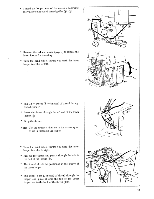
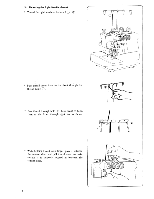
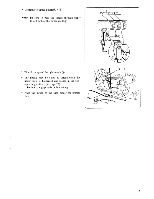
11. THREADING THE MACHINE • THREADING DIAGRAM * A color coded threading diagram is located inside the looper cover for quick reference. * Thread the machine in the order C) to C) as shown. • UNDERSTANDING THE COLOR CODE * Left needle thread - Blue C) * Right needle thread - Green C) * Upper looper thread - Orange C) * Lower looper thread - Yellow O 4 THREADS 3 THREADS LEFT RIGHT NEEDLE NEEDLE • STITCH DIAGRAM * Upper looper thread - Orange * Lower looper thread - Yellow 0 * Right needle thread - Green 0 * Left needle thread Blue 0 CD Topside Underside • TO THREAD THE MACHINE CORRECTLY (1) Threading the Upper Looper (Orange) * Thread the upper looper as indicated ® • 10 O ate
-
 1
1 -
2
-
3
-
4
-
5
-
6
-
 7
7 -
 8
8 -
 9
9 -
 10
10 -
 11
11 -
 12
12 -
 13
13 -
 14
14 -
 15
15 -
 16
16 -
 17
17 -
18
-
19
-
20
-
21
-
22
-
23
-
24
-
25
-
26
-
27
-
28
-
29
-
30
-
31
-
32
-
33
-
34
-
35
-
36
-
37
-
38
-
39
-
40
-
41
-
42
-
43
-
44
-
45
-
46
-
47
-
48
 |
 |

11.
THREADING
THE
MACHINE
•
THREADING
DIAGRAM
*
A
color
coded
threading
diagram
is
located
inside
the
looper
cover
for
quick
reference.
*
Thread
the
machine
in
the
order
C)
to
C)
as
shown.
•
UNDERSTANDING
THE
COLOR
CODE
*
Left
needle
thread
—
Blue
C)
*
Right
needle
thread
—
Green
C)
*
Upper
looper
thread
—
Orange
C)
*
Lower
looper
thread
—
Yellow
O
•
STITCH
DIAGRAM
*
Upper
looper
thread
—
Orange
*
Lower
looper
thread
—
Yellow
*
Right
needle
thread
—
Green
*
Left
needle
thread
Blue
0
0
•
TO
THREAD
THE
MACHINE
CORRECTLY
(1)
Threading
the
Upper
Looper
(Orange)
*
Thread
the
upper
looper
as
indicated
®
•
4
THREADS
Topside
ate
3
THREADS
LEFT
RIGHT
NEEDLE
NEEDLE
0
CD
O
Underside
10