Singer CE-350 Futura Instruction Manual - Page 10
Getting Started Sewing - sewing machine
 |
View all Singer CE-350 Futura manuals
Add to My Manuals
Save this manual to your list of manuals |
Page 10 highlights
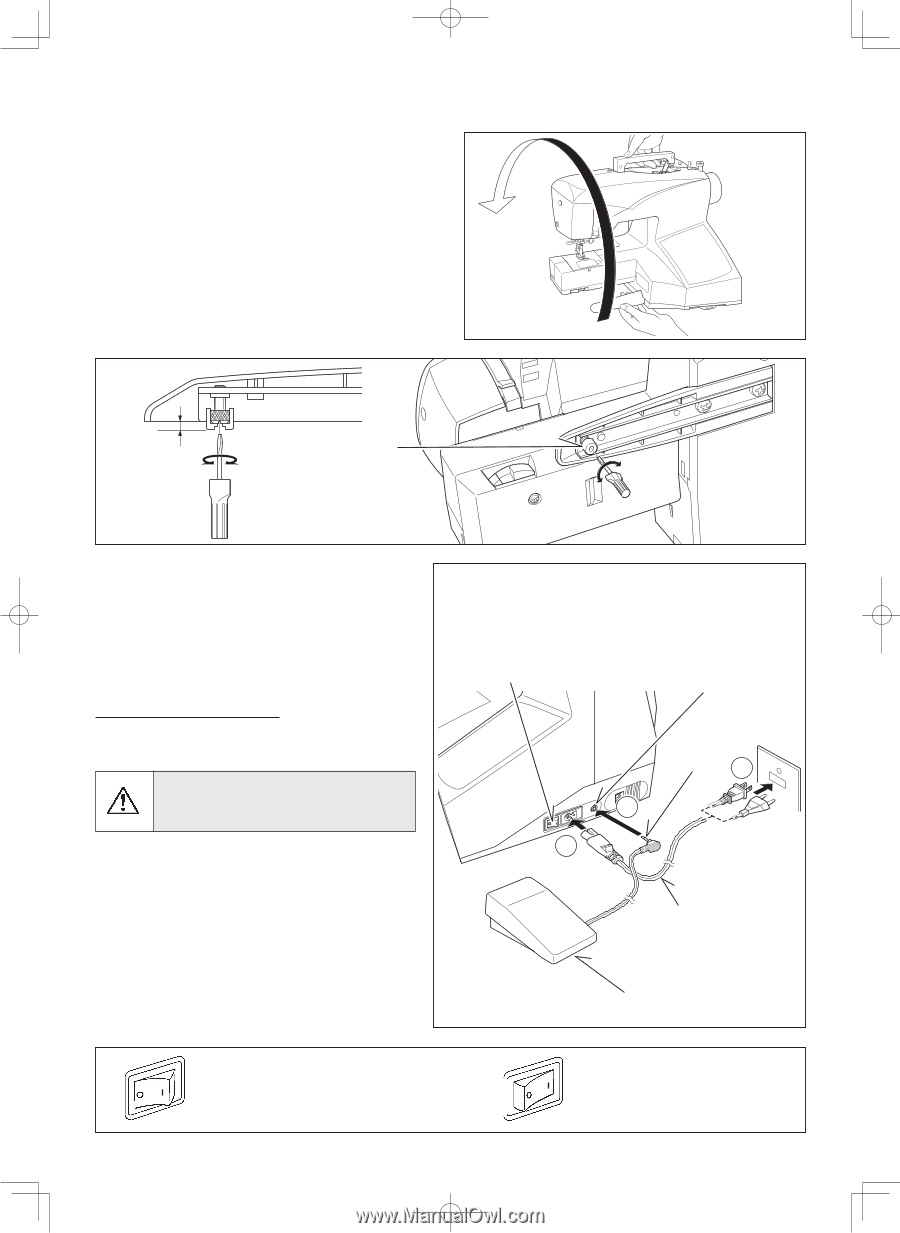
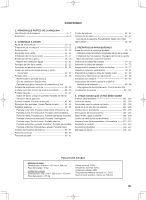
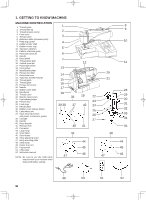
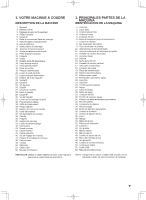
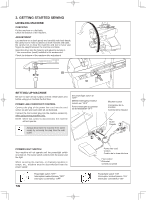
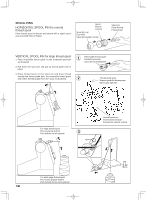
2. GETTING STARTED SEWING LEVELING MACHINE CHECKING Put the machine on a flat table. Check the balance of the machine. ADJUSTMENT Lay machine on its back gently and carefully with both hands. Be careful not to make scratches on both machine and table. Be careful not to drop the machine and not to have your fingers be caught between the machine and table. Insert the driver into the hole (1) and adjust by turning it. * Use screwdriver (small) included in the accessories. Check the balance of the machine after adjustment. (1) SETTING UP MACHINE Be sure to wipe off any surplus oil from needle plate area before using your machine the first time. Power line cord/FOOT CONTROL Connect the plug of the power line cord into the cord socket (1) and your wall outlet (2) as illustrated. Connect the foot control plug into the machine socket (3), when using sewing machine only. NOTE: When foot control is disconnected, the machine will not operate. Set power/light switch at "OFF" Mettez l'interrupteur moteur/ lumière sur "OFF". Poner el Interruptor de corriente/ luz de velocidad en "OFF" Always disconnect the machine from power supply by removing the plug from the walloutlet. 3 1 machine socket Connecteur de la machine Conector de la máquina Pin Butée 2 Pasador POWER/LIGHT SWITCH Your machine will not operate until the power/light switch is turned on. The same switch controls both the power and the light. When servicing the machine, or changing needles or Iamps, etc., machine must be disconnected from the power supply. Power/light switch "OFF" Interrupteur moteur/lumière "OFF" Interruptor corriente/luz "OFF" 10 Power line cord Cordon Cordón de la linea eléctrica Foot control Rhéostat Control por pedal Power/light switch "ON" Interrupteur moteur/lumière "ON" Interruptor corriente/luz "ON"
-
 1
1 -
2
-
3
-
4
-
 5
5 -
 6
6 -
 7
7 -
 8
8 -
 9
9 -
 10
10 -
 11
11 -
 12
12 -
 13
13 -
 14
14 -
 15
15 -
16
-
17
-
18
-
19
-
20
-
21
-
22
-
23
-
24
-
25
-
26
-
27
-
28
-
29
-
30
-
31
-
32
-
33
-
34
-
35
-
36
-
37
-
38
-
39
-
40
-
41
-
42
-
43
-
44
-
45
-
46
-
47
-
48
-
49
-
50
-
51
-
52
-
53
-
54
-
55
-
56
-
57
-
58
-
59
-
60
-
61
-
62
-
63
-
64
-
65
-
66
-
67
-
68
-
69
-
70
-
71
-
72
-
73
-
74
-
75
-
76
-
77
-
78
-
79
-
80
-
81
-
82
-
83
-
84
-
85
-
86
-
87
-
88
-
89
-
90
-
91
-
92
-
93
-
94
-
95
-
96
-
97
-
98
-
99
-
100
-
101
-
102
-
103
-
104
-
105
-
106
-
107
-
108
-
109
-
110
-
111
-
112
-
113
-
114
-
115
-
116
-
117
-
118
-
119
-
120
-
121
-
122
-
123
-
124
 |
 |