Singer Futura XL-400 Instruction Manual - Page 72
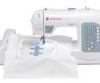
Preparing The Machine Before, Installing The Hoop, Attaching And Removing, Embroidery Hoop
 |
View all Singer Futura XL-400 manuals
Add to My Manuals
Save this manual to your list of manuals |
Page 72 highlights
PREPARING THE MACHINE BEFORE INSTALLING THE HOOP 1 1. Turn hand wheel counter clockwise (toward you) until the needle comes to its highest position. ATTACHING AND REMOVING EMBROIDERY HOOP 1 (A) 1. Raise presser foot and needle, and push up lever (A) of embroidery foot with your finger and pass embroidery hoop under it. To remove, pull the hoop forward to slide it out from underneath the embroidery foot. 2. Slide the hoop onto the embroidery unit from front to back until it clicks into place. 2 To remove, press the release lever and slide the hoop towards you. NOTE: Before attaching small hoop, turn on power switch to move the carriage to embroidering standby position. Carriage Chariot Carro Hoop mounting plate Plaque de montage de cerceau Placa de montaje de aro Hoop release lever Levier de retrait du cerceau. Palanca de liberación del aro 70
-
 1
1 -
2
-
3
-
4
-
5
-
6
-
7
-
8
-
9
-
10
-
11
-
12
-
13
-
14
-
15
-
16
-
17
-
18
-
19
-
20
-
21
-
22
-
23
-
24
-
25
-
26
-
27
-
28
-
29
-
30
-
31
-
32
-
33
-
34
-
35
-
36
-
37
-
38
-
39
-
40
-
41
-
42
-
43
-
44
-
45
-
46
-
47
-
48
-
49
-
50
-
51
-
52
-
53
-
54
-
55
-
56
-
57
-
58
-
59
-
60
-
61
-
62
-
63
-
64
-
65
-
66
-
 67
67 -
 68
68 -
 69
69 -
 70
70 -
 71
71 -
 72
72 -
 73
73 -
 74
74 -
 75
75 -
 76
76 -
 77
77 -
78
-
79
-
80
-
81
-
82
-
83
-
84
-
85
-
86
-
87
-
88
-
89
-
90
-
91
-
92
-
93
-
94
-
95
-
96
-
97
-
98
-
99
-
100
-
101
-
102
-
103
-
104
-
105
-
106
-
107
-
108
-
109
-
110
-
111
-
112
 |
 |
