Singer One Instruction Manual 3 - Page 20
Needle, Position, Stitch, Width, Accessories
 |
View all Singer One manuals
Add to My Manuals
Save this manual to your list of manuals |
Page 20 highlights
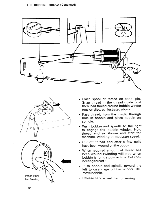
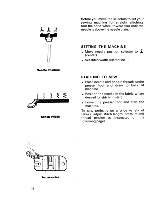
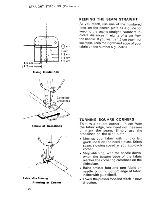
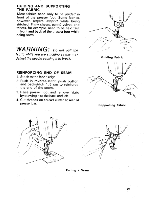
L. Q Before you move the selectors to set your sewing machine for straight stitching, turn the hand wheel toward you until the needle is above the needle plate. Needle Position a111111111•11111111 Stitch Width SETTING THE MACHINE • Move needle position selector to I (center). . Set stitch width selector on STARTING TO SEW • Place needle and bobbin threads under presser foot and draw to back of machine. e Position the needle in the fabric where desired for stitching start. . Lower the presser foot and start the machine. To sew 'perfectly on a wide variety of fabrics, adjust stitch length, pressure and thread tension as instructed on the following pages. 4 4•• 34 56 0 Accessories 16
-
 1
1 -
2
-
3
-
4
-
5
-
6
-
7
-
8
-
9
-
10
-
11
-
12
-
13
-
14
-
 15
15 -
 16
16 -
 17
17 -
 18
18 -
 19
19 -
 20
20 -
 21
21 -
 22
22 -
 23
23 -
 24
24 -
 25
25 -
26
-
27
-
28
-
29
-
30
-
31
-
32
-
33
-
34
-
35
-
36
-
37
-
38
-
39
-
40
-
41
-
42
-
43
-
44
-
45
-
46
-
47
-
48
-
49
-
50
-
51
-
52
-
53
-
54
-
55
-
56
 |
 |

L.
Q
Needle
Position
a111111111•11111111
Stitch
Width
4
4••
3
4
5
6
0
Accessories
Before
you
move
the
selectors
to
set
your
sewing
machine
for
straight
stitching,
turn
the
hand
wheel
toward
you
until
the
needle
is
above
the
needle
plate.
SETTING
THE
MACHINE
•
Move
needle
position
selector
to
I
(center).
.
Set
stitch
width
selector
on
STARTING
TO
SEW
•
Place
needle
and
bobbin
threads
under
presser
foot
and
draw
to
back
of
machine.
e
Position
the
needle
in
the
fabric
where
desired
for
stitching
start.
.
Lower
the
presser
foot
and
start
the
machine.
To
sew
'perfectly
on
a
wide
variety
of
fabrics, adjust
stitch
length,
pressure
and
thread
tension
as
instructed
on
the
following
pages.
16