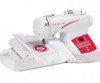
Singer SES2000 Instruction Manual - Page 3

Table Of Contents - embroidery hoop

Page 3 highlights

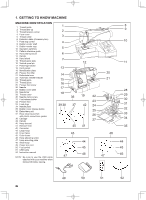
TABLE OF CONTENTS 1. GETTING TO KNOW MACHINE Machine identification 6 - 7 Accessories 8 - 9 2. GETTING STARTED SEWING Leveling machine 10 - 11 Setting up machine 10 - 11 Spool pins 12 - 13 Winding bobbin 14 - 15 Inserting the bobbin 16 - 17 Setting the top thread 18 - 19 Automatic needle threader 20 - 21 Control panel function 22 - 29 Quick reference table of stitch length and width 28 - 31 Straight stitching 32 - 37 Keeping seams straight, Turning a square corner, Reverse stitch, Inserting zippers and piping Hand-look quilt stitch 36 - 37 Straight stitch with auto tie-off function 36 - 37 Zigzag stitching 38 - 39 Adjusting stitch width and length, Satin stitch Placement of patterns Blind stitch, Shell stitch 40 - 41 Multi-stitch zigzag, Fagoting 42 - 43 Stretch stitches 44 - 53 Straight stretch stitch, Overedge stitch, Ric-rac stitch, Feather stitch, Honeycomb stitch, Slant Overedge Stitch, blanket stitch, Turkish stitch, Slant pin stitch, Reinforced overedge stitch, Thorn stitch,Wizard stitch, Crossed stitch, Chevron stitch, Pin stitch, Entredeux stitch, Ladder stitch, Criss-cross stitch, Greek key stitch, Fishbone stitch Decorative Stitching 54 - 55 Continuous patterns 56 - 57 Novelty patterns 58 - 59 Sewing on a button 58 - 59 Buttonhole making 60 - 65 Using buttonhole foot, Procedure, Corded buttonholes Manual buttonhole 66 - 67 3. PREPARATION FOR EMBROIDERY SEWING Before attaching embroidery unit 68 - 71 Attaching embroidery foot, Inserting the bobbin, Setting top thread, Picking up bobbin thread, Extension table, Feed dog control Attaching embroidery unit 72 - 73 Removing embroidery unit 72 - 73 Securing material in embroidery hoop 74 - 75 Using the material and stabilizer 76 - 79 Preparing the machine before installing the hoop --------- 80 - 81 Attaching and removing embroidery hoop 80 - 81 Installation of software 82 - 85 Operation switches when embroidery unit is attached ------ 86 - 87 Operation switches, Thread tension control Troubleshooting 88 - 99 4. OTHER THINGS YOU SHOULD KNOW Presser foot lifter 100 - 101 Feed dog control 100 - 101 Converting to free-arm sewing 100 - 101 Adjusting top thread tension 102 - 103 Changing presser foot 102 - 103 Operation switches 104 - 105 Needle, thread and fabric chart 106 - 107 Performance checklist 108 - 109 Cleaning hook area and feed dogs 110 - 111 Oiling inside the face cover 112 - 113 Special accessories 114 - 117 Helpful messages 118 - 121 For European version Sewing machine Dimensions: 428 mm × 307 mm × 294 mm Mass of the equipment: 10 kg Embroidery unit Dimensions: 433.5 mm × 269.5 mm × 133 mm Mass of the equipment: 2.26 kg Rated Voltage: 230V ~ Rated Frequency: 50Hz Rated input: 60W Rated ambient temperature: 15 - 35°C Acoustic noise level: less than 70db(A) 3

  • 1
  • 2
  • 3
  • 4
  • 5
  • 6
  • 7
  • 8
  • 9
  • 10
  • 11
  • 12
  • 13
  • 14
  • 15
  • 16
  • 17
  • 18
  • 19
  • 20
  • 21
  • 22
  • 23
  • 24
  • 25
  • 26
  • 27
  • 28
  • 29
  • 30
  • 31
  • 32
  • 33
  • 34
  • 35
  • 36
  • 37
  • 38
  • 39
  • 40
  • 41
  • 42
  • 43
  • 44
  • 45
  • 46
  • 47
  • 48
  • 49
  • 50
  • 51
  • 52
  • 53
  • 54
  • 55
  • 56
  • 57
  • 58
  • 59
  • 60
  • 61
  • 62
  • 63
  • 64
  • 65
  • 66
  • 67
  • 68
  • 69
  • 70
  • 71
  • 72
  • 73
  • 74
  • 75
  • 76
  • 77
  • 78
  • 79
  • 80
  • 81
  • 82
  • 83
  • 84
  • 85
  • 86
  • 87
  • 88
  • 89
  • 90
  • 91
  • 92
  • 93
  • 94
  • 95
  • 96
  • 97
  • 98
  • 99
  • 100
  • 101
  • 102
  • 103
  • 104
  • 105
  • 106
  • 107
  • 108
  • 109
  • 110
  • 111
  • 112
  • 113
  • 114
  • 115
  • 116
  • 117
  • 118
  • 119
  • 120
  • 121
  • 122
  • 123
  • 124

3
1. GETTING TO KNOW MACHINE
Machine identification
------------------------------------------------6 - 7
Accessories -------------------------------------------------------------8 - 9
2. GETTING STARTED SEWING
Leveling
M
achine --------------------------------------------------10 - 11
Setting up machine
------------------------------------------------10 - 11
Spool pins
----------------------------------------------------------- 12 - 13
Winding bobbin ---------------------------------------------------- 14 - 15
Inserting the bobbin ---------------------------------------------- 16 - 17
Setting the top thread
-------------------------------------------- 18 - 19
Automatic needle threader ----------------------------------- 20 - 21
Control panel function ------------------------------------------- 22 - 29
Quick reference table of stitch length and width ---------- 28 - 31
Straight stitching
-------------------------------------------------- 32 - 37
Keeping seams straight, Turning a square corner,
Reverse stitch, Inserting zippers and piping
Hand-look quilt stitch --------------------------------------------- 36 - 37
Straight stitch with auto tie-off function
---------------------- 36 - 37
Zigzag stitching ---------------------------------------------------- 38 - 39
Adjusting stitch width and length, Satin stitch
Placement of patterns
Blind stitch, Shell stitch
------------------------------------------ 40 - 41
Multi-stitch zigzag, Fagoting
----------------------------------- 42 - 43
Stretch stitches
---------------------------------------------------- 44 - 53
Straight stretch stitch, Overedge stitch, Ric-rac stitch,
Feather stitch, Honeycomb stitch, Slant Overedge Stitch,
B
lanket stitch, Turkish stitch, Slant pin stitch,
Reinforced overedge stitch, Thorn stitch,Wizard stitch,
Crossed stitch, Chevron stitch, Pin stitch, Entredeux stitch,
Ladder stitch, Criss-cross stitch, Greek key stitch,
Fishbone stitch
Decorative Stitching
---------------------------------------------- 54 - 55
Continuous patterns ---------------------------------------------- 56 - 57
Novelty patterns --------------------------------------------------- 58 - 59
TABLE OF CONTENTS
Sewing on a button
----------------------------------------------- 58 - 59
Buttonhole making ------------------------------------------------ 60 - 65
Using buttonhole foot, Procedure, Corded buttonholes
Manual buttonhole
------------------------------------------------ 66 - 67
3. PREPARATION FOR EMBROIDERY SEWING
Before attaching embroidery unit ----------------------------- 68 - 71
Attaching embroidery foot, Inserting the bobbin,
Setting top thread, Picking up bobbin thread,
Extension table, Feed dog control
Attaching embroidery unit --------------------------------------- 72 - 73
Removing embroidery unit -------------------------------------- 72 - 73
Securing material in embroidery hoop
----------------------- 74 - 75
Using the material and stabilizer ------------------------------ 76 - 79
Preparing the machine before installing the hoop -------- 80 - 81
Attaching and removing embroidery hoop ------------------ 80 - 81
Installation of software ------------------------------------------- 82 - 85
Operation switches when embroidery unit is attached ----- 86 - 87
Operation switches, Thread tension control
Troubleshooting
--------------------------------------------------- 88 - 99
4. OTHER THINGS YOU SHOULD KNOW
Presser foot lifter ----------------------------------------------- 100 - 101
Feed dog control
----------------------------------------------- 100 - 101
Converting to free-arm sewing ----------------------------- 100 - 101
Adjusting top thread tension -------------------------------- 102 - 103
Changing presser foot ---------------------------------------- 102 - 103
Operation switches -------------------------------------------- 104 - 105
Needle, thread and fabric chart ---------------------------- 106 - 107
Performance checklist ---------------------------------------- 108 - 109
Cleaning hook area and feed dogs -------------------------110 - 111
Oiling inside the face cover ---------------------------------- 112 - 113
Special accessories
------------------------------------------- 114 - 117
Helpful messages ---------------------------------------------- 118 - 121
Sewing machine
Dimensions: 428 mm × 307 mm × 294 mm
Mass of the equipment: 10 kg
Embroidery unit
Dimensions: 433.5 mm × 269.5 mm × 133 mm
Mass of the equipment: 2.26 kg
Rated Voltage: 230V ~
Rated Frequency: 50Hz
Rated input: 60W
Rated ambient temperature: 15 - 35°C
Acoustic noise level: less than 70db(A)
For European version