Sony Ericsson W902 User Guide - Page 40
Say Busy., Settings, General, Voice control, Voice answer, Activate, Continue, Calls, Divert calls
 |
View all Sony Ericsson W902 manuals
Add to My Manuals
Save this manual to your list of manuals |
Page 40 highlights
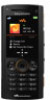
5 If the recording sounds OK, select Yes. If not, select No and repeat steps 3 and 4. Voice commands are saved in the phone memory only. They cannot be used in another phone. To voice dial 1 From standby press and hold down a volume key. 2 Wait for the tone and say a recorded name, for example "John mobile." The phone plays the name back to you and connects the call. Voice answering When you use a handsfree, you can answer or reject incoming calls with your voice. To activate voice answering and record voice answer commands 1 From standby select Menu > Settings > the General tab > Voice control > Voice answer > Activate. 2 Follow the instructions that appear and select Continue. Wait for the tone and say "Answer", or say any other word of your choosing. 3 Select Yes to accept or No for a new recording. 4 Follow the instructions that appear and select Continue. Wait for the tone and say "Busy", or say any other word of your choosing. 5 Select Yes to accept or No for a new recording. 6 Follow the instructions that appear and select Continue. 7 Select the environments in which you want to activate voice answering. To answer a call using voice commands • Say "Answer." To reject a call using voice commands • Say "Busy." Diverting calls You can divert calls, for example, to an answering service. When Restrict calls is used, some divert call options are not available. See Restricted dialling on page 40. To divert calls 1 From standby select Menu > Settings > the Calls tab > Divert calls. 2 Select a call type and a divert option. 3 Select Activate. 4 Enter the number to divert calls to and select OK. 38 Calling This is the Internet version of the User guide. © Print only for private use.
-
 1
1 -
2
-
3
-
4
-
5
-
6
-
7
-
8
-
9
-
10
-
11
-
12
-
13
-
14
-
15
-
16
-
17
-
18
-
19
-
20
-
21
-
22
-
23
-
24
-
25
-
26
-
27
-
28
-
29
-
30
-
31
-
32
-
33
-
34
-
 35
35 -
 36
36 -
 37
37 -
 38
38 -
 39
39 -
 40
40 -
 41
41 -
 42
42 -
 43
43 -
 44
44 -
 45
45 -
46
-
47
-
48
-
49
-
50
-
51
-
52
-
53
-
54
-
55
-
56
-
57
-
58
-
59
-
60
-
61
-
62
-
63
-
64
-
65
-
66
-
67
-
68
-
69
-
70
-
71
-
72
-
73
-
74
-
75
-
76
-
77
-
78
-
79
-
80
-
81
-
82
-
83
-
84
-
85
-
86
-
87
 |
 |