Sony BDV-E280 Operating Instructions - Page 45
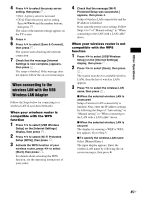
When connecting to the wireless LAN with the USB Wireless LAN Adapter - wireless adapter
 |
UPC - 027242809710
View all Sony BDV-E280 manuals
Add to My Manuals
Save this manual to your list of manuals |
Page 45 highlights
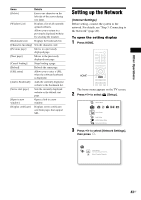
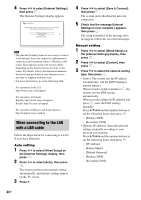
Other Operations 4 Press X/x to select the proxy server setting, then press . • [No]: A proxy server is not used. • [Yes]: Enter the proxy server setting. Press C/X/x/c and the number buttons, then press . The value of the internet settings appears on the TV screen. 5 Press c. 6 Press X/x to select [Save & Connect], then press . The system starts checking the network connection. 7 Check that the message [Internet Settings is now complete.] appears, then press . The setup is finished. If the message does not appear, follow the on-screen messages. When connecting to the wireless LAN with the USB Wireless LAN Adapter Follow the Steps below for connecting to a wireless LAN (Local Area Network). When your wireless router is compatible with the WPS function 1 Press X/x to select [USB Wireless Setup] on the [Internet Settings] display, then press . 2 Press X/x to select [Wi-Fi Protected Setup (WPS)], then press . 3 Activate the WPS function of your wireless router, press X/x to select [Start], then press . For details about activating the WPS function, see the operating instructions of your router. 4 Check that the message [Wi-Fi Protected Setup was successful.] appears, then press c. Setup of wireless LAN connectivity and the IP address is finished. Next, enter the proxy server setting. Follow Steps 4 to 7 of "Manual setting" in "When connecting to the LAN with a LAN cable" above. When your wireless router is not compatible with the WPS function 1 Press X/x to select [USB Wireless Setup] on the [Internet Settings] display, then press . 2 Press X/x to select [Scan], then press . The system searches for available wireless LANs, then the list of wireless LANs appears. 3 Press X/x to select the wireless LAN name, then press . x When the selected wireless LAN is unsecured Setup of wireless LAN connectivity is finished. Next, enter the IP address settings by following the Steps of "Auto setting" or "Manual setting" in "When connecting to the LAN with a LAN cable" above. x When the selected wireless LAN is secured The display for entering a WEP or WPA key appears. Go to Step 5. x To specify the wireless LAN name Select [Manual Entry]. The input display appears. Enter the wireless LAN name by following the onscreen messages, then press c. 45US
-
 1
1 -
2
-
3
-
4
-
5
-
6
-
7
-
8
-
9
-
10
-
11
-
12
-
13
-
14
-
15
-
16
-
17
-
18
-
19
-
20
-
21
-
22
-
23
-
24
-
25
-
26
-
27
-
28
-
29
-
30
-
31
-
32
-
33
-
34
-
35
-
36
-
37
-
38
-
39
-
 40
40 -
 41
41 -
 42
42 -
 43
43 -
 44
44 -
 45
45 -
 46
46 -
 47
47 -
 48
48 -
 49
49 -
 50
50 -
51
-
52
-
53
-
54
-
55
-
56
-
57
-
58
-
59
-
60
-
61
-
62
-
63
-
64
-
65
-
66
-
67
-
68
 |
 |
